How to decorate a coffee can. DIY decorative glass jars. Lighting fixtures and lamps
You can successfully complement the kitchen interior with your own hands using the decor of jars. There are many decoration options, for example, painting, decoupage, fabric decoration.
Against the backdrop of the variety of accessories on the shelves of boutiques and shops, exclusive “hand made” items, that is, created with one’s own hands, remain in demand. They are not only unusual in appearance, but also contain a piece of soul and inspiration, which creates a special atmosphere. Convert with my own hands, mastering simple techniques, even boring, familiar jars - glass, tin, available to every housewife.
Techniques for decorating glass jars
The desire to create unusual exclusive accessories from ordinary cans is easy to realize if you create a bank interesting ideas showing in what ways and techniques you can decorate them yourself. Let's look at the main types of design.
painting
A convenient way to decorate with your own hands, allowing you to elegantly fit the resulting products into the created interior. Even without the ability to paint, you can easily realize your ideas using stencils. The jars can be decorated in the Gzhel style or choose any other design.
Decoupage
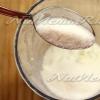
This is a decoration technology that is easy to implement even for children. The resulting decor depends on the design of the napkin, the top layer of which is applied to the surface of the can, previously primed with water-based paint, and carefully smoothed from the center with a brush with varnish.

Decor with fabric and knitting
A simple decor that combines jars into a single composition can be done on your own if you cover their side surface with a piece of elegant textile, romantic lace, threads of different colors and textures, satin ribbon, and stickers.
Decorating glass jars with a knitted cover is a well-known and effective technique that allows you to choose color combinations for a specific environment.
Jars in openwork crocheted outfits look especially elegant, although knitted covers can look great.
Macrame on a jar of silky medium-thick ropes looks noble and sophisticated. The techniques of this technique are accessible, and you can do them yourself using special diagrams and instruction cards.

Bas-relief
Decorative patterns imitating antique flowerpots are created using a nylon stocking. Such decoration looks mesmerizing if you take a product with sparkles. The jar is covered with a layer of PVA, on which a layer of nylon from a stocking cut lengthwise is applied.
While the glue has not dried, chaotic folds are made by hand different directions and weaves, and after drying, a protective layer of clear varnish is applied to the jar.
The fun activity of turning pragmatic, ordinary DIY cans into outstanding pieces of creative design doesn't require any special materials or tools. Many details are at hand, and their competent arrangement and sense of color makes it possible to equip the interior, making do with minimal supplies, entire collections of original things.

Using decorative glass jars
By thinking through original decor for existing glass jars of various shapes and sizes, their future functional role is initially determined.
- A flowerpot that occupies its rightful place in the landscape space, having the appropriate dimensions, and elegantly fits into the apartment conditions.
- A display showcase for photographs will amaze guests. By mounting your favorite photos on wire stands inside a fairly voluminous jar, you can admire them at any time.
- Organizers made from jars equipped with lids, the unusual and sophisticated decoration of which allows them to look great in any room, are used for storing small items.
- A living corner, created with due patience with your own hands, always refreshes and brings a touch of sophistication to the surrounding atmosphere. Small plant forms are used, planted in soil poured onto the bottom of a plastic container with holes in the bottom, placed in a jar with a wide neck. Additional decor in the form of painted pebbles, large beads, and small toy animals enhances the impression.
- Candlesticks are a particularly common use for all kinds of jars decorated in-house. The reflections of a candle flame breaking through the elements of the applied decor create a mysterious, enchanting atmosphere.
- Lamps that frame especially favorably look no less impressive. landscape forms in the evening twilight. Magnificent night lights are made from glass containers painted on the inside with light-accumulating paints.

Interesting and amazing involves a combination of techniques. You can fill the bottom of a pre-decorated container with coarse salt, cereals (millet colored in different colors looks especially impressive), and beans, surrounding a candle fixed at the bottom with this entourage.
If you add an additional small container of water to which a few drops of aromatic oil have been added, the atmosphere of comfort will be enhanced by pleasant smells.
Original souvenirs
Simple decor using available items makes it possible to create souvenir gift items with your own color combinations. To do this, fill jars with interesting shapes with nuts, pasta, beans, laying them in layers of different thicknesses. Any small cones, leaves, or acorns are glued to the lids of the jars.
The layers of multi-colored cosmetic coarse salt, interspersed with shells and beautiful pebbles, are incredibly beautiful. You can create entire collection exhibits with your own hands as a memory of visiting different places.

Remember Plyushkin from “ Dead souls» Nikolai Vasilievich Gogol? This character had an incredible ability to accumulate. And it would be fine if he had money, but no, he saved up all sorts of rubbish. Of course, the image of Plyushkin is hyperbolic, but such people still exist today. True, there are two types of “buns”: those who save simply because it’s a pity to throw them away and those who can return “useful” properties to completely unnecessary things.
Personally, I consider myself to be the second type. Yes, of course, at first it was like this: “I’ll leave this small glass jar, maybe it’ll do.” Then, under the pressure of circumstances (read: household members), bags with various rubbish ended up going to the landfill. But over time, I learned to leave only those things that contributed to the birth and implementation of a specific idea.
The idea to create decorative glass jars came to mind precisely because it was a shame to throw them away. Arguments like “they will be useful for pickles and jam” were not taken into account, because jars with lids from coffee and chocolate paste were not suitable for this. Very opportunely, the need to make a small present arose. Actually, the gift was pine nuts, but it’s not good to give them in a bag? And it was decided to make a beautiful decorative jar with a lid.
I bring to your attention several options for decorating jars with your own hands. Perhaps after reading you will have your own.
DIY can decor: tools and materials


- Small glass jars. These usually sell coffee and chocolate spread. I think any jars with lids will do just fine. The main thing is that the volume of the jar matches the amount of “filler”.
- Filling: candies, nuts, dried flowers. The decor of a glass jar mainly depends on the filler.
- PVA glue is universal and glue gun. In principle, any quick-drying glue will do.
For decoration
Option 1: Coffee beans, star anise flower and nylon ribbon with an elastic band


Option 2: A piece of raincoat fabric slightly larger than the lid, satin ribbon, shells, pebbles for aquarium


Option 3: Lavender flowers, beads, lace ribbon


Before starting work, remove labels and glue from the surface of the jars. To do this, just soak them for a while in hot water, and then clean the glass with a hard sponge. The lids should also be thoroughly washed and dried.
Making decorative jars
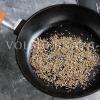
Option 1. Coffee aroma
I'm sure coffee lovers will like this option more than others. Moreover, they probably have coffee jars and coffee beans at home.
First, scatter the coffee beans on the table, this will make it much more convenient to work. Before decorating, degrease the lid of the jar with alcohol.

Using a glue gun or regular glue, attach the coffee beans to the surface of the lid. Try to arrange them so that the gaps between the grains are minimal. Brown color of the lid in this case goes well with the color of the grains and, if necessary, will hide all the imperfections of the decor.


When the entire upper surface of the lid is filled with grains, glue a nylon tape with an elastic band along the rim. This tape can be purchased at any hardware store. You can also take regular thin nylon tape and glue it, slightly gathering it.

We close the gap formed between the tape and the grains with coffee beans.

Finally, glue an anise flower to the center of the lid, and a bow made of nylon tape and a coffee bean to the jar itself.


You can fill the jar pine nuts(by the way, you can also cover the lid with them in the absence of coffee beans) or store, for example, instant or ground coffee in it.

Option 2. Romance of the sea
Pebbles and shells are usually brought by vacationers from the sea, probably even in larger quantities than the notorious magnets. And these treasures gather dust on glass shelves or distant cabinets: it’s a pity to throw them away, and there’s no use except memories. For lovers of such “memorable” little things, I offer an option for decorating a jar in a marine style.
For work I used a jar of chocolate paste.

In this case, the lid does not need to be cleaned of the sticker, since we will cover it with a cloth. Place the lid on the fabric from the wrong side. It is better to choose a synthetic fabric, for example, raincoat, so that it can be easily cleaned from dust later. Cut out a square of such a size that it covers the entire lid, including the rim.

Apply a little glue to the top of the lid and fix the square of fabric, while the lid should be in the center of the square.

Turn the square into a circle. I did this using only scissors. For convenience, you can first trace the boundaries of the circle, cutting off the corners, and only then cut along the line.

Glue the edges of the fabric to the rim of the lid.

At the very edge of the lid rim we glue a thin satin (or any other) ribbon.

The background is ready. Now you can select decorative elements. To begin, we lay out pebbles-shells in various variations on the surface of the lid. When the pattern is chosen, we proceed directly to gluing.

In a “sea” jar you can put candies in multi-colored wrappers (for example, caramel) or the same nuts, and not necessarily pine nuts.

Option 3. Provence
For decoration you will need a jar with a lid with a small side. A jar of Nutella will do just fine. Carefully pour PVA glue onto the lid and distribute it evenly over the entire surface. It’s better to take “PVA Universal”, otherwise the elements will simply come off.


Sprinkle beads onto the glue in an even layer. The color of the beads can be any, the main thing is that it matches with lavender and lace.

Sprinkle some lavender flowers on top of the beads.

Cover the lid with plastic, put something heavy on top, for example, a couple of books, and leave for several hours, or better yet, overnight. When the glue dries, turn the lid over so that the flowers that do not stick fall off.
Glue lace to the rim of the lid. PVA is not very suitable for this purpose, so it is better to use a glue gun or glue such as “Second”.

In the same way, we glue the lace around the bottom edge of the jar.

Fill the jar with lavender flowers. Such a jar will become not only a decoration, but also a natural flavoring in the house. Just open the lid slightly and a wonderful aroma will fill your home. To enhance the scent, you can add a few drops to the herbs. essential oil lavender. You can use any herbs and spices whose flavor you like.

Decorative jars are good both on their own and as gift wrapping. You can make a surprise jar by hiding a piece of paper with fortunes (wishes), theater tickets, or a small but valuable gift, such as earrings or a flash card, among candies, herbs or nuts.
There are glass jars in every home, but in most cases housewives try to hide them in a closet so as not to spoil them general form interior Why not decorate them with your own hands and turn them into a decorative item?
Paints
To work with glass jars, it is best to purchase special paints: acrylic, stained glass, alcohol. Contours and fixing varnishes with different effects are also on sale: metallic, glitter, craquelure, etc.
Please note that some paints require firing at high temperatures, which is not always possible to do at home.
Below are several options for decorating a glass jar using paints.
painting
Glass can be painted by hand using brushes. For convenience, print out the stencil and place it inside the jar. In the same way, you can create an interesting pattern or do dot painting using an outline in a tube.
Painting with contour paints
arrow_left Painting with contour paints
Stained glass
The drawing is made up of separate multi-colored fragments. To prevent the paint from spreading, first mark the boundaries with an outline.


Stained glass painting
arrow_left Stained glass painting
Using stencils
Cut out a design from paper or self-adhesive film, and then apply paint over it using a spray can or sponge.


Ideas for using stencils
arrow_left Ideas for using stencils
Fluorescent paint
It is enough to spray the phosphor on the jar, and it will turn into a decorative object that glows in the dark.


Phosphor for creating glow-in-the-dark cans
arrow_left Phosphor for creating glow-in-the-dark cans
Fill
Pour some paint into the jar and spread it over the inner surface.


Filling allows you to get a uniform color coating
arrow_left Filling allows you to get a uniform color coating
Threads and ribbons
At home you will always have a skein or two of yarn, twine or decorative tape on hand. With their help you can also decorate beautifully glass jar.
Winding with threads
In order to secure the thread to the glass, you will need glue. Pre-degrease the surface and cover it with a layer of silicate glue. You can also use regular PVA, but then it’s better to bathe the threads yourself in it. Wrap the jar with the threads chosen for the work or lay out patterns from them and let dry.
If you use tapes, it is better to use glue sticks and a heat gun.

Tying with yarn
Banks “in warm clothes” look very impressive. To do this, crochet a circle along the diameter of the bottom, and then, according to the pattern you like, tie the can itself to the height you need. If you have knitting skills, you can decorate the cover with braids and arans.


Macrame
You can create an openwork decoration for a jar using threads and knots, but weaving will take a little more time than simply gluing it. Stock up on simple schemes and patience.


Textile
This is a very simple way to transform a simple glass jar into an interior decorative element. In addition, it can be used for practical purposes, for example, to store various small items in the kitchen, or use it as a stand for cosmetics or writing instruments.
There are three options for fabric decor.
Lace
Stick it on the jar or cut out individual elements to decorate the glass surface.


Unobtrusive lace decor
arrow_left Unobtrusive lace decor
Pieces of fabric
Cut a strip of colored fabric or burlap, trim the edge so it doesn't fray, and then wrap it around the jar. You can secure the fabric with glue, thread or tape, or simply stitch the edges together to create a removable cover.


You can use fabric scraps for decoration.
arrow_left You can use fabric scraps for decoration.
Embroidery
Buy canvas and floss from a craft store and select suitable drawing or create your own design and decorative detail yourself, and then simply attach it to the jar.


Embroidered caps for jar lids
arrow_left Embroidered caps for jar lids
Paper
It’s even easier to decorate jars using paper. Here, too, three interesting ideas can be highlighted.
Flowerpot.
Use a knife to cut out shapes or patterns on a strip of paper and wrap it around the jar.


Paper flower pots for candle holders made from jars
arrow_left Paper flower pots for candle holders made from jars
Decoupage
Apply a layer of glue to the jar, and then press it with a paper napkin using a flat brush. After drying, fix the coating acrylic varnish. You can complement the decor with varnish or paint with a craquelure effect.


Decoupage with craquelure effect
arrow_left Decoupage with craquelure effect
Weaving
Cut strips 3-5 cm wide from paper or newspapers, roll them into a tube, starting from the corner. These tubes can be used to braid a jar, and then paint and varnish the paper.


Weaving from newspaper tubes
arrow_left Weaving from newspaper tubes
Applications
Jars decorated in this way can be used anywhere and any way: in the kitchen, desktop, living room, for practical purposes or purely for decoration. You can use any available materials, the main thing is that they can be glued to the glass surface.
Stones and shells
Collect suitable decor on the beach or buy colored glass in the store.


Colored pebbles for decoration
arrow_left Colored pebbles for decoration
Branches
Use already dry branches so that the material does not wrinkle after loss of moisture.


Binding from twigs
arrow_left Binding from twigs
Modeling
You can make suitable figures, flowers or decorative curls from polymer clay. Just look at what
Decorating jars can be done using many techniques. Several techniques can be applied to one jar at the same time, combining them into a harmonious ensemble. To make the product neat and beautiful, you need to put in a lot of effort and spend a lot of time on work. You can use any decorative materials and methods for attaching them, but before that you should consider the design of the can and its further functionality.
Preparation before work
Before you start directly decorating the jars with your own hands, you should think through all the nuances that relate to this procedure. Preparation consists of several main stages:
- Prepares naturally first workplace. Usually this is a table whose surface is covered with film or newspapers.
- Depending on the types of materials that will have to be worked with, containers and storage containers are prepared.
- Selection of material for decoration. This list will depend on the type of finish. In most cases, a means is required to attach decorative elements to the surface of the can. It's better to use a glue gun.
- Additional means are selected to clean the surface of the cans. For metal ones it can be sandpaper, for glass - acetone, clay ones are not specially treated.
The choice of all materials and the cans themselves depends on where and how the finished decorative product will be used. It is also important to think about the design of the containers. It can first be embodied on paper, and only then transferred directly to the surface.
Decoration of tin cans
The decor of tin jars is considered the simplest. This item can be used to decorate a kitchen, hallway or corridor. Since tin cans are quite durable and practically not subject to mechanical damage, they are often used as flowerpots outdoors.
The decor of the jar begins with its preparation:
1. Using pliers and a file, remove sharp edges where the cover is cut.
2. Using a nail or drill, make several holes in the bottom so that when watering, excess water can pour out.
3. Use sandpaper to remove the factory paint from the surface.
4. Buy plastic or clay saucers in accordance with the diameter of the container, if the jars will stand. When placed vertically, such an element is not needed.

Banks made from this material are usually painted with facade paint, although regular paint can also be used. Painting can be a solid color or using stencils. The container can be decorated with additional elements: beads, ribbons and glass, twigs, bark and wire.

To be able to hang the jar, you can make a handbag out of macrame-style threads or use regular wire to make a handle like on a bucket.

Such products are used as organizers for pencils and pens, towels in the bathroom, small screws and nails in the shed. Decorated tin cans are often used as candlesticks. To do this, holes are punched in the body of the container in the form of a pattern.

On video: master class on decorating a tin can.
Decorating glass jars
The decor of a glass jar is more varied; moreover, this product has a wider range of uses compared to its tin counterpart. Since the shapes, sizes and colors of glass jars can be varied, the methods of use are correspondingly different.
Storage for spices
Small jars, for example, from baby food can be reused for spices. It is better to decorate jars for the kitchen with your own hands in a minimalist style so that the decorative elements do not fall off and fall into the food.

First, the factory label along with the sticky glue is removed from the glass. You can make your own decorative sticker from paper or you can paint it directly on the jar with paints. After this, you should decorate the lid. Most often, decoupage technique is used for this. But you can also paint the surface or cover it with gift paper.

On video: decoupage of glass jars.
For cosmetics and bath accessories
Larger jars are used to make containers for bathrooms and decorative cosmetics. Often, the decor of the cans in this case is minimal and concerns mostly the lids. It is decorated with beads that serve as handles. For a more romantic style, the container itself can be decorated.
The most common decorative elements are ribbons, beads or beads, and combined weaving of them is also possible. Often the entire jar is simply sprinkled with glitter and opened with colorless varnish.

An interesting option is to decorate a glass jar using the dot painting technique. The result is very impressive.

On video: decor of jars for the bathroom.
Jar as a candlestick
Often candlesticks or vases are made from such fragile jars. Making such a product is very simple. Since in both the first and second cases the product is subjected to use in extreme conditions, the only correct solution would be artistic coloring.
All kinds of patterns and designs are created acrylic paints, in extreme cases it could even be nail polish.

These are the main areas of application for decorative glass jars, but their number can be easily increased. The main thing is to think about the conditions under which the product will be used in order to select the appropriate decoration technique.
On video: decorative candlesticks from jars.
Trendy decorating ideas
In addition to the standard DIY decoration of jars, non-etching methods of decorating them are often used. IN Lately natural and natural materials, which, at least in a minimal amount, simply must be present in the interior of the room.
One such material is textiles, in particular burlap. With its help, you can create stunning compositions on any surface, and jars made of any material are no exception. You can sew decorative covers, flowers from burlap and glue them to the surface, just wrap the container around the perimeter.

Additional decoration can include: cereals, coffee beans, beans, twigs and much more. Similar to burlap, knitting thread can be used.

Another interesting solution in the field of decorating jars was the vine. In addition to its aesthetic value, it also protects the jars from mechanical stress. Thanks to the wicker weaving technique, you can create a variety of compositions in the form of covers and cocoons, which can additionally be decorated or painted with other colors, forming an interesting pattern.

We invite you to familiarize yourself with information on how to decoupage a glass jar for bulk products. In general, the technique is quite simple, so anyone can do it, even a beginner in this matter.
Perhaps, for many, as in the old days, bulk products in the kitchen are stored in the simplest ordinary jars. However, modern household stores offer various options jars with lids in which bulk products can be stored.
We invite you to familiarize yourself with your own decoupage of jars, as well as how to make them look like ceramic ones using the example of a rustic style. In fact, you can choose absolutely any option, in any case the principle is the same.

Master class on decoupage of a glass jar
To get started, you need to prepare the following materials:

A very ordinary glass jar, along with a lid, will do.

Napkins with an original image, with which you will do decoupage.
- A sponge or a simple foam sponge.
- Acrylic based paints and varnish.
- Hairdryer, scissors, brush.

Decoupage on a glass jar
First of all, the surface of the jar is degreased. Use nail polish remover/acetone/alcohol for this. You need to wipe the entire surface of the container. Sponges/cotton wool will also help with this. The same procedure is performed on the lid.

When the surface has been degreased, apply white paint in one layer with a brush. Cover the lid completely as well. Let the items dry (by themselves or with golden air from a hairdryer).

Since the proposed version uses a rustic style, let's start with the sky. To do this, white paint is mixed with literally two drops of blue. The result should be a heavenly color. It is important to mix the paint thoroughly, then, using a sponge and light movements, apply this background to the top of the jar.

Then, in a napkin, separate the bottom layer and leave only its “top”. After this, mix PVA with 1k3 water and glue the napkin to the jar.

After placing the napkin on the surface, hold it with your hand and begin gluing. Dilute the glue in advance, dip a brush in it and brush the design on top of the napkin. You don't need to do this too quickly, since the napkin is very delicate, otherwise it will simply tear or wrinkle. Move in the direction - towards the edge from the central part. If bubbles or wrinkles form during the coating process, it is recommended to smooth them out using a soft sponge. If the napkin is not enough to apply the design completely to the entire surface of the jar, you can finish painting anything with a brush. It will turn out very cool! You can see this for yourself by looking at the proposed photos of decoupage glass jars.

When you have glued the decoupage napkin onto the surface of the jar, you need to give it time to dry thoroughly. You can use a hairdryer, but if you turn it on, use only cold air!

Then the lid also needs to be tinted. In our case, this is done with blue paint. To get a beautiful heavenly shade, you should mix white and blue paint. The resulting shade should be as beautiful as the color of the sky. When you achieve the desired shade, paint your entire lid.

Then open the jar using varnish, and this does not have to be done in one layer. It will be even better if you apply two or three layers. In this case, each applied layer must dry very thoroughly. As a result, using glue with glitter, you need to make dots of different colors on the lid and again let it dry well.

That's all, yours independent work completed. We wish you success and creative ideas.

Photos of the best options for decoupage of a glass jar


Read also...