How to hang a door on hinges: necessary rules
Installing the door - a lot depends on this, simple at first glance, operation. Skewed door leaf is not only disappointment and spoiled mood. These are drafts walking around the house, poor sound insulation and lack of comfort. In the end, it's just not beautiful, but it can also spoil the most modern and expensive repairs. How to properly hang the door on the hinges and enjoy the comfort and silence, and not listen to the constant reproaches of loved ones? To do this, you need to be patient, arm yourself with the necessary tools and brush up on the main nuances of the work.
The choice of canopies for doors
Before you go to the store, you need to decide which loops to buy. The focus should be on functionality, not appearance. The choice will be successful if you analyze the following aspects in advance:
- In which direction should the door open? As a rule, this is important for reasons of saving square meters, and, sometimes, the convenience of using sockets and switches;
- Do you have to take it off sometimes? The problem is relevant only for apartments of the old layout, where even a completely open opening makes it difficult to carry large items;
- The weight and dimensions of the door leaf.
The selection criteria are clear. It remains to find out what kind of canopies are suitable for them. Most often you have to choose between the following types of door hinges:
- Universal. The most common awnings today. They owe their name to the ability to open in both directions. They have many design solutions and are quite reliable. One "but" - they do not allow you to remove the door from its hinges. Therefore, if necessary, you will have to unscrew the fasteners.
- Unilateral. It is impossible to hang the door to the other side without changing the canopies. But if necessary, it can be easily removed and put in place. The opening side is marked with the letters "L" and "P".
- Pendulum. Structures equipped with such hinges are capable of opening forward and backward, but this design is rarely used in residential premises;
- Screw-in. Miniature canopies, one part of which is screwed into the canvas, and the other into the box. Thus, there is no need to work with a chisel. True, the door should have a ledge at the end - a europorch.
These are just the main, most common types of loops. As for the weight and dimensions of the canvas, there is the following relationship:
- Hinges with a length of 75 mm can be installed on a door weighing no more than 25 kg;
- A canvas weighing from 25 to 40 kg can be hung on loops 10 cm long;
- The same length, but with a hinge width of 60 mm, suitable for doors from 40 to 60 kg.
As for the dimensions, there is the following rule - a door with a height of 210 cm is hung on 4 hinges, which should be located at regular intervals. All about loops. Now about how to install them. The process will be considered on the example of the most common canopies - universal. However, this method is also suitable for some other species.
Hinge installation
First of all, it must be recalled that hanging is a painstaking process and requires sufficient accuracy. A few millimeters of misalignment can cause the door to close and open with noticeable effort. Therefore, about everything in order and as detailed as possible.
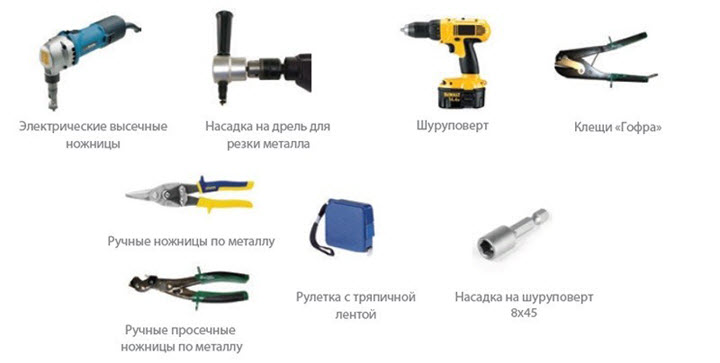
First of all, you need to take care of the necessary tools and accessories. You will need:
- sharpened pencil;
- a tape measure, and preferably a metal ruler, it is much more convenient to work with it;
- chisel. It also needs to be sharpened;
- a hammer;
- screwdriver;
- level.
If everything is available, you can proceed. But first, the loops must be cut in half. How to do this depends on the design. In universal canopies, you need to remove the decorative element and pull out the axle. The canopy will split into two halves - the upper and lower. The first is attached to the door leaf, the second - to the box. Therefore, both must first be marked out.
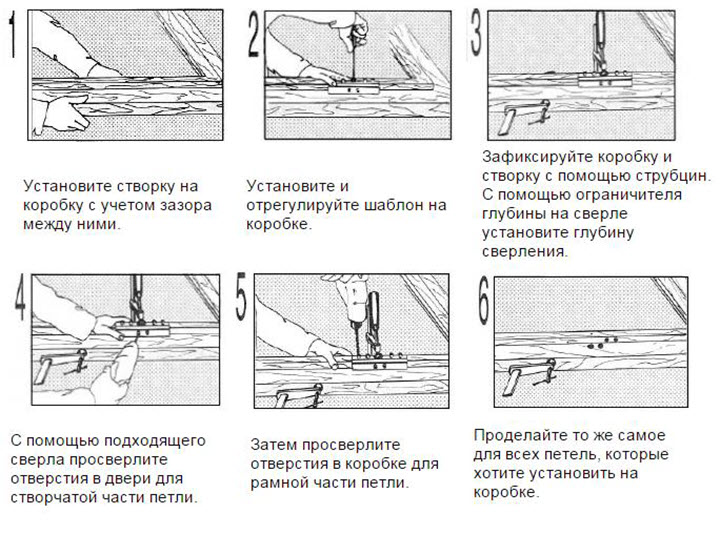
To do this, the door is placed on the end. 20 cm is measured from the bottom edge of the door. The bottom cut of the hinge should be in this place. The canopy is applied to the door and is well aligned, after which it is outlined with a pencil. A correctly traced loop outline should be a perfect rectangle with equal opposite sides. This must be checked. If there are deviations, the markup should be repeated. Only then can you move on.
Now 30 cm is measured from the top edge of the door. The top cut of another hinge will be located in this place. The future place for it is marked similarly. Dimensions are checked. If everything is correct, you can proceed to work with a chisel. This requires some skill. For those who don't have one, here are some tips:
- They begin to choose a recess along the contour, with light strokes, approximately half the thickness of the loop;
- Modern doors with a paper base will definitely jam. Therefore, it is necessary to hold the chisel with the bevel inward;
- Once the contour is finished, you can proceed to the removal of wood from the recess. There is no need to use a hammer here. You can do this with your hands, holding the chisel with the bevel down;
- When the top layer is removed, again go to the contour. And so on until the depth of the recess is equal to the thickness of the loop;
- A properly installed canopy should be, as they say, flush with the end of the door. It is important here not to show excessive fanaticism and not try to make a recess in fewer passes. Otherwise, the recess will be too deep.
Now you can install the hinges in their places and fix them with decorative screws.
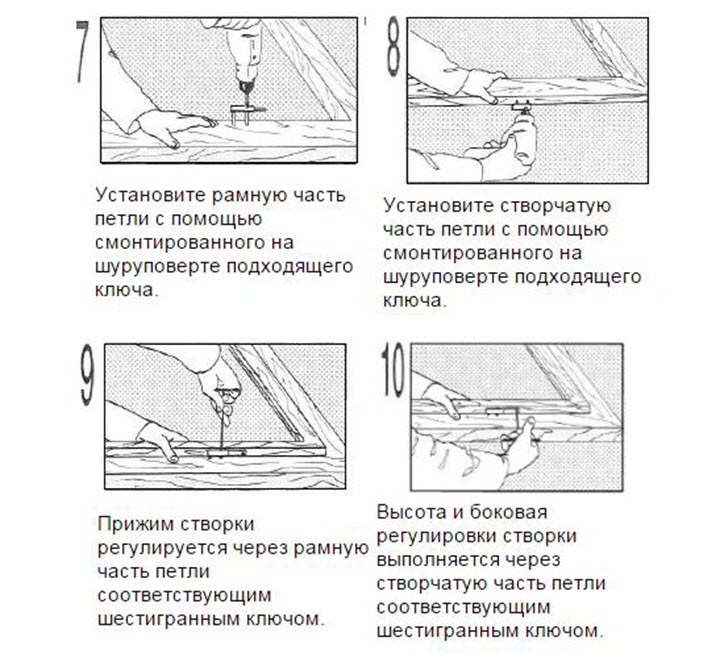
The door frame is marked in the same way. It is less convenient to hold the loop there, so it is better to use the services of an assistant. One in this case holds the loop, the other outlines the contours with a pencil. On the box, it is difficult to visually control whether the hinge is evenly pressed, so you need to use a vertical level.
The groove in the box is selected by analogy with the door. There are 2 differences possible. First, less convenient. Secondly, sometimes the box is not installed quite correctly and under hammer blows it can “play”, i.e. sag. It is best to remove the cash and insert a wooden block of a suitable size between the box and the opening. After the work is completed, it must of course be removed.
Hinges are installed and screwed into the finished grooves. You can try to hang a door on them. If everything is done correctly, this can be done alone, and it is still better to call an assistant, especially if the door is quite heavy. To install the door, you need to connect the halves of the hinges and insert the fixing pins. Everything, the work is finished. The finished product should open and close without tangible effort, squeaks and knocks. The quality of work can be checked using a level. Or maybe just open the door a little. A correctly installed canvas will remain in this position.