General wiring diagrams
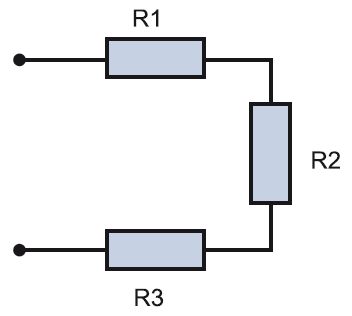
Parallel- with this method, the elements included in the chain are united by two nodes and are not connected to each other. With such a connection of the elements, even if one of the lamps burns out and breaks the circuit, the rest will not go out, since the current will have “bypass” paths.
Sequential- all elements of the chain are located one after another and do not have nodes. An example of a serial connection is the well-known Christmas tree garland: a large number of light bulbs connected by one wire. If one burns out, the chain will break and all will go out.
There are three main types of electrical wiring. Let's consider them in detail, since the whole scheme depends on the type chosen.
1. star type sometimes called boxless, or European, type of wiring. In short, this type can be displayed as follows: one outlet - one cable line to the shield. This means that each socket and lighting point has a separate cable line that goes directly into the apartment panel and ideally has a circuit breaker. What are the advantages and disadvantages of this type of wiring? Plus - first of all, in safety and the ability to control each electrical point. In addition, there is no need to install junction boxes. This type of wiring is done when a smart home system is installed. Minus the "stars" - at least three times the consumption of wiring and, accordingly, labor costs for its installation. In addition, the housing shield becomes the size of an average closet. It can include 70–100 groups of automata, especially if the facility also has information networks. It is difficult to install such a shield on your own, and it is more expensive than usual.
2. Loop type resembles a "star", but differs from it in efficiency. You can depict it like this: a socket - a socket - a socket - an apartment shield or a junction box. Several electrical points are connected in series to one cable, from which a common supply conductor goes either to the apartment shield or to the junction box.
3. Type of wiring in junction boxes- the most common variant. This is how wiring was done in Soviet times. An economical way that does not require special expenses. There is no shield in the apartment at all, it is located on the landing. An apartment branch departs from such a common supply "riser". There is a meter and a circuit breaker on it in the shield (sometimes - 1, sometimes - 2-3, rarely more). The supply cable enters the apartment, then with the help of junction boxes - into the premises, approaching each point. We can say that from the junction box, the wiring goes to the "star" points.
In its pure form, wiring types are rarely used. Based on available resources and optionally, a mixed type is usually selected. An example of wiring in a separate apartment.
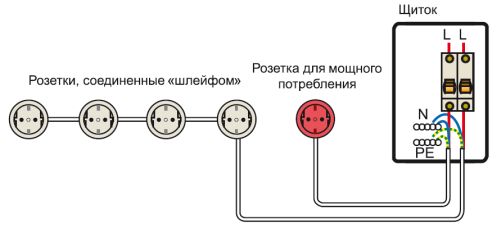
Two types of wiring: socket - shield ("star") and shield - socket - socket - socket ("loop")
The power cable is included in the apartment shield, where there are several groups of automatic machines and protection devices. In the shield, the common cable is routed into several zones, for example, in living rooms and separately in the bathroom and kitchen, divided into sockets and lighting. The power cable of a separate zone enters the room and is distributed in a box by points. Options are possible here: the cable will go to the sockets with a “loop” or a separate wire will be allocated to each point.
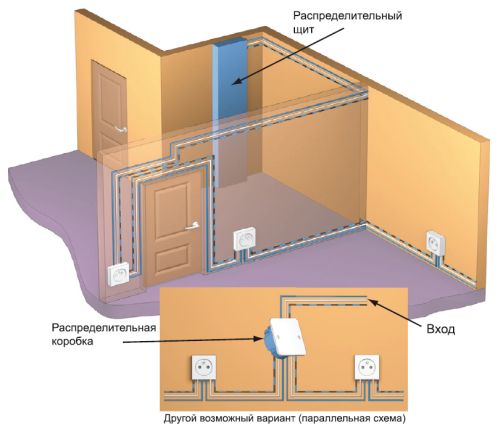
Serial "loop" and parallel in junction boxes
Professional electricians draw up such circuits taking into account all factors. These are the wishes of the owner of the object, that is, what exactly you want to see in an apartment or house. For example, the owner says that the living room should have two groups of outlets, three in each. Plus two walk-through switches and telephone sockets in the amount of three pieces. The electrician, taking into account these data, according to the rules of electrical work, draws up a diagram that takes into account safety parameters, the procedure for performing work, the type of wiring, the dimensions of the gate, etc. Such a drawing is a document and is certified by a special organization.
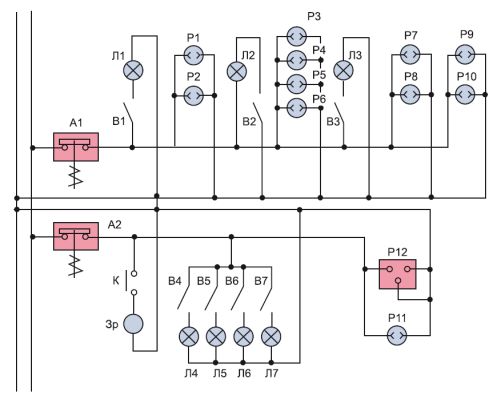
An example of a schematic diagram of the power supply of an apartment, compiled by a professional electrician
Modern firms providing services for electrical work use computer programs. They were created specifically for engineering and technical workers (ITR) and are unlikely to be useful to a home master.
To do the wiring yourself, you can draw the diagram yourself. This is done quite simply. To begin with, an apartment plan is depicted, taking into account all sizes. If the necessary documentation is not available, you can take it from the developer, although it must also be kept by the owner of the property.
Then, using special symbols, all the desired points are set: lamps, sockets, circuit breakers, etc. You must not be too lazy and put generally accepted symbols so that other people understand this scheme. There are frequent cases when, after some time, the author of the scheme cannot figure out the mysterious hieroglyphs, which he himself invented. After that, lines are drawn that indicate the wiring. Be sure to indicate on the plan how far from the ceiling or floor the cable is, especially if the wiring is hidden.
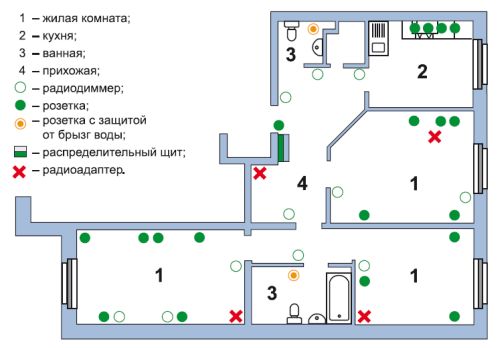
The following is an example of an electrical circuit of an apartment. Different colors show lighting wires, power cables and ground wire. Conventional icons depict fixtures, sockets, switches and junction boxes. Such a scheme is very clear, and all the necessary calculations can be performed on it. This is necessary in order to know exactly where the wires go in the future. Otherwise, when hanging a picture or a shelf, you can get a drill directly into the cable.

There are standard rules for installation. They are:
1. The wire is laid only along vertical and horizontal lines at right angles. If there is a desire to cheat and save the cable by running it diagonally, it is better not to do this. In the future, it is very difficult to find this curved path, and getting into it with a nail is as easy as shelling pears.
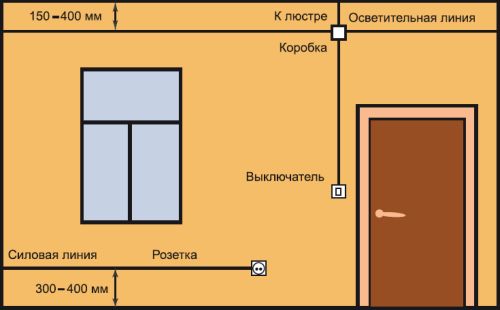
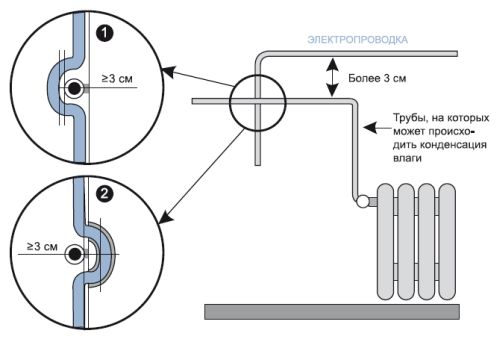
2. The distance from the wire to the ceiling or floor should be 15 cm. From the corners, door jambs and window frames - at least 10 cm. When passing through heating pipes, a gap between them and the wiring should be at least 3 cm.
3. Avoid crossing wires when laying. If this is difficult, then the distance between the cables should be at least 3 mm.
4. To simplify calculations, all sockets and switches should be at the same height. Usually, switches are installed to the left of the door at a height sufficient to touch them with a lowered palm, that is, 80–90 cm. Sockets are mounted at a height of 25–30 cm. However, in the kitchen and in the case of connecting high-hanging electrical appliances, this distance may be and others. It is best if the wire to the switches will go down from above, and to the sockets from below - this is what most electricians do.
5. The length of the conductor coming out of the electrical point should be 15–20 cm. This is done for the convenience of mounting points with a hidden type of wiring. If it is of an open type, then the length of the conductor may be less: 10–15 cm.
The ends of the cores of wires that go into electrical points must be insulated with electrical tape. Armed with a drawing, you can begin to mount the wiring.