How to make a rough floor screed - work technology guide
Smooth floors are the face of any room. However, aligning them can be tricky. An important stage of flooring in a private house is the rough screed, the main task of which is to ensure the strength and reliability of the base. For its device, you will need minimal skills in handling concrete and unconditional adherence to technology.
Types of rough screed
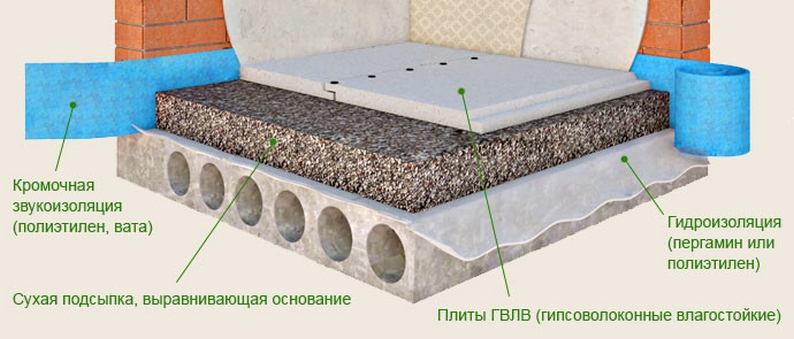
Rough floor screed is carried out dry or wet. A dry screed is a multi-layer cake that is performed in several steps.
- The overlap or the ground is leveled.
- A vapor barrier is being laid, which can be a plastic film, isospan or other materials.
- Dry backfill, which includes expanded clay, fine-grained slag, expanded perlite, quartz or silica sand, is distributed over the surface in a layer 30-50 mm thick.
- Around the perimeter of the room, it is necessary to lay a damper tape, which will compensate for the thermal expansion of the base and exclude sound bridges.
- The dry screed is covered with chipboard or OSB boards, plywood panels, modules with polystyrene or gypsum fiber board. The material is laid in two layers, while the joints are displaced. Fixation is carried out with glue and self-tapping screws.
A rough screed on a concrete base has a number of advantages, including:
- Low cost;
- High mechanical strength;
- Long service life;
- Availability.
The ground floor structure consists of several layers:
- Leveled soil;
- Sand and gravel;
- Waterproofing layer;
- Rough screed;
- Insulation;
- Concrete screed;
- Finishing floor covering.
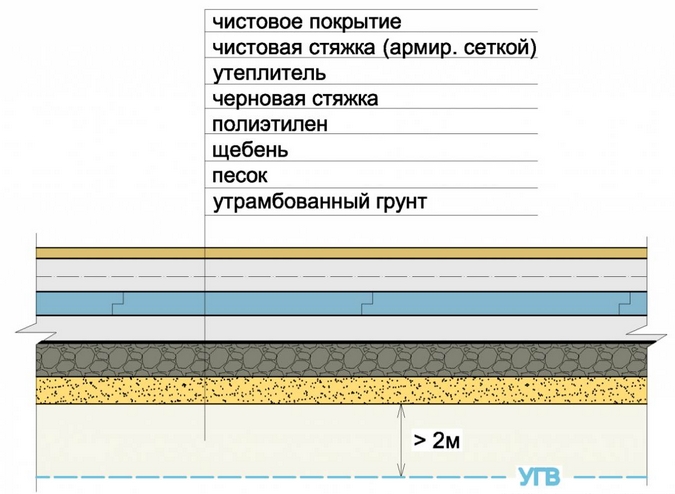
Depending on the type of soil, the type of finishing material and other factors, some design changes may be made.
The ground should be stationary and dry, and the groundwater should not be closer than 4 m from the surface.
Mounting
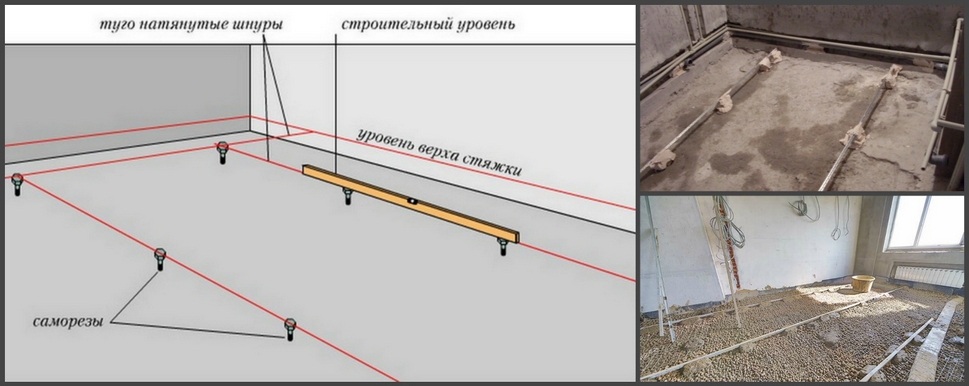
Preparation of the base. Work on the arrangement of the floor in a private house on the ground begins at the zero level mark. How do I find it? Marks are made on all walls with a chopping cord. Do not forget that the zero level must coincide with the bottom plane of the door frames.
After that, they begin to prepare the soil. Since the floor will be at least 35 cm thick, the top layer of soil is removed exactly to this depth. Then the ground needs to be leveled and tamped. This can be done using a vibrating plate or a manual rammer. If the rough screed is poured over the floor slabs, their surface should not have cracks, holes, mold, etc. The existing defects are repaired with plaster or tile glue, and then the boards are primed.
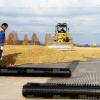
Next step: hydro and thermal insulation. Gravel, crushed stone (fraction 40-50 mm) or expanded clay with the same layer is poured onto a sand cushion with a thickness of at least 10 cm, and then it is carefully compacted. When the surface is prepared, waterproofing materials are laid on it (you can also use plastic wrap or bitumen roll material). In this case, the material should go to the walls by 15-20 cm.
Expanded clay, perlite, extruded polystyrene foam or basalt wool are used as thermal insulation for the subfloor in a private house. If a rough screed is made on the ground, then thermal insulation is required; if on the floor slabs, then the insulation is put if necessary.
Do not forget about sound insulation. A special soundproofing material is glued to the wall at a height of 15-20 cm.
The next step is reinforcement. It is performed in order to strengthen the screed and increase its strength indicators. This type of work is necessary if the screed is poured over the ground. For reinforcement, a plastic or steel mesh with a cell size of 100x100 mm or a mesh assembled by hand from reinforcement is used. The reinforcing frame is laid on supports with a height of 20 to 30 mm, so that it is in the thickness of the future concrete screed.
Next, beacons are installed, with which you can control the level of the screed and its filling. The height at which the beacons are installed depends on the nature of the base:
The profiles are evenly distributed along the base parallel to the wall. They are fixed with screws, which are screwed in every 60-80 cm. In this case, their caps should be at the same height 5-10 mm below the final floor level. The distance between the lines of the screws should not exceed 1.5 m. The width of the resulting sections should not be larger than the tool with which the poured mortar will be leveled. Then concrete mortar cakes are applied to the screws. Using a level, be sure to check how evenly the guides are set.
After that, you can proceed to mixing the solution. You can prepare the cement-sand mixture yourself. Cement (grade 400 and above) and sand are taken in a ratio of 1: 3 and thoroughly mixed with a shovel or construction mixer. Then water is added to the mixture in such an amount that the solution does not turn out to be too liquid. The solution should stand for at least five minutes, and then it should be mixed well again. For some, this option seems too complicated, so you can use the finished product, in particular, a dry mixture.
Filling and leveling the floor
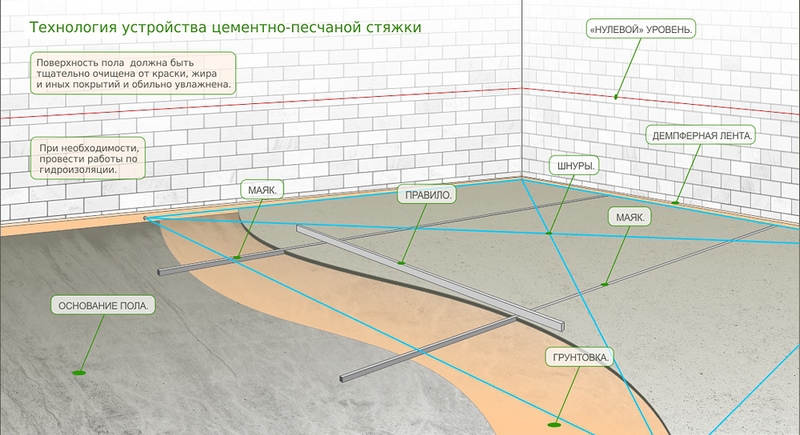
Before pouring out the solution, the base is moistened with water.
Pouring the rough screed starts from the far corner of the room. The mixture is poured in strips to the level of the beacons and leveled with a rule. When the rough screed is poured, it is left alone for at least a day. And to get the beacons out, you can make an "island" of drywall or chipboard and move around with it. Traces left by the "island" are rubbed with a construction float. At the end of the work, the subfloor must be watered and spread with plastic or cellophane film on it.
The formation of cement stone occurs after five days, therefore, during this period it is necessary to moisten the surface. The rough screed is then left to harden for at least 21 days. There should be no drafts in the room, and no direct sunlight should fall on the floor, otherwise cracks may appear. If defects do appear, they must be moistened immediately using a roller, or wiped with cement mortar.
The drying process of the concrete screed must not be accelerated.
Often, the rough screed is not completely horizontal. But if you plan to install underfloor heating, then it must be flat, otherwise the floor heating will be uneven.
If you live in a private house, a rough screed is an indispensable element of the flooring, regardless of whether it is performed on the ground or on concrete floors. It is possible to fill the floors with your own hands, without having construction skills, by adopting the advice of specialists. Your opinions and comments will be very helpful, also leave your questions on the topic in the form below!