How to make a roof on a veranda
The veranda can be safely called the center of suburban life. This kind of continuation of the house, depending on the design features (open or closed type), allows you to gather households or guests under your roof. Climatic conditions and the purpose of the extension determines the construction of the structure. Usually it serves as a place to relax in the warm season, and in winter it is used as a utility room. Of course, if you wish, you can insulate it and arrange a greenhouse, a library, etc. in it. The article will discuss how to build a veranda roof.
Veranda roof
It is optimal to design the construction of a veranda from the beginning. But, if it so happens that it has to be erected to an existing house, then here it is necessary to take into account several recommendations:
- the use of materials from which residential real estate was built will help to achieve perfect harmony;
- a wooden house settles down within 2-3 years, therefore, extensions should not be made before the expiration of this period;
- the veranda is positioned in such a way that there is an exit from the inner room (kitchen, corridor) to it;
- it is desirable that the foundation and roof for the main structure and the veranda be the same. If the extension is erected later, then the frame is supported by brick columns, and the roof is made with a large slope;
- the length of the building usually corresponds to the parameter of the wall, the width does not exceed 2.5 m.
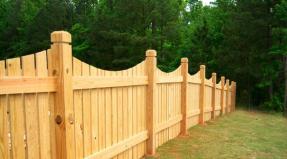
Roof of the veranda photo

Roofing rules for the veranda
- As a rule, the roof is finished with the same material and in the same color scheme as the main structure. This approach will avoid disharmony and provide visual continuation. A single-pitched roof for a veranda most often has a steep slope, which allows snow masses falling from the house during a thaw not to accumulate on the roof.
- The roof structure is carried out using lumber. To increase the service life of the finished frame, all wooden elements are treated with impregnations. Means provide protection against moisture, fire, damage by woodworms.
- For safety reasons, the slope of the roof is organized away from the entrance. In winter, this will prevent unpleasant consequences associated with snow melting.
- The step of the rafters and lathing is determined by the material with which the coating will be carried out. Particularly noteworthy is the joint between the veranda roof and the wall of the house. It must be securely insulated, otherwise leaks cannot be avoided.

- Waterproofing should not be neglected, especially if the building is covered and will be operated until late autumn, and used as storage in winter. Further, useful tips will be given on how to make a roof on a veranda.
Do-it-yourself veranda roof
- The slope of this type of roof should be much higher than the minimum indicator - 12-15 °. The supporting structure, including rafters, posts and other elements, is made of boards with a thickness of at least 50 mm.
The device of the roof of the veranda photo

- Roof construction begins with determining the side of its slope. An additional frame, which is installed on the upper harness of the future extension, will help to create the desired height.
- It is made of bars with a height of 600-800 mm or more, depending on the planned slope. The upper horizontal girder is attached to the main building wall by means of anchor bolts. The frame racks are attached in the same way. All structural details are fixed to each other with hardware or metal corners.
- Spacers are inserted into the resulting rectangle every 500 mm, they will strengthen the bearing capacity of the roof. To increase the rigidity, the posts are reinforced with braces set at an angle of 45 °.
- In the strapping bars at the rafter attachment points, cuts are made for their installation.
- The upper ends of the rafters are installed on a girder (horizontal beam) that runs along the wall of the house and is connected to the veranda frame posts. The underside of the supports is inserted into the prepared grooves of the harness. Fastening of wooden elements is carried out by means of nails or screws.

- The step between the elements of the rafter system is determined by:
- total length of the roof;
- the angle of inclination (the larger it is, the more often the longitudinal supports are located);
- the length of the rafter legs (a high indicator reduces the step between the elements);
- choice of roofing material (for lightweight material, the distance between the rafters can be maximum).
- The step recommended by experts, depending on the roofing material:
- ceramic tiles - up to 35 cm;
- metal tiles - 60-90 cm;
- corrugated board - 60-90 cm;
- ondulin - 60-100 cm;
- slate - up to 80 cm;
- polycarbonate - 700 -105 cm.
- The roof is covered with a crate, which can be solid or discharged; again, the laying of horizontal boards is determined by the type of coverage. Roll materials are spread on a continuous flooring. During installation, it is advisable to cut the material in such a way that its edges on all sides of the roof are 10 cm larger. Later they will be bent and nailed with special nails.
- Before laying insulating or roofing material, a metal apron must be installed at the junction of the roof and the wall of the house. Here you can also use additional elements (inner corners) corresponding to the roofing.
- Such details will provide reliable protection against possible leaks, will not create problems when attaching materials of the same type and will give the structure a complete look.
An overview of roofing materials
| Name | dignity | limitations | cost (m²) | complexity of installation |
| natural roof tiles | The most important advantage is high resistance to adverse weather conditions (temperature extremes, humidity, ultraviolet rays). It has excellent performance in terms of hydro and sound insulation properties. Not flammable. Almost eternal. | High price. Significant weight involves the arrangement of a reliable rafter system | from 1000 to 2200 rubles The cost depends on the country of origin | |
| metal roof tiles | Possesses high resistance to mechanical stress, difficult operating conditions. The decorative qualities are also up to the mark. Refractory. The service life can be 30-50 years. | Low sound insulation characteristics. Large waste, especially if the roof has complex shapes. The coating is prone to condensation. Additional costs for the arrangement of the roof structure. Not recommended for roofs with minimal slopes. | RUB 230-300 | It is better to entrust styling to specialists. |
| profiled sheet | Various colors and reasonable cost allow keeping the leading position of the corrugated board. Fire-resistant, lightweight, but durable sheets will last at least 40-50 years. | Low noise insulation properties require a sound-absorbing underlay. If the protective layer of the sheet is damaged, corrosion may occur. | RUB 180-220 | do it yourself |
| ondulin | A rich palette and high protective qualities distinguish it among other roofing materials. Among the advantages are: water resistance, mechanical strength, corrosion resistance, excellent sound insulation. | minimum service life - up to 20 years. Flammability of the material. Propensity to fade when exposed to sunlight. | RUB 200-300 | it is better to entrust the installation to professionals, but if you have the necessary knowledge, you can do the installation yourself |
| slate | This material has gained wide popularity due to its affordable cost and longer service life. Does not corrode. The service life is about 50 years. | The fragility of the material. Hygroscopicity leads to the formation of mold and mildew. | from 105 rub. for gray slate and from 150 rubles. for painted | do it yourself |
Polycarbonate roof for veranda
- An excellent solution for covering the roof on the veranda is polycarbonate. It will give lightness to the structure, perfectly in harmony with brick buildings and structures decorated with natural or artificial stone.
Roof of the veranda photo

- Its transparency allows more natural light to enter the room, without the penetration of harmful ultraviolet radiation. Of the disadvantages of this roofing, it can be noted that it is weakly resistant to mechanical and abrasive influences.
- Despite a certain airiness, the material is durable and reliable. It is able to withstand severe loads in the form of snow, rainstorm and strong winds. The recommended sheet thickness is 6-10 mm.
- Polycarbonate makes it possible to design the roof in an original style, thanks to the choice of shade and shape of the bend. The coating is mounted both on a metal frame and on a traditional wooden lathing.
- Of course, with a metal base, you will have to spend a lot of time, if you take into account the curved lines of the future roof. Therefore, it is better to entrust such projects to a specialized company.
As for the crate for a flat sheet of polycarbonate, here it is enough to follow a few rules:
- during installation, stiffening ribs should be located along the slope, thereby not allowing moisture and condensate to linger and accumulate;
- it is not recommended to lay a whole sheet on the roof, it is better to cut it along a width of 1050 or 700 mm;
- the pitch of the rafters is selected in such a way that the joint of the sheets falls on a wooden support - respectively, it will be 1050 or 700 mm;
- during the work, profiles are used that hermetically and aesthetically cover the joints, the ends of the sheet. Connecting parts are detachable and one-piece, transparent and colored;
- if the whole panel will fit, then it is necessary to equip the transverse crate. For this, bars with dimensions of at least 50x20 mm are used. The distance between them should be 500-700 mm;
- fixation of polycarbonate is carried out by means of self-tapping screws with a pitch of 350-400 mm. Hardware should be with a sealing washer, which will prevent moisture from entering between the material and the wooden support;

- holes for fasteners must be drilled in advance, while the diameter of the drill must be more than the diameter of the self-tapping screw by a couple of millimeters;
- screwing is carried out until the washer is snug against the material, but without deformation (jamming) of the latter.
Veranda roof gutters
- An important element of any structure is rain and melt water drainage systems. The veranda and the house should have separate gutters. The fact is that the existing system may not cope with its purpose due to the increased area.
- Here it is enough to use standard U-shaped gutters. They can be covered with a net to prevent leaves, branches and other large debris from entering. The main thing is that the diversion is carried out as far as possible from the foundation of the house. The ideal option would be the exit of the drainpipe in the immediate vicinity of the storm sewer.

If desired, the veranda can be insulated and glazed. It is important to remember here that the larger the glazing area, the more heat loss occurs. The material is selected taking into account the general style of the house. It can be timber, rounded logs, brick, metal.
It is not necessary to conduct the entire construction using one type of material. So, a veranda completely made of brick will turn into a banal extension. In such cases, the stone is used to erect column supports or other supporting elements.