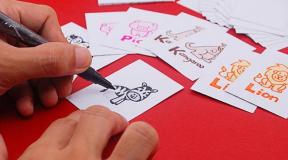
Wood feeder. Bird feeders. Examples of beautiful do-it-yourself birdhouses
The bird feeder performs several functions at once. Firstly, it is a place for saving birds from starvation. Secondly, the feeder - decorates the exterior, gardens, parks or simply streets. Thirdly, making a feeder is quite an entertaining process that brings parents and children together and teaches the younger generation the norms of behavior and human qualities. Therefore, whenever possible, we recommend building feeders, and we will learn how to do this later.
How to make a bird feeder with your own hands
We offer you to get acquainted with the main variations of bird feeders, which are most often used for feeding them in the winter.
The first and easiest option is to make a roofless forest dining room. It has a flat shape with sides that prevent spillage of feed. Such a bird dining room is good because it attracts birds, as they do not like a closed area. The disadvantage of the feeder is that the food, under atmospheric influences, quickly gets wet and deteriorates, and the wind easily overturns such a dining room. For the construction of this variation of the feeder, one piece of plywood and bars that serve as a frame are enough. Fixing the feeder is carried out using a regular rope, in order for the feeder to attract birds, paint it in a bright shade.

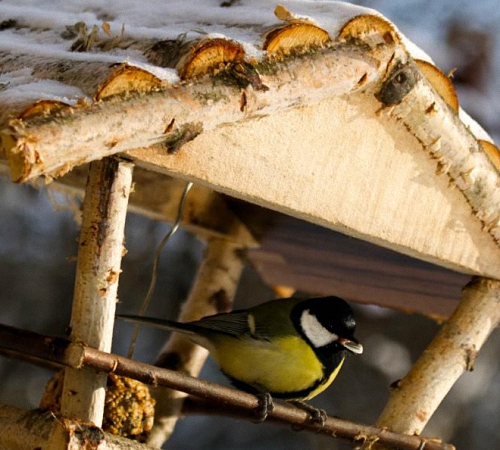
A do-it-yourself bird feeder made of wood with a roof is a more sustainable option. On a regular base, four support posts are installed, and the roof of the feeder is fixed on them. The top piece for the roof should be slightly larger than the bottom to protect the stern from rain and snow. This version of the feeder also belongs to the simple ones and does not require special experience in working with wood. Among the disadvantages of this design, we note that snow accumulates on a flat roof, the feeder becomes heavy in weight, and may fall from the tree. Therefore, it is recommended to periodically clean such a feeder from snow or install a pitched roof.
If there is a sunflower at home or large berries that birds can eat, it is enough to treat the birds with them. A variation in the manufacture of rowan beads or beads from cones is possible. You can build such a feeder from improvised materials. For example, you can put goodies in a regular grid that sells tangerines or oranges. You need to hang such a gift on a regular rope. Another way is to add wheat or other grain delicacy to unsalted melted lard, after hardening, you need to make a small ball from this mixture, which is installed in any place accessible to birds. The hardened fat holds the grain, which is gradually eaten by the birds.

To protect the food in the tangerine net, you can additionally build a roof. Thus, the food will not be exposed to moisture and snow. Periodically, such a feeder needs to be filled with new food. It is possible to supplement the main feeder with additional feeders with nets, in which there is a variety of treats. These feeders will be a great place to feed small birds.
If you have a coconut shell at home, you can also build a small feeder out of it. It will be a natural addition to any tree, and will not really stand out against its background. Two round holes must be cut in the shell. We also recommend placing grain mixed with melted fat inside the feeder. This variation of the feeder has an unusual and original design. If there is a steel mesh at home with a small section of cells, you can also build a feeder from it. Choose the diameter of the feeder individually, try not to make it too large, as a lot of feed makes the structure heavier. Make a protective cover on such a feeder to prevent food spoilage.
There are many ideas for do-it-yourself bird feeders, it’s enough to dream up and get the right materials. A feeder can be built even from cutting a branch. It is enough to connect several of these parts together to get the bottom of the feeder. The roof is made in the same way.

Some craftsmen make feeders from ordinary glass jars. They set them at a certain angle and pour food inside. You can paint such a feeder using special paints for glass surfaces. In the same way, you can make a feeder from the old part. It is better to fill it with food gelatinized, previously poured with melted gelatin. In the same way, you can make attractive bird feeder ornaments. For example, a solution of gelatin and various seeds is poured into a silicone mold, after hardening, it is possible to obtain beautiful heart-shaped, star-shaped, semicircular, etc. shapes.
Beautiful do-it-yourself bird feeder
We offer a variation of creating a cereal dining room for birds with your own hands. For this product, it is enough to use food, while the feeder perfectly complements the exterior of the garden and becomes its decoration. When performing the workflow, you will need to have accessories in the form of:
- a variety of small-sized feed, most often cereals or cereals are used;
- eggs;
- oatmeal;
- flour;
- gelatin composition;
- pencil
- thick cardboard base;
- scissors and thread.

Using a pencil and cardboard, come up with a shape for the future product. A variation in the manufacture of a dining room for birds in the form of a star, polyhedron, oval, circle or heart is possible. Using scissors, cut out the previously prepared drawing.
Prepare materials that act as bird food. It is possible to use different grains or bread crumbs. Using a needle, put a thread on the future sketch, which will later fix the feeder on the trees. In order to firmly hold the grains on the feeder, it is necessary to connect them with a natural adhesive composition.
To prepare it, combine the ingredients in the form:
- two tablespoons of oatmeal, beaten into flour;
- one egg;
- one teaspoon of honey;
- a few tablespoons of flour.
After connecting all the components, leave them for half an hour and only after this time, combine with previously prepared food.

First, the base of the workpiece is covered with an adhesive composition. In a separate container, all ingredients for the feed are combined with glue. Roll the workpiece in the resulting composition on both sides. For faster freezing of the feeders, place them in the refrigerator for 2 hours.
In the absence of any of the ingredients of the adhesive composition. You can prepare natural glue in another way. To do this, just take one pack of gelatin and soak it in warm water, according to the instructions on the package. Small grain products are combined with a solution and placed in a refrigerator to solidify.
This composition can be put in an old cup or glass, they are also fixed on trees with a rope. Such a bird canteen is quite easy to make, but at the same time it is an excellent place to feed birds in the winter season.
We also suggest that when performing the workflow, prepare materials in the form of:
- three flat-shaped candy boxes;
- glue;
- adhesive tape;
- ropes.

In order to build this feeder, it is enough to connect two candy boxes together with an adhesive solution. At the same time, they must form a roof. The third box is used as the bottom section of the feeder. This variation of the feeder is quite easy to manufacture, but at the same time it is an excellent place to feed the birds. To protect the cardboard from moisture, the feeder is covered with tape on all sides. In order to fix the feeder on the tree, an additional rope is attached to it. You can decorate the feeder with colored paper, in relation to the chosen design. The only drawback of such a feeder is the lightness of its weight. It is unstable and poorly held on weight.
Make a bird feeder with your own hands photo:

We offer another not difficult variation of creating a bird dining room. To do this, you must use a box from under any drink. The upper part of the box is fixed on the tree with a cord, and a hole is cut out on the lower part for feeding and eating food. It is recommended to additionally glue the box with adhesive tape, in order to avoid its destruction under the influence of water.
DIY bird feeder - original ideas
There are many extraordinary ideas for creating bird dining rooms. Most often, these exterior elements are made of wood or plastic. We suggest that you familiarize yourself with the variation in the construction of PVC feeders.
To complete the workflow, you will need:
- scissors or knife;
- a plastic tank with a volume of five liters;
- wire.
In addition, food for birds should be prepared, which will be located in the forest canteen. Using a utility knife or scissors, cut a round hole in the bottom of the container. The diameter of the opening should be such that a bird can easily fly into it. A variation of the construction of several windows at once is possible, through which feed will be supplied. The upper part of the container is wrapped with wire and installed on a branch. To weight the finished product, use plywood or similar material that fits on the bottom. This feathered canteen has a roof so the bird food will not get wet. In addition, the presence of large holes in diameter is a guarantee that there will always be a lot of birds in your feeder.

It is possible to design a do-it-yourself bird feeder using PVC bottles. When working on a dining room for birds, you will need to prepare materials:
- PVC bottles;
- wires;
- two spoons made of wood.
Using a knife or scissors, make an opening in the tank so that you can put a wooden spoon through it. 5 cm higher, make another identical hole. Set the spoons and pour the food into the bottle. On one side of the spoon, which is adjacent to the bottle with a wide edge, build a hole of a larger diameter. Thus, food, as it is eaten by birds, will spill out of the bottle. The upper part of the container is fixed to the tree, most often using wire or rope.
DIY bird feeders photo:

An easier variation on making a bird canteen is to cut a small door in a PVC bottle. In order to avoid injuring the birds in the process of getting into the feeder, all edges of the hole are sealed with electrical tape. Food is poured directly into the container.
Original do-it-yourself bird feeder
In the process of creating a wooden forest dining room for birds, you need to stock up on tools in the form of:
- wood or plywood;
- hammer with nails;
- timber;
- screwdriver;
- compositions to protect wood from high humidity.
Using plywood and a board, use a screwdriver to cut out the base for the feeder. The second part should be the same shape, only slightly larger. Thus, it will protect the feeder from moisture. Saw the timber into several parts, of which you need to make the sides for the feeder.
To fix the beam, use fasteners and a hammer. A wire or cord should be fixed on the roof, which will hold the roof on the branches. To connect the roof and the bottom of the forest dining room, additional supports are used, installed at the corners, or two - in the center. Open the feeder with an antiseptic, which prevents its destruction under atmospheric influence, it is additionally recommended to varnish the feeder.
Please note that it is strictly forbidden to feed birds with fresh bread, rye types of bread and flour, citrus fruits, salty foods, toasted seeds, oatmeal. These products will not bring any benefit to the birds, but only harm them.
Various types of grains, wheat, nuts, fruits, dried foods, lard, mountain ash with viburnum, etc. are used as food for birds. A beautiful do-it-yourself bird feeder will decorate any interior, children will be happy to watch how the birds eat food and rejoice that they are taken care of.
DIY bird feeder video:
We present to your attention several options for interesting bird feeders made. It turns out that the feeder can be easily made from ordinary plastic bottles, all kinds of boxes, wood - there would be a desire. This article will try to awaken this desire in you, thanks to which many birds will be able to comfortably survive the winter.

To begin with, let's take a look at a great many different feeders made from a variety of materials. This will help you decide on the image, choose the option that suits you.

plastic bottle and glass jar


Indeed, with the help of wood, the feeder can be given any look: you can build a mini-castle, you can put an ordinary “dining room” on racks, you can decorate the feeder with intricate carvings, etc. as far as your imagination allows and there are the necessary building materials.


It is very good when children are involved in making - they immediately form such character traits as caring for their neighbor, love for animals, responsibility, they show interest in making things, creating something!

Whatever you make your feeder out of, it is important to know the basic (and mandatory) elements of the feeder:
1. Your feeder must be with a roof - so the food will remain dry and will not be covered with snow, and it will be easy and simple for the bird to enjoy your treat;
2. Be sure to make the opening of the feeder wide enough, the birds are very shy, especially afraid of enclosed spaces. What if several hungry flyers arrive at once in your “bird dining room” for lunch? It is important to take care of this option;
3. When choosing a material for the feeder, be guided by its strength and moisture resistance: the denser and more moisture-resistant the source material, the longer your feeder will last;
4. The feeder very often turns out to be too light, therefore it reacts to every gust of wind, while grains and crumbs crumble and the birds remain hungry. To cope with this problem, you need to slightly weight the feeder. To do this, lay a piece of plywood, linoleum on its bottom (strictly according to the size of the bottom).


Now you will learn how you can independently make a similar feeder from all kinds of cereals.
This feeder looks great and, at the same time, perfectly copes with its functions! Tree branches adorned with such "decorations" give your garden an aesthetic and exclusive look. So let's get started!
We will need:
All kinds of grains, crumbs, seeds - all raw, as fried ones will only harm small flyers;
Egg;
Oatmeal;
Honey;
Gelatin;
Flour;
Pencil;
Thick cardboard;
Scissors;
Dense kapron thread.

1. Using a pencil and a regular sheet of paper, draw the shape of the future feeder. Hearts, stars, triangles, circles, squares - any geometric shapes will look beautiful;
2. Cut out a paper blank with scissors and attach it to thick cardboard. Circle with a pencil and carefully cut along the contour;
3. Take care of preparing bird food in advance. Pick up unroasted and unsalted grains, all kinds of bread crumbs;
4. Using a needle and a dense nylon thread, make a hole in the cardboard base and thread the thread into it - with its help this “delicacy” will be attached to a tree branch;
5. In order for the grains and crumbs to stick together and attach well to the cardboard base, start preparing natural glue:
- 2 tbsp. tablespoons of oatmeal (in no case oatmeal);
- 1 egg;
- 1 teaspoon of flowing honey;
- Flour.
All ingredients are thoroughly mixed in a bowl and left for 30 minutes. for swelling.
6. We apply the prepared adhesive mass to the base;
7. In another container, thoroughly mix all our grains;
8. We dip and roll in the resulting crumb-grain mixture our base coated with “glue”;
9. Ready grain feeders must be placed in the refrigerator for several hours - the mass should solidify well and acquire the necessary strength;
10. Hang such delicious “treats” on the branches of trees and watch from afar the feast of birds that have flown in to treat themselves and feast!

Dissolve one sachet of gelatin in warm water;
Pour all kinds of grains into the still warm solution;
Send the molds with the contents to the refrigerator to thicken;
Delicious toys are ready, you can safely hang them on the branches of trees!

Another "quick" option is to get a few old cups, or take ordinary plastic cups, fill to the top with the prepared mixture (on any basis from the proposed ones). After the mixture thickens in the refrigerator, tie the feeder to a tree branch with a ribbon! The quick version is just as good! 
An ordinary cardboard box can successfully serve as a dining room for birds! However, it is advisable to pick up boxes covered with a special protective layer, laminate - this way the life of your feeder will increase significantly!

Juice boxes are ideal (they are covered with a special moisture-proof layer inside and out), from small appliances, medium-sized boxes from postal parcels, bright candy boxes. Even shoeboxes will do a great job with the functions of the feeder!
Candy box bird feeder
You will need:
Candy box (3 pcs.)
Two medium nylon twine or two shoelaces.
Insert one end of the box into the other so that you get a triangle of three candy boxes connected to each other, as shown in the picture:
Pass the cord through the roof of the feeder, with the second cord securely attach your feeder to the tree.

candy box feeder
The feeder is ready, it remains only to fill in delicious grains and crumbs!
Even a child will cope with the manufacture of such a feeder (by the way, do not forget to involve children in this entertaining activity).
You will need:
Juice or milk box;
Long lace;
Knife or scissors.
Take an appropriately sized box and, using scissors or a knife, carefully cut a hole in the side of the box.
Through the top edge of the box, right in the middle, thread the string and fasten the “freshly prepared” feeder to the branch.

Hurry up and fill in the bird food - they have already discovered a new bird feeder and are eagerly waiting for your treat!
If you want to make a large enough feeder. To fit a whole flock of birds in it - take an ordinary postal parcel box! Glue the top carefully with adhesive tape, cut wide holes in the side moans, fix it on a tree - you're done! See what happened:
That's where there is a soul to turn around! There are a lot of plastic bottles of various shapes and colors around! There is a huge opportunity to show your creativity, invention, originality!
Let's take a closer look at the idea of turning an ordinary plastic water bottle into a bird feeder.
We will need:
- Knife or scissors;
- Plastic bottle with a capacity of 5-6 liters;
- Wire;
- Bird food.
1. Using a knife or sharp scissors, carefully (so as not to cut yourself) cut a wide hole in a plastic bottle, located slightly above the bottom of the bottle (2-3 cm will be enough);

2. You can make several windows, one on each side.
3. Wrap the neck of the bottle with a strong wire and fasten the other end of the wire to a tree branch;
4. Lay plywood or a piece of linoleum on the bottom of the feeder, with their help we will make our feeder heavier and it will not sway and turn over with every breath of the breeze;
5. Pour in bird food and wait for your invited "guests"!
Plastic bottle feeder with spoons
Let's say that you want to make a small compact plastic feeder, then take a 1.5-2 liter plastic bottle!
You will need the following materials:
1.5-2 liter plastic bottle;
Wire;
Sharp knife or scissors;
Two wooden spoons for coasters;
Bird food.

Step-by-step instruction:
1. Take a plastic bottle with a capacity of 2 liters, measure 15 cm from the bottom of the bottle with a ruler and make a through hole for a wooden spoon at this height in the very center of the bottle;
2. Rise even higher (approximately to the middle of the bottle) and make another through hole for the second spoon. Only at a different angle (perpendicular to existing holes);
3. Insert through the spoon bottle;
4. Enlarge the hole on the wide side of the spoon - the grains will spill out and it will be convenient for the birds to peck them;
5. Pour the bird food into the bottle;
6. Tie the neck of the bottle with wire and attach it securely to the branches of the tree.
The feeder is ready! In a few minutes, birds wishing to treat themselves will visit it.
Another option for a plastic bottle feeder, more simplified:
We use the same materials as for the feeder with spoons. But now we don’t need spoons, but instead prepare electrical tape.

So, in a two-liter bottle we cut a large hole at a height of 5-7 cm from the bottom of the bottle. In order to make it convenient for the birds to sit on the cut edges of the bottle, we paste over the cuts with electrical tape or tape (your choice). We wrap the wire around the neck of the bottle and fasten it to a tree branch. Pour food - you're done!
DIY wooden bird feeder
We have already considered quite a lot of different options for bird feeders, made from all kinds of improvised means and even waste. It will not be right at all if a reliable and durable wooden feeder is left without attention - these are the feeders that hung on the trees in our childhood. It was them who were taught to make us at labor lessons by our Trudoviks!

Recall the manufacturing technology and - for business!
First, let's get creative and draw a little! Armed with a piece of paper and a pencil, draw the feeder you plan to make. Seeing it on paper. Estimate the dimensions of the future bird "dining room". Only after that you can start making the feeder.
As an option - use the ready-made drawings, which are presented at the very beginning of this article. The dimensions are already indicated there, the contours are clearly outlined - you can safely proceed to the next events.
To make a wooden feeder, you will definitely need the following tools:
1. Hacksaw;
2. Hammer;
3. Nails.
Prepare the following materials in advance:
Plywood of the right size;
Bars 2x2 cm;
Thin wooden board for the base of the feeder.
We go strictly by size! Dimensions are shown on the drawing.
1. From a thin wooden board (solid), we cut out a rectangular base of the desired size;
2. Now go to the plywood sheet and cut out a rectangle of the same size as the base - this plywood sheet will serve as the roof of your feeder;
3. We cut the bar into four parts, and one pair of bars should be 3 cm shorter than the first pair. Thanks to this design, the water will flow smoothly over the roof of the feeder and not stagnate on it - the roof will last much longer!
4. We retreat 1-1.5 cm from each edge of the feeder and nail the racks, first to the base of the feeder. And then we nail the roof to the racks. The front struts should be shorter than the rear;
5. We nail a wire or a strong nylon cord to the middle of the roof and fix the feeder on the tree.
All! The work is done, we pour the food, and admire the fun bird feast! Don't forget to take pictures - the memory will last a lifetime. There will be something to show to the grandchildren and what to make together with them!
In no case do we paint the feeder with paint or varnish - the birds do not tolerate such smells and will not visit the painted feeder with their presence!
What food is good for birds, and what, on the contrary, can harm them?
Feeding birds is a laudable occupation, but it is worth knowing that not all food is suitable for birds to eat! One food can provoke a disease of a gullible and hungry flyer, another can lead to the death of a bird, but the third one will definitely help a bird survive in a cold and hungry press and live until the long-awaited spring!
So, what can not be given to birds for food:
- Crumbs from fresh white bread;
- Crumbs from rye bread;
Skins of bananas and all kinds of citrus fruits;
Cream pies, cakes;
Chips;
Roasted and salted seeds;
Oat flakes;
Nuts.
What can and should be treated to birds:
- Raw seeds;
- Buckwheat, millet, oats, millet;
- Crumbs and small pieces of stale white bread;
- Dried and cut into pieces fruits (dried fruits);
- Titmouse are very fond of small cubes of unsalted lard;
- For red-sided bullfinches, put mountain ash, viburnum in the feeder.
A few more photos of the original feeders:


Thanks to your attention and care in the winter period, there will be a real chance for more birds to survive, which, in turn, will definitely thank you later with their songs and "sanitary and health" work in your garden!
Watch also the video: Do-it-yourself bunker bird feeder in 10 minutes.
Winter has always been and remains a difficult time for birds. Day by day it is getting harder and harder for these little animals to find food. Think about birds and place a handmade feeder in your yard, because any materials at hand that we usually throw in the trash are suitable for working with. The article will present ideas and photos of ready-made solutions, the implementation of which will not require complex drawings or any special skills.
DIY birdhouse
Think for yourself, because it is impossible to imagine all the splendor of the surrounding world without birds and fervent trills. By their nature, these animals fill everything around them with harmony and life, and therefore even a tiny garden will look much nicer if there are birds in it.
By placing the feeder in the countryside, you can daily observe the secret life of birds and the fascinating bird bustle. Some of them will enter into fierce competition with other species, others will try to defend their own rights in the fight against relatives. But all of them always carefully look around, so as not to miss the moment of the attack of any predator.

A bird feeder can be assembled with your own hands from a variety of materials. However, there are certain general rules that must be observed when assembling:
- It is best to place the feeder on the wall of outbuildings or directly on the branches of trees. At the same time, the placement height should be at least half a meter, so that it is convenient for you to feed the birds, and so that the cats cannot climb to them.
- For small birds, the birdhouse should be made of appropriate dimensions so that larger animals cannot get inside.
- The corner walls of the finished structure should not be piercing and sharp.
- It is better if the building material from which the bird feeder will be made will have good resistance to adverse conditions and moisture. Otherwise, the birdhouse will not be able to last for a long time, and it will have to be replaced.
- Provide special sides and a roof in the design of the feeder that will protect food and birds from wind, rain and snow.
- And most importantly - the feeder itself should always remain convenient for feathered animals, so that it is easy for them to take out food!


Advice! Do not forget that the birds remember the place of constant feeding, and therefore they are ready to fly a long distance to the right place - in our case, the feeders. Based on this, feeding the birds must be carried out daily, otherwise they may die!
Plywood bird feeder
Of course, the feeder can always be purchased ready-made in the store, but it is better to make it yourself, besides, if it only takes a couple of hours. A plywood feeder can be made with a gable roof, flat or without it at all. It is also possible to provide a special bunker compartment if you know that you will not be able to accurately monitor the amount of feed inside. Naturally, drawings will be required for work, since a huge number of developments are presented on the Internet with ready-made sizes and dimensions for cutting. You will only have to decide on the solution you like.

Important point! Do not neglect the drawing: firstly, it will greatly facilitate and speed up the work. Secondly, this approach ensures that in the end you get exactly what is shown in the picture.
When deciding on the appearance of the future feeder, do not forget to take into account the bird population specific to your region. After all, for example, pigeons are able to eat all the stocks, leaving tiny titmouse without food. Based on this, it is recommended to make the opening in the feeder so that large birds cannot penetrate inside.

Required to work:
- Bar with a section of 20 by 20 mm;
- Plywood sheets;
- Sandpaper;
- A hammer;
- Water based adhesive;
- Electric jigsaw;
- Nail.


Operating procedure :
- First of all, all the elements are outlined on the plywood sheets, which are then cut out with a jigsaw. A square sheet of plywood with sides of 25 by 25 cm will serve as the bottom of the feeder. At the same time, the dimensions of the roof should be made a little larger in advance so that water during rain does not flow down onto the food along the walls.
- To avoid burrs, the edges of the workpieces should be pre-treated with sandpaper.
- We cut out 4 racks from a bar about 30 cm long.
- If you want to make the roof lean-to flat, you should shorten a couple of bars by 2-3 cm.
- We fix all the details with waterproof glue, after which we fasten the structure with nails. We attach racks to the bottom of the feeder, to which we fix the sides.
- We fasten the roof to the racks with self-tapping screws.
- We install a container for food, add food and watch the bird feast.
Wooden feeder: photos and ideas
The main advantage of a wooden bird feeder is that such a design keeps its shape perfectly and can serve for a long time, which in turn is explained by the high reliability and high characteristics of the tree itself. For self-assembly of the feeder, you will need drawings, as well as at least minimal experience in working with tools.

To assemble a wooden feeder, you will need a board about 18-20 millimeters thick.
Next, we will consider a variant of a simple design, which can be easily done with your own hands, using a simple photo instead of a drawing. For work you will need: glue, timber for racks 2x4.5 cm, nails, for the bottom a piece of plywood sheet measuring 25x25 centimeters, self-tapping screws and a pair of sheets of plywood 22x35 cm for the roof.

Work order:
- First of all, of course, the sides and bottom of the structure are assembled. The bars, fitted to the dimensions of the lower part, are assembled for fitting, the end sides are smeared with adhesive, after which we strengthen the fastening with self-tapping screws. As a result, we get a small frame. At the same time, it is recommended to make two parallel sides slightly larger than the base, approximately 5 centimeters, so that later perches can be installed to them.
- We fix the bottom of the feeder to the finished frame and nail it.

- We fix 18-20 cm racks from the inside of the resulting structure.
- We supplement the racks with rafters. To do this, we install a pair of bars at a right angle, strengthening the joint area with an additional bar. As a result, you will see a right angle with the same sides. You will need another similar part.
Important point! Fix the bars at right angles on the table, while it will be correct if the wide side is on the table, and the additional bar is on top!
- Next, we fix the rafters to the racks with the help of self-tapping screws.
- We fix sheets of plywood to the racks, which will play the role of a roof. If you have a wooden corner, you can use it by making a skate.
- Do not forget about the elongated sides - glue sticks or bead to them, which will play the role of perches.

Thus, you can easily and quickly assemble a bird feeder with your own hands. The finished structure can either be hung on a wire by a hook by drilling several holes in the ridge, or placed directly on top of any pole in the area. Inside the house, the food will be perfectly protected from rain and wind, moreover, several birds will be able to fly up to the feeder at once. The birds will love this kind of cozy dining room!
Photo instruction
If there is a gazebo on your suburban area, then it would be a great idea to place a simple open feeder near it. In this case, it will be sufficient to build the bottom and side.

If you want to cover the feeder with varnish or paint, you should use water-based formulations! This approach will protect the birds.
Birdhouse from a box or bag of milk or juice
A beautiful bird feeder can also be made from such simple things as a bag or a box of juice or milk. Moreover, even a child can make a birdhouse. For work you will need:
- Stationery knife or scissors;
- A box of juice or milk;
- Marker;
- Wire or nylon rope;
- Adhesive plaster.
The first step is to precisely mark and cut small holes on opposite sides of the box. The lower part of the window should be pasted over with adhesive tape so that it is safe and convenient for the birds to fly out and take food from the feeder.

Using scissors, we make tiny holes under the holes, here later we will insert the cardboard rolled up with a tube, which remains from the holes made earlier. We put the rope or wire through the holes in the bent corners of the future birdhouse and tie it to the branch. Ready!
The finished feeder can be placed on a tree branch, since the structure will not swing much in the wind. Once again, feeding slots will contribute to this, which can be performed on adjacent sides, and not opposite ones. You can fix the craft more strongly if you attach a wire to one side of the feeder, tying it to a tree.

You can also make a beautiful birdhouse with your own hands from several juice boxes. In this case, it is worth cutting off the third part from the first workpiece by cutting a hole for the birds in front - the element will become the bottom of the feeder or fodder board. We cut the second blank along the sidewalls, leaving the upper part untouched. We combine the components in such a way that in the end we get a triangle. You can connect the elements with adhesive tape or glue.
Craft from small plastic bottles
1 option. Simplest
We cut a couple of small holes symmetrically on both sides of the bottle. What shape is up to you to decide, they can be both rectangular and square, rounded and in the form of an arch. Leave jumpers between the holes. The visor will cover your feathered friends from the rain, you can make it by making a cut with an inverted letter “P”, after bending the plate up.

The bottom of the hole in the new birdhouse should be covered with some material, whether it be fabric electrical tape or adhesive plaster - this will remove the pointed edges of the bottle, allowing the birds to sit comfortably.
At the bottom of the bottle, we make holes at the same level, so that after that you can place the stick in a horizontal plane - a kind of perch for birds.

You can place the finished bottle feeder directly on the tree by wrapping the jumper with rope, tape or any other material, as in the photo.


Make holes in the bottle cap by inserting the ends of the twine into them and tying them into a knot, thus obtaining a loop with which you can conveniently fix the birdhouse on a branch of any tree in the yard.
Option 2. Bunker feeder
A bunker-type bird feeder is advantageous in that food can be poured into it with a margin, up to several days. At the same time, as the birds eat part of the reserves, the feed will automatically be filled up.

For this design, you will need a pair of identical bottles. The first one should be marked with a marker, after which small holes should be made at the bottom, similarly to the first feeder, and the upper third of the bottle should be removed. From above we make a couple of holes at the same level - subsequently, twine or tape for hanging the feeder will pass through them.

In the case of the second bottle, you need to cut several holes in the narrowest place - it is through them that feeding for birds will fall out.
Do not make large holes, if necessary, they can always be expanded over time.
Finally, fill the bottle with food and screw the cork back in place, then simply place it in the rest of the first bottle. Ready!
3 option. spoon design
A hole is made inside the cork, where the twine is later inserted. After that, a couple more holes are made at the same level according to the dimensions of the spoon. The last hole is cut in the bottle itself, above the deep bowl-shaped area of the spoon. At the same time, it should be slightly expanded so that the birds can comfortably eat in the feeder. In the end, it remains only to fill the birdhouse with food.

A little advice! Moisture can accumulate inside the craft over time. This can be avoided by a simple solution: using a tiny carnation or a heated needle, make a few holes in the bottom of the bottle - this will allow moisture to leave as it accumulates.
Craft from a 5 liter bottle
Surely everyone has at least one 5-liter plastic bottle that is lying around. A bird feeder is quite simply made with your own hands from this material. In addition, the volume of the bottle will allow you to place much more food for birds inside, and well-made holes will make it possible to feed several animals at once!

Using a bottle as a birdhouse is a fairly quick and easy solution that even kids can do: just use wire or tape to place the structure on the tree and place a small supply of food inside. Of the devices, you only need a clerical knife or secateurs and, of course, the bottle itself.
It is worth making a hole depending on how the feeder is planned to be placed on the tree:
- Vertically - 3 rectangles or a pair of square holes are cut at a distance of 5-7 centimeters from the bottom of the bottle;
- Horizontally - a pair of large holes are cut from the side of the neck and bottom.

It is convenient to hang a future birdhouse for birds from a bottle by twine or wire by the neck. When choosing a horizontal placement option, a couple of holes are made on the wall of the bottle, where a rope is later passed for tying to a branch.
You can avoid swinging crafts if you place a quarter of a brick inside, which will make the feeder heavier. Load the feed from above and there will be no problems with rocking.
Bunker
If desired, a 5-liter bottle allows you to do it yourself with a bunker feeder. For this, in addition to the mentioned bottle, you will need a couple of one and a half liter bottles, a rope, a stationery knife and a marker.

Work order:
- First of all, we mark future holes for bird entrances on the bottom of the workpiece. The ideal option is one large and a couple of smaller holes. The first should fit a 1.5-liter bottle.
At the same time, it is better to cut a large hole in the shape of an inverted letter “P”, with this approach, the visor bent up will cover the birds from rain and snow. As in the case of 1.5-2-liter bottles, the bottom of the edges of the openings should be sealed with some kind of material, for example, adhesive tape, to avoid injuring the birds on sharp corners.
- Inside the smaller bottle, we also make holes in those places where it will touch the bottom of the 5-liter container. An additional hole will be required and just above the indicated place. Through them, as you eat, the food will wake up in the feeder.
- Inside the lid of a 5-liter container, it is necessary to make a round hole so that, when fully tightened, the thread of the neck of the second bottle is visible from above.
- We remove the top and neck from the second container to make a funnel. We put it on the neck of the bottle placed inside, after which we fasten it with a cork.
- In this way, a beautiful and comfortable bunker bird feeder is obtained. All work is done simply and quickly with your own hands. It remains only to fill the new birdhouse with food and place it on a branch in the yard.
Having shown a little imagination, you can always make interesting and unusual crafts for birds from the same plastic containers, which will not only become a real find for birds, but also decorate your garden design well.


Using a shoebox
For self-assembly of a bird feeder, any material that is idle on the balcony can fit. Shoe boxes, food and utensil boxes can also come in handy!
Give preference to boxes and cardboard, having a laminated finish! Thanks to him, the finished feeder can last much longer.
The main advantage of a birdhouse out of the box is that the original blank already has a roof, walls and bottom. You will only have to make small holes on the sides of a rectangular or square shape.

For work you will need: adhesive tape, a knife or scissors, as well as a nylon cord. As you know, cardboard cannot be called a durable material, especially when used outdoors. Therefore, it should be wrapped with tape, so that the feeder can last at least until the next season. After making holes on the sides and fixing a new birdhouse on a cord on a tree, fill the container with food, and the birds will not take long to wait.
So that the craft does not shake much with the wind, it is worth placing some pebbles or sand at the bottom of the box.
You can do everything differently. The lid of the box is placed perpendicularly so as to act as a stern stand, while the second part will act as a roof and side. In this form, the design is glued with adhesive tape for greater reliability. A pair of hooks are made from a piece of wire, with which the "ceiling" of the birdhouse is pierced. The hooks are twisted and bent from the inside. With the help of hooks, the bird feeder can easily be fixed on the branch, as shown in the photo. It remains only to put food and wait for feathered friends.

Video Ideas
Bird feeders in winter help to save birds from hunger. However, this is not the only reason why you should start making them.
By themselves, beautiful and original feeders can become a unique decoration for your garden.

And the process of their creation instills in the younger generation a sense of responsibility and concern for weak creatures.

In addition, this is an invaluable time that allows parents to spend time with their children with interest and benefit.


Wooden bird feeders
There are several types of feeders that can be made from wood. Firstly, these are feeders that look like a base made of plywood or other similar material with sides around the edges that prevent treats for birds from crumbling.

Most often, such a design is suspended from a tree branch on thick ropes.

But such a feeder has a number of disadvantages. The most obvious is that such a design does not protect the feed poured into it from precipitation and bad weather. It is also quite light and can move or roll over with the wind.

The second version of wood feeders is more like a house and has a roof. In such feeders, the food is reliably protected from the weather. The base of the structure looks the same as in the first version, only there are supports on it that support the roof.

The roof can be either straight or pitched. Any child can make a straight roof, because in fact it is a rectangular piece of plywood, only slightly larger than the base.

A pitched roof has a slightly more complex design, but it is better because, unlike a straight roof, snow does not accumulate on it and it does not have to be periodically cleaned.

There are also original options for feeders made of wood. For example, a feeder can be made from an ordinary log. To do this, you will need a chainsaw, a chisel and a hammer, as well as a chain and rings for hanging.

To begin with, you need to saw off two round logs from the log on both sides of the future feeder. Then a wedge is cut along the entire log, and longitudinal and transverse cuts are made, not reaching the bark of about 5 centimeters.

This is necessary in order to subsequently make it easier to extract the middle from the workpiece with a chisel. After all the work is done, the previously cut rounds are nailed on both sides of the feeder.

It remains only to screw the rings and attach the chain on which you can hang the feeder.

Plastic bottle feeders
For bird feeding, plastic bottles are also used as feeders. It can be both containers of 5-6 liters, and small 1.5-2 liter bottles.

Most often, a plastic bottle is turned into a feeder by cutting out several windows in the body.

Then such feeders are hung horizontally or vertically, depending on the design. For the convenience of birds, cross perches are installed near the bottom of the feeder.

But sometimes you can find quite original feeders, which provide for the automatic addition of feed. These are the so-called bunker feeders.

Such a feeder can be two wooden spoons inserted at an angle into the through holes in the bottle. Thus, the food from the bottle will gradually spill onto the spoon.

A bunker feeder can be made from a 2-liter bottle. To do this, it is enough to cut the bottle in half, make round holes in the lower part, and turn the top upside down and put the neck down. The top can be covered with a lid or a disposable plate. In such a feeder for a long time it will not be necessary to add food.

Improvised materials in the creation of bird feeders
The simplest feeder you can think of is a garland of rowan, cone or berries. A treat for birds strung on a rope will decorate young trees in the garden. The only disadvantage of such a feeder is that as the feed is eaten, the garland loses its appearance.

An interesting solution would be to make a feeder in the form of lumps with grain or seeds. Such decorations can be placed on benches, tables, or simply hung on trees in nets, in which tangerines are usually sold in a store.

They are based on fat or gelatin. The lard is melted and the main food is added to it. Then the finished substance is poured into molds (it can be baking molds or an ordinary balloon) and placed in a cold place to solidify.

They also do it with dissolved gelatin mixed with grain.

If you have a coconut shell lying around, then it can also be used to make a feeder.

As a result, such a design will be invisible on the tree. Juice or milk boxes are also suitable for making feeders. Their very design will not differ much from simple feeders made from plastic bottles.

Photo of bird feeder ideas