Rembrandt's light in photography by famous photographers. Rembrandt lighting is a classic portrait lighting scheme. How to Create Rembrandt Lighting
Today we will shoot a classic portrait imitating the style of the old master painters. Moreover, we will not use expensive equipment, which we have in abundance in our studio.


We will use an ordinary 200-watt light bulb, which we place in our case behind the milky plastic, but you can use, for example, tracing paper. And we form a spot of light on the face by simply raising and lowering and/or moving and moving the lamp away from the plastic.
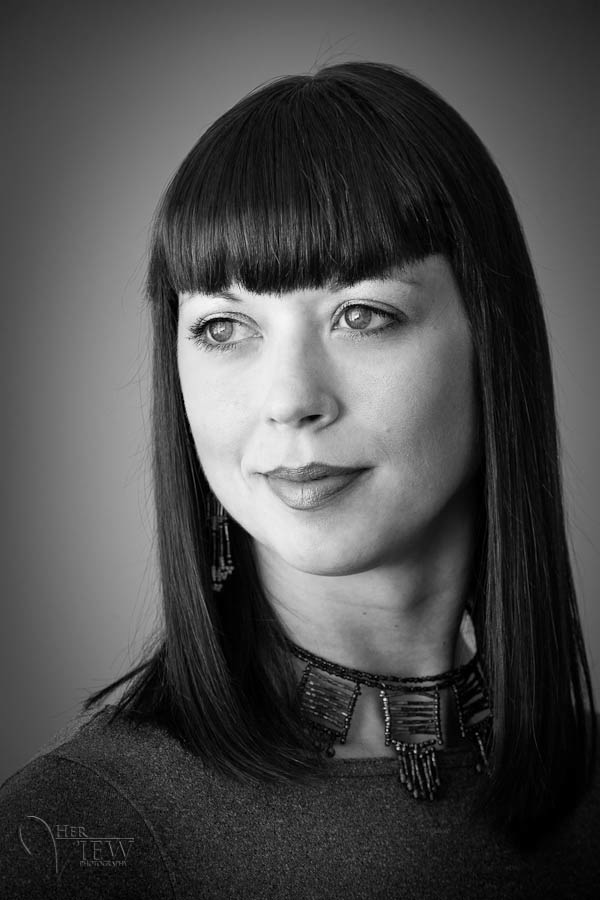
In our shooting, the light spot is located above and to the side of the model’s face, i.e. we get classic lighting like a Rembrandt portrait. The right side of the model’s face is fully highlighted, and the opposite side is partially highlighted: the classic triangle under the eye is highlighted, and the shadow of the nose falls on the nasolabial fold.

We use a black background as a background; it is velvety and, therefore, completely absorbs light. We used another black screen to cover the camera lens from the flow of light from the lamp, so as not to catch glare.
In the camera settings we set it to great value ISO - as much as 51200 - so that noise appears, but in our case it is artistic noise, imitating the structure of an old painting. Set the aperture to F11. The shutter speed at our ISO value is 1/200 s. We deliberately set the white balance to warm.

The right side of the model's face is highlighted, and the left is in the gap. We take a simple reflector made of foil (from fish slices) and attach it to the stand to the left of the face to create volume, slightly illuminating the head from above and from the side.
You can shoot with either a serious camera or, for example, a smartphone.


The goal we wanted to convey with this shoot is don't be afraid to experiment in the studio. For a good and extraordinary result, professional and serious equipment is not necessary. Of course, it is much more convenient and comfortable to work with, but you can start small, take a powerful light bulb, thin plastic/tracing paper/fabric, black fabric and you are quite ready to take a classic and even sophisticated portrait.
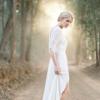
Self-portrait by Rembrandt illustrating the lighting style named after him.
As you learned more about working with studio light and its arrangement, you have probably heard about Rembrandt light or, as it is also called, Rembrandt’s triangle.
It is one of the most widely used lighting patterns, along with short, long, split, butterfly, loop, and shell lights. If you're just getting started with studio portraiture (or even just using controlled natural light, like large windows), already by searching these terms online, you'll begin to better understand lighting patterns and how to create them.
What is Rembrandt light?
Rembrandt Harmens van Rijn is one of the greatest artists of all time. His work depicts a variety of subjects and styles ranging from portraits and self-portraits to landscapes, miniatures, allegorical, biblical, mythological and historical scenes, as well as animal studies. In addition to his specialized works, Rembrandt is also known in photography circles for his very characteristic style lighting.
The Rembrandt square became popular long before the advent of cameras. Rembrandt did not invent this style of lighting as others had already used it. However, the artist was able to effectively and successfully apply the scheme when drawing portraits, for which it was named after him. Some sources claim that Rembrandt painted most of his portraits in a single room with a specifically positioned window and seated his subjects in the same location, creating a consistent and distinct style of lighting.
How to recognize Rembrandt light?
This lighting pattern is usually defined by having a small triangle of light on the cheek further away from the light source. It is obtained thanks to the shadow from the nose and the cheek itself. Technically, the triangular island of light should not be wider than the eye or longer than the nose. It is its presence that distinguishes Rembrandt light from ordinary short light.
However, everything does not end with one triangle. When using this style, approximately half of the model's face is in shadow, while the other is almost completely illuminated. In this case, the aforementioned triangle appears just on the shadow side. This lighting scheme makes portraits more dramatic. Compare it to something light and bright like shell lighting and you will understand the difference.
The triangle is important because it allows the photographer to create a dramatic short burst of light while still illuminating the eye on the shadow side. This characteristic makes it not as dark and ominous as a split light that leaves half the face in shadow. This way you can express the specific effect you want.
Making slight variations in the lighting scheme plays an important role in conveying mood or personality. Let's say you're photographing portraits for a movie cover. The main villain should be shown in a split light (with one side of his face completely in shadow), and the other character, who appears to be bad at first but then becomes a positive hero, can be shown in a Rembrandt light, hinting at the presence of good traits in his personality. All this can be achieved simply by changing the position of the light. A more common example would be a yearbook shoot. If the graduate wants a dramatic portrait, split lighting will be too intimidating or even sinister. However, Rembrandt's triangle works well due to its clever combination of shadow and light.

Although it's not so obvious, you can see a small triangle under the model's right eye. This style of lighting works very well for corporate portraits.
Why Rembrandt light is popular
It's easy to create. The diagram below shows that you don't need a lot of equipment. In practice, if you find the right place (for example, near a window), the perfect Rembrandt triangle can be obtained with only a camera. If you choose artificial light, you only need one flash. You can modify the arrangement to get the look you want, but at its core, Rembrandt lighting is a very basic single-source design. It couldn't be simpler.
Another advantage in addition to the minimum set of equipment is ease of installation. As you will see in the photo below, if you are careful, it is very difficult to mess up the arrangement.
It is also easy to identify. Largely due to the fact that only one light source is used. This way, if you are trying to get a Rembrandt triangle, it will be clear whether it worked or not. The triangle on the cheek and the light around the eye on the shadow side of the face are characteristic and understandable features. You can adjust the position of the light and the model to move a little away from the canonical look and get a more suitable option for a particular case.
He looks great! Certain lighting schemes make the difference between professional and amateur portrait photography. Rembrandt's light is one of them. Despite its simplicity, this lighting scheme looks very professional. Clients will appreciate your ability to create a compelling result, and viewers will see that the photo was taken with a specific intent and purpose. But this style also looks natural. Its creator used only light from a window, so with the right approach you get the feeling of using only natural light. In my opinion, this design is a unique combination of professionalism and purposefulness, but still looks natural.
And also this style in most cases is very successfully shown by the model. Thanks to the shadow falling on the side of the face and bottom part chin, the face looks thinner, and the jaw line is favorably emphasized. This is especially useful for hiding small double chin. Some models may want to draw attention to one side of the face or hide a pimple on the other. This scheme allows you to capture the details of the face, hiding some areas if necessary. With the right approach, almost anyone looks attractive in Rembrandt's light.
How to create Rembrandt light
In the simplest case, this lighting scheme is achieved using a single light source, even including just a window, as Rembrandt himself did.
The basic setup consists of a light source rotated at a 45-degree angle relative to the camera, aimed at the subject, and raised above eye level so that the light falls from top to bottom. There are several reasons to do this. First, the light source obscures one half of the face and illuminates the other. If you don't raise it above eye level, there will be a sharp line between the halves of the face. The greater the angle of rotation relative to the model, the thicker the shadow and sharper the transition. It is important not to go too far to the side, otherwise the eye on the shadow side of the face will lose its shine. This will make it dark and lifeless, bringing the circuit closer to split or short light.
A 45 degree rotation is a good starting point for a traditional Rembrandt light.
The height of the light source plays a big role, since it is thanks to it that the famous triangle on the cheek is created. If you raise the lamp above eye level, some of the light will pass over your nose and illuminate a piece of the cheek on the other side of your face. This is what creates a style that differs from the simpler short light.
If you have a standing or modeling light, it will be much easier to position it to create a triangle in right place. Otherwise, the trial and error method has not yet been canceled.
You can start by raising the light 0.3-0.6 m above eye level and pointing it down.
If you're doing a commercial job, it's best to have someone act as a temporary model (or do it yourself) to adjust the position of the light before the client arrives. Of course, he may have a different height or need to adjust the pattern a little, but preparing ahead of time can save a lot of time and create a feeling of professionalism.
It would also be a good idea to place a reflector on the shadow side to soften the transition of light to shadow. A reflector (or even a fill light on low) will help lighten some shadows and add detail. Some say that using a reflector is not "real" Rembrandt light. My answer is that no one cares what they say. Do what looks best. There are no strict boundaries in photography, and all the so-called “rules” are made to be broken.

If you're using natural light from a window instead of flash, there are other things to consider. On a cloudy day or with sunlight reflecting from the building opposite, the model should be planted closer to the window. If the sun shines directly through the window, you should place the model further away to avoid harsh shadows. Of course, as I mentioned above, rules are made to be broken, so for a more dramatic transition from shadow to light, you can do the opposite. There are no right or wrong actions. It is not what you do that matters, but why you do it and for what purpose.
When to use Rembrandt light
We briefly mentioned earlier that Rembrandt lighting is a very versatile lighting method. I often use it as a basis when shooting corporate portraits. I can then add additional components such as a reflector or fill light. This scheme works for almost any photograph, from waist-high shots to portraits like the example above.
The flexibility of Rembrandt light allows it to be used for more serious poses and even smiling portraits. This is one of the reasons it can be used with so many types of shooting. You can try different facial expressions or poses while keeping the lighting constant. You can then add something without making changes to the position of the main light. This makes Rembrandt light great for when you need to get things done quickly. For the example above, it took me 25 minutes to complete the entire shoot, including setup time.
In general, Rembrandt light is a technique that every photographer should be able to use. This is my working lighting scheme for most individual portraits. Whether you have an external flash or just light from a window, try it out, then change it up and add your own style.
I'd love to hear about your experiences and what situations you use this type of lighting in. Feel free to share your opinions or questions in the comments!
To create a classic portrait, the photographer needs to take into account several important factors at once, namely: lighting scheme, ratio of light sources, shooting point, face turn. This article will talk about lighting patterns: what they are, why they are important, and how to use them.
Without glare, your eyes will become dark and lifeless. Therefore, the white dot must be in at least one of the model's eyes. Note that the highlight illuminates the entire eye and highlights the pupil.
2. Loop type lighting
Loop lighting creates a slight shadow from the nose on the model's cheek. To build such a light scheme, you need to install the light source slightly above the model’s eye level and position it 30-45 degrees from the camera (the angle of the light depends on the type of face).

Look at the photo above: there is a slight shadow from the nose on the left cheek. However, with a loop, the shadow from the nose does NOT touch the shadow from the cheek itself. The shadow should be small and look down. At the same time, the light source should not be installed too high, otherwise the shadows will become ugly and the highlights will disappear from the eyes. The loop lighting pattern is one of the most popular types of portrait lighting because the light is easy to position and suits most subjects.

In this diagram, the black background is the trees against the background of the models. The sun is shining from behind the trees, but the greenery is in the shade. To the left of the camera there is a white light disk that reflects the light onto the faces of the newlyweds. It is not necessary for the sun's rays to fall on the light disk; even without them, faces can be well illuminated. Change the position of the light disk to get the desired direction of light. For Loop lighting, the reflector was positioned 30-45 degrees from the camera, above the models' eye level, so that the "loop" of shadow from the nose was directed towards the lips.
Note: Very often, novice photographers install a reflector below the models' eye level and point it upward. This results in faces being illuminated in an unnatural direction of light - from bottom to top. Don't make these mistakes.
3. Rembrandt's Light

Rembrandt lighting is named after the artist Rembrandt, who often used this type of lighting for portraits. For his self-portrait, published above, this is exactly the light used. Rembrandt's lighting is recognized by the triangle of light on the model's cheek. Unlike the "loop" where the nose shadow and cheek shadow do not touch each other, in this lighting scheme they merge, resulting in a small illuminated "triangle" appearing on the cheek. For a portrait to be properly lit, the highlight from the light source needs to be visible in both eyes of the model. This scheme is used for expressive and emotional portraits.

To achieve Rembrandt light, you need to have the model slightly turned away from the light source. The light source should be located above the model's head so that the shadow of the nose falls on the cheek. This scheme is not suitable for every person. This light suits a person with high or pronounced cheekbones. For portraits of people with a small nose or a flat bridge of the nose, it is difficult to use such light. In addition, you should not strictly adhere to a particular lighting scheme. If you were able to emphasize all the advantages of your appearance with one light or another, then it suits the model. To stage Rembrandt's light, you can use light from a window - in terms of lighting, it provides everything for the photographer, provided that the window is located high enough and its lower part is covered with material.
4. Butterfly lighting

This scheme received the name “butterfly” because in such lighting a butterfly-shaped shadow appears under the model’s nose. The key light source is installed above eye level and behind the camera. The photographer finds himself directly under the light source. Most often, this light is used for glamor photography and to create shadows under the cheeks and chin. This light is well suited for middle-aged and elderly models, since wrinkles on the face do not stand out as much as with side lighting.

For a “butterfly”, the highlighting light source should be placed directly behind the camera and slightly above the level of the model’s eyes or head (it all depends on the type of face). Sometimes this scheme is supplemented with a reflector, which is placed under the model’s chin (often a light disk is given to the model’s hands). This type of lighting is better suited to models with pronounced cheekbones and a thin face. Models with round and full faces are better suited to loop or split lighting. With only a reflector or window light available, such a circuit is difficult to simulate. Most often, a stronger source, such as the sun or a flash, is needed to make the shadow under the nose more expressive.
5. Luminous half-turn

When we talk about a light half-turn, we are not talking about the lighting scheme, but rather the type of lighting. Any of the lighting schemes described above can be modeled with either a light or a shadow half-turn, be it a loop light, a Rembrandt light, or a split light.
With a light half-turn, the model's face is slightly turned away from the camera, and more wide part The face (who is looking at the camera) is illuminated by the main light source. Thus, a large area of the face is illuminated, and a smaller part of the face remains in the shadow. Half-turn light is sometimes used for high key portraits. This type of lighting makes a person's face appear wider (hence the name), which is why it is used to photograph thin-faced models. Most people, however, want to look thinner in photos, so this setup won't work for models with full or round faces.

For a light half-turn, the model needs to turn away from the light source. Notice how well-lit the wide part of the face that faces the camera is. Visually, less of the face is in shadow. Conclusion: with a half-turn of light, the part of the face that is best visible in the photograph is illuminated.
6. Shadow half-turn

Shadow half-turn is a type of lighting opposite to light half-turn. As can be seen from the example, with a shadow half-turn, the part of the face facing the camera (and, accordingly, visually larger) goes into shadow. This type of lighting is often used for low key portraits. With a shadow half-turn, the face is in shadow, and the photograph itself appears more voluminous. The shadow half-turn can be used to photograph most people.

Please note that in this photo, the part of the face that is visually smaller and further away from the camera is better lit. Conclusion: with a shadow half-turn, the visually large part of the face is turned into shadow.
What to do about it?
Once you understand the difference between lighting patterns and types, you can start practicing. To pick up the required diagram light for the model, you need to study her face. In the same way, the mood of the portrait, set by the light, is selected. A portrait of a model with a round face for a student vignette and a portrait of a music group whose members want to look proud and professional should be lit in various ways. By knowing basic lighting patterns, understanding the direction and qualities of light, and the relationship between different light sources (which we'll talk about in the next article), you'll be well prepared for any shoot.
Of course, it's much easier to change the light pattern by moving artificial sources around in the studio. With sunlight and light from the window, everything is more complicated - they cannot be moved. Therefore, instead of shifting the light, you need to ask the model to turn around, or choose a different shooting point yourself.
Practical task
Find a model (preferably a human, not a dog or cat) and try to replicate each of the lighting patterns you learned about today:
- "Butterfly"
- "Loop"
- Rembrandt's light
- Split light
Be sure to shoot portraits with both a highlight and shadow half-turn for each setup, if possible. During this shoot, don't focus on other factors (light power, fill light, etc.), make every effort to understand the patterns themselves. Use window light, sunlight or regular room light and be sure to watch how it outlines the face (I advise against using flashes at first as they are harder to learn - the direction and nature of the light is unclear until the photo is taken ). In addition, try to start by taking portraits from the front (as for a passport), without turning your head, with the exception of portraits for which you will need to get a light or shadow half-turn.
The design is called Rembrandt because this type of lighting is often found in Rembrandt's paintings, as can be seen in his self-portrait above. Rembrandt lighting is defined by the presence of a triangle of light on the cheek. Unlike loop light, where the shadow from the nose and cheek does not close together, here they merge together, which creates a light triangle on the cheek under the eye on the shadow side. To create correct scheme You should make sure that there is a highlight from the light source on the shadow side of the eye, otherwise the eyes will be “dead”, without a pleasant shine. Rembrandt's lighting is more dramatic, as such a chiaroscuro pattern creates a more restless mood for the portrait. Use it accordingly.

To create Rembrandt lighting, it is necessary for the model to be slightly away from the light. The source should be above the top of the head so that the shadow of the nose falls on the cheek. Not every person is suitable for this scheme. If it has high or prominent cheekbones, the design may work. If the model has a small nose or a flat bridge, this lighting may be difficult to achieve. Again, remember that you don't have to do this exact circuit with this exact model. Choose something that will highlight the model’s advantages and present it in the most advantageous way. Then the lighting will work as it should. If you are using a window as a light source and the light from the window falls onto the floor, you may need to cover the bottom of the window with a gobo or panel to achieve this type of lighting.

4. Butterfly pattern

This pattern is aptly named "butterfly" after the shape of the nose shadow it creates. if the light source is placed above and directly behind the camera. Basically, with this setup, the photographer is under the light source. The butterfly pattern is often used for glamor shots, highlighting the model's cheekbones. It is also suitable for shooting older people, since, unlike other schemes, it emphasizes wrinkles less.

The butterfly pattern is created by a light source directly behind the camera and slightly above the eyes or head, depending on the type of face. Sometimes the scheme is supplemented with a reflector directly under the chin; the model can even hold it herself. This scheme suits models with beautiful cheekbones and a narrow face. A round or wide face will look better with a loop or even side light. This pattern is more difficult to create using light from a window or reflector. Often, to make shadows more pronounced, a more powerful and directional light source, such as the sun or a flash, is needed.
In the portrait genre of photography, there are several points that influence the fact that your portrait photograph will come out great not only artistically, but also technically. And these are the moments: this is the ratio of the illumination of the entire scene, the light and shadow pattern, the type of face and angle. In this article we will look at lighting schemes that can be used to create excellent classic portraits.
Black and white drawing- this is the play of light and shadow on the model’s face, which gives the portrait its zest. For a classic portrait there are 4 light models (or light schemes)
- Division lighting or side lighting
- Loop lighting
- "Rembrandt" lighting
- Butterfly style lighting
There are also so-called “wide” and “short” lighting, but these are not separate schemes, but rather styles, but first things first...
1. Division lighting or side lighting.
When light falls from the side, it produces so-called side lighting. This lighting divides the face into two equal parts, one part is illuminated, the other is in shadow. This arrangement is often used to create dramatic portraits, such as an artist or musician at work. More often, this lighting is used for shooting male portraits. But remember that there are no hard and fast rules in photography, so you can experiment with shooting a female portrait. The light diagram is in the figure below.

To apply this pattern, place the light source at a 90-degree angle to the model on the right or left. To achieve better effect move the light source a little higher or lower, because A lot also depends on the type of face of the model. See how the cut-off pattern will change. With proper side lighting on the shadow side of the face, the light should only hit the eye to create a highlight on the eye. If it turns out that the cheek is illuminated, move the source a little back; if the cheek is still illuminated, then perhaps this type of face is not suitable for such lighting.
What is a glare?

Pay attention to this photo, the light source is reflected in the child’s eyes, this is a glare. If you look closely you can see the shape of the light source that was used to take this portrait.

Did you see that this spot is actually a hexagon with a dark center? This is a hexagonal softbox that was put on the flash when shooting. It is the glare that gives life to the eyes; without glare, the eyes look dead and lifeless, so make sure that at least one eye has a glare!
2. Loop lighting

Loop lighting is lighting where light from one source is reflected from an obstacle and hits the model again. This lighting creates a characteristic shadow from the model’s nose that extends to the corner of the mouth. For loop lighting, place the light source slightly above eye level and at an angle of 30-45 degrees from the shooting point. The exact position of the light source depends on the model's face, learn to read people's faces!

Look at this photo and you will see how the shadow falls, and you can also see small shadows from the noses of the newlyweds on the left side of the face. Set the lighting so that the shadow of the nose is only slightly cast. Don't raise the light source too high as this can result in strange long shadows and missing highlights. This scheme very simple and popular with most photographers.

This picture shows a loop lighting scheme, the black background is a background of trees, sunlight falls from behind the trees on the model, but the trees themselves remain in shadow. Reflector white, located to the left of the models and reflects the light falling from the sun back onto the models' faces. Let me remind you that the reflector should be located at an angle of 30-45 degrees to the photographer and slightly above the models’ eye level. A very common mistake is placing the reflector below eye level; this creates unsightly shadows on the face.
3. "Rembrandt" lighting

The following scheme is called Rembrandt, because the great artist Rembrandt used it very often in his paintings. This lighting creates an inverted triangle of light on the cheek of the shadow side of the subject's face. Unlike loop lighting, where the shadow of the nose and cheek do not touch, in Rembrandt lighting they interlock to form a triangle. This can be seen in his self-portrait above. To create this pattern, place the light fixture at 45 degrees to the camera-subject axis and raise the light source high enough so that the light hits the face at a 45-degree angle. When setting the light, make sure that there is a highlight on the eye of the shadow side of the face, otherwise the eyes will appear lifeless. Rembrandt lighting is more dramatic than loop lighting.


The light should be positioned slightly above the head so that the shadow from the nose falls on the cheek, forming a triangle. This lighting does not work for every face type; if a person has a small nose or a flat nose, this effect will be difficult to achieve.
4. Butterfly style lighting

If you place the main light source from above directly behind the camera, the shape of the shadow that is created under the nose will be in the form of a butterfly. It turns out that the photographer is under the light source. This shoot is often used for fasion and glamor shoots to create shadows under the cheeks and chin, and is also suitable for shooting older people because This scheme, unlike others, emphasizes wrinkles the least.

As mentioned above, the light source is installed above the camera just above the model’s eye level, sometimes an additional reflector is placed directly under the chin, basically the model holds it herself. This lighting is better suited for models with a narrow face and prominent cheekbones; for people with a more rounded face, it is better to use loop lighting. For this lighting, window light and reflected light are not suitable; here it is better to use a powerful directional light source, such as the sun or a flash.
5. Wide illumination
Wide lighting is not so much a lighting scheme as it is a lighting style. Any of the lighting patterns above can be done with wide or short lighting.

Wide lighting is lighting in which the subject's face is slightly turned away from the center and the side of the face closest to the camera is illuminated. In this case, the illuminated part of the face has a larger area compared to the shadow side. Sometimes this lighting is used to shoot high key portraits. This lighting makes the model's face wider, hence the name, and is therefore used for models with narrow faces. For people with a wide face, the use of such a sensation is inappropriate.

To create wide lighting, turn your subject's face away from the light source. Remember to light the side of your face closest to the camera.
Short lighting

Here everything is exactly the opposite; you need to illuminate the far side of the face. This lighting is often used for low-key portraits and makes the face appear narrower, which is suitable for people with wide faces.

We turn the model so that the face is facing the light source. The shadow, in turn, will fall on the part of the face facing the camera.
Let's sum it up
Learn to see and create each lighting scheme, then you will be able to apply them freely. Study people's faces to understand which lighting scheme will suit this or that person better, then you can create the mood in the portrait and show the model from the best side.
Of course, it is much easier to work with light sources when they can be moved, but everything is a little more complicated when the light source is the sun or a window, so it is important to be able to move the model in relation to the light source.