Electrical wiring diagram in the apartment
The norms for the power supply of residential buildings in force a couple of decades ago, which determined the wiring diagram in the apartment, meant that the maximum total power consumed by one subscriber of electricity does not exceed 1-1.5 kW. Subsequently, the norms for one-room apartments were increased to 6-10 kW, but they hardly correspond to modern realities: only kitchen electrical appliances can consume two or even three times more electricity ...
- Do I need to change it?
- Wiring methods
- Concealed installation
- Open mounting
- Combined installation
- Which way to choose?
- Wire selection
Do I need to change it?
Today, any human housing is very voracious in terms of electricity consumption - for a small cottage with a total area of less than 200 square meters. m, for example, only the design power consumption is usually at least 20 kW. And this is taking into account the use of modern economical equipment, light sources that are characterized by low power consumption!
High requirements for the load capacity of electrical wiring in new buildings are taken into account already at the stage of project development. The situation is much worse with the old residential sector, which is often several decades old - the standard aluminum wiring at the time of construction does not meet modern requirements at all, and is often simply dangerous. The operation of such premises, especially in houses made of reinforced concrete panels, is practically impossible without a complete replacement of the internal power supply system.
Burnt electrical wiring - consequences of improper load distribution
This pleasure is quite expensive even for one-room housing, requiring specific professional skills from the performer; nevertheless, the wiring in the apartment can well be done by hand - with minimal effort and maximum effect.
Basic requirements for the finished wiring project
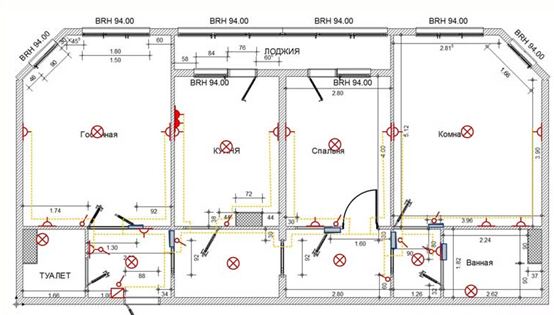
As with any engineering construction work, it all starts with the creation of a project. For intra-apartment power supply networks, this is especially important - electricity, as you know, does not like to joke! Do-it-yourself design begins with determining on the floor plan the locations of electricity consumers (household electrical appliances) and sources of artificial lighting.
In this case, the project should take into account the following points:
- The correct wiring diagram for electrical wires should have a minimum of spatial "overlaps" with other utilities (heating and ventilation systems, water supply and sewerage systems). In theory, there should be no intersections at all.
- In a modern home, especially in the kitchen, there are not many sockets!
- Traditionally, sockets are placed in such a way that they are not conspicuous - for example, they hide behind furniture. It is not so difficult to do this in a one-room apartment with your own hands - but at the same time, prompt access must be provided to all wiring accessories ...
- When installing using junction boxes, it is also necessary to provide free access to them.
- In panel houses, the project should make the most of the voids available in reinforced concrete slabs.
- Do not forget about the safety of using self-assembled electrical wiring - according to the plan, sockets and switches should not be placed in damp or very hot places.
- Lighting a room, especially a large one, with one centrally located chandelier is ineffective - it will be much better, albeit somewhat more expensive, if you add zonal light sources to it. This rule can be violated in one-room apartments, but in rooms with high ceilings, violation is unacceptable.
Wiring methods
The second stage of creating a project is deciding how to make the wiring, taking into account the material from which the building is built. Simply put, according to the plan, the method of installation of wires, sockets, switches, regulators and junction boxes is chosen. There are only three such ways:
- Hidden electrical wiring;
- Open wiring;
- Combined installation.
Concealed installation
Without exception, all branch and main wires are masked in all possible ways - they are embedded in the walls, filled with a concrete screed placed on the floor, laid in the voids of slabs of panel houses, in the presence of suspended ceilings, they are hidden in the ceiling space.
To save on electricity bills, our readers recommend the "Electricity Saving Box". Monthly payments will be 30-50% less than they were before using the economy. It removes the reactive component from the network, as a result of which the load and, as a result, the current consumption are reduced. Electrical appliances consume less electricity, and the costs of paying for it are reduced.
Concealed installation of electrical wiring - embedding wires into the wall
Only sockets - switches and lamps - remain visible in this installation project. Flush-mounted junction boxes are rarely installed - usually the wires from each "point" are brought together into one large switchboard, where they are connected to each other in accordance with the electrical equipment operation plan.
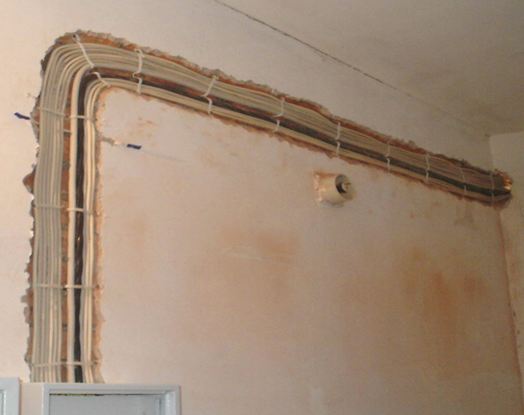
Open mounting
Open wiring, in comparison with hidden, implies the visual accessibility of most of the wires. For decorative purposes and to facilitate installation, they are usually placed inside plastic boxes (other names are electrical boxes, cable ducts), all connections are made in serviceable junction boxes.
An example of exposed wiring
Due to its technological simplicity, this is the most common installation method, however, it requires careful thought over the wire routing plan - if they intersect with each other, then the overlap will be very difficult to "cultivate" ...
Combined installation
Combined installation in projects is used relatively rarely. Its essence is as follows: the bulk of the wires are hidden in the ceiling or underground space. Only descents (from the ceiling) and ascents (from the floor) of wires to sockets, switches and lamps are made visible.
Such a wiring is usually used in utility and utility rooms - in cases where the requirements for the beauty of the interior in the room are minimal.
Which way to choose?
All three types of installation have their own advantages and disadvantages, the following table will help you navigate:
| Mounting type | Where is applied | Advantages | disadvantages |
|---|---|---|---|
| Hidden | In concrete, brick, stone houses, in rooms with sheathed gypsum board, MDF or PVC panels. Very rarely - in wooden buildings. | Does not affect the interior design of the room. If performed correctly, the service life is tens of years. Ideal for studio apartments. | It is very laborious and expensive in execution, it is characterized by an increased consumption of materials. It is done once and for all, after commissioning it is practically not amenable to change. Very low maintainability. There is a high probability of accidental damage during repair and construction work. |
| Open | In buildings made of any material. Most common in wooden buildings. | It is extremely simple in execution, it can be mounted even with your own hands very quickly. Possesses high maintainability. Such wiring can be easily upgraded or altered without much effort. Financial costs are minimal. | It usually fits into the interior with great difficulty. The wiring plan must be thought out very carefully. The wiring is highly influenced by atmospheric conditions. Even when properly assembled, it rarely serves more than 20 years. |
| Combined | In buildings made of any material. Most often it is used in houses made of rounded logs. | Material consumption can be minimized. With the appropriate approach, it effortlessly fits into any interior. In financial terms, not much more expensive than open wiring. | Time consuming to execute. Maintainability is only slightly higher than that of hidden wiring. Modernization lends itself only under certain conditions. |
A little about separate nutrition. Power supply ...
In accordance with modern regulations, a correctly executed power supply wiring diagram must include separate lighting power lines and outlet. Moreover, it is permissible to power no more than four electrical appliances from one outlet line, and no more than five lamps from one lighting line. All powerful consumers of electricity - electric stoves, microwave ovens, washing machines, water heaters - should be connected to the switchboard by a separate line according to the project; each of these electrical appliances - its own, "personal".
In addition, residual current devices (RCDs) must be installed on these outlet lines. All lines, without exception, must be protected by circuit breakers of appropriate ratings.
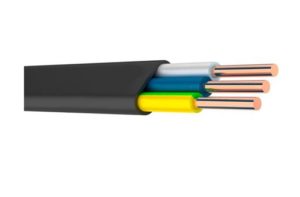
Wire selection
If the electrical wiring in the apartment is done by hand, you should pay special attention to the selection of the brand and cross-section of wires.
 On the domestic market, two types of wire are most common: VVG and PUNP (PUGNP). The main difference between them is not only in the quality of insulation (VVG in this respect is beyond competition), but also in the attitude of manufacturers to the declared technical characteristics of the wires. The fact is that only VVG is manufactured according to strict GOST standards; the diameter and cross-section of the conductors of the PUNP wire are determined by technical conditions that allow a deviation of 20% or even more. In reality, the discrepancy between the declared section and the actual one can reach 50%!
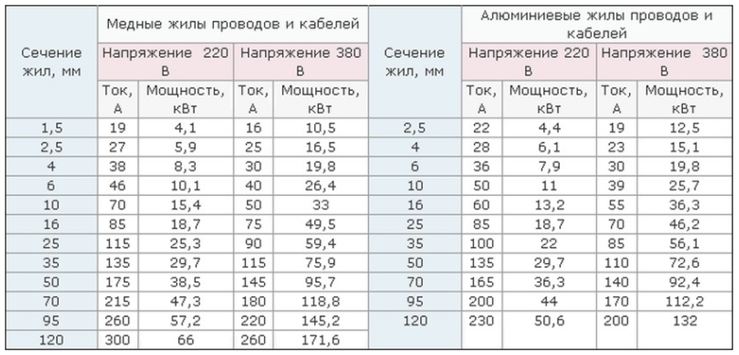
In home wiring projects for a one-room apartment, wires of the following cross-section are usually laid:
- For lighting lines - 1.5 sq. mm;
- For socket lines - 2.5 sq. Mm;
- For lines with increased load capacity (electric heaters, washing machines, electric stoves) and main lines, a wire with a cross-section of at least 4 square meters is used. mm.
Usually, the attitude towards wiring in a residential area is polar: either according to the principle "it will do just that!", Or on the verge of admiration for electricians-wizards. In reality, it is enough just to understand the basics of creating a plan for a home electrical network and remember the points listed above - and replacing the old (or wiring new) electrical wiring with your own hands will be quite feasible.