How to choose and install a shower drain in the floor under the tiles
A quality pallet with a built-in drain system is expensive. But with the performance of the same functions, the shower drain in the floor under the tile will perfectly cope. You can install it yourself, which will save you extra money. This project will be easier to implement after a careful study of this article. There is not only an overview of different designs, but also detailed instructions for installation work.
This special product is designed to remove liquid from the shower floor. It also traps large mechanical particles to prevent clogging. It prevents the penetration of odors from the sewerage system. The following characteristics distinguish a good shower ladder:
- Its appearance is neutral, so it matches the decorative finishes of different styles.
- Coatings and materials have good resistance to household chemicals and cleaning agents. Aesthetic and functional characteristics are preserved for a long time without significant precautions and restrictions.
- The product withstands mechanical loads without damage.
- Its capacity is sufficient for quick draining, so water does not accumulate on the floor.
- There are no unnecessary difficulties during cleaning.
These features can be used when choosing suitable products in the distribution network.

Advantages of a shower cabin without a pallet on the floor
It should be clarified why such a decision really makes sense. Pallets are made of metal or plastic. With a relatively small wall thickness, some models make noise and deform. Such products are produced in certain sizes, which makes it difficult to select the exact match to certain requirements.
The ceramic tile floor drain has the following advantages:
- This design is created in strict accordance with the design features of the environment. It looks appropriate in a certain interior.
- If desired, you can create a small or large cabin, install a seat inside, a “tropical” shower, and other devices. The absence of limiting parameters allows you to make a special shape of the site.
- High-quality ceramics on a concrete base is increased reliability. This design will not collapse after decades of continuous operation. Without much care, it will keep the aesthetic parameters in excellent condition.
- The shower drain itself in the floor under the tiles is installed in such a way that it does not experience any unnecessary influences.

Related article:
This is a suitable option for finishing the surfaces of walls and floors in rooms with a high level of moisture. Useful recommendations will allow you to choose the right material and avoid many mistakes.
Different types of shower drains and shower drains
For a better understanding of the principles of operation, it is necessary to study in detail the typical design.
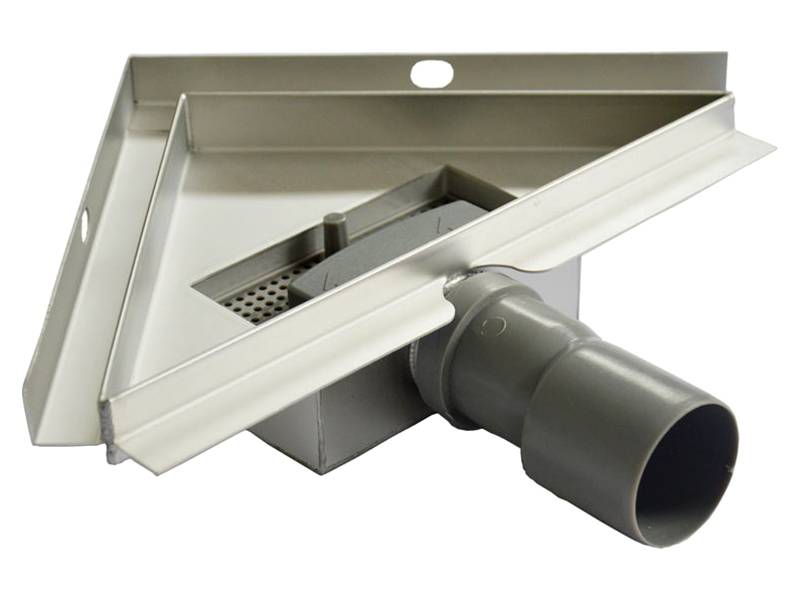
- The grate is made of durable stainless steel. It is not subject to corrosion, able to withstand heavy loads.
- The rubber seal is embossed. Rings can be cut off. This process allows you to set the desired neck height in 4-5 mm increments.
- The inlet is closed with a plastic cover so that during construction the sand-cement mixture and other hard-to-remove contaminants do not get there.
- The presence of a ball joint with a hermetic seal at the outlet helps to install the butt joint with a sewer very accurately.
- The specified pipe diameter and other components of the product provide good performance (0.8-1 l / s). With the taps fully open, water will flow into the drain system without delay.
Notes are included in the following figures to explain the operation of the dry shutter system.
Drains 1 and 2 differ in the type of connection to the drain system, horizontal and vertical. The latter option implies the best performance. But for this it is necessary to bring the pipes in an appropriate way. The number 3 indicates the "slotted" ladder. In it, the lower part is identical, but the liquid collection area is significantly increased.
On a note! When using a long grate, it is allowed to slope the bottom of the shower in only one direction.
Where is the shower drain installed in the floor under the tiles?
Depending on the installation site, you will have to create a floor with a different slope.
Ladder installation
The easiest way is to install a shower drain in the floor under the tiles when building a private cottage. In this case, you can consider different options at the design stage. For maximum performance, a vertical outlet to the drainage is used. Apply point and slot systems as needed.
It is more difficult to implement a project in an apartment building. To ensure uninterrupted functionality of the drain, it is necessary to create a slope of 25 to 35 mm per meter. For a standard size bathroom, this means raising the floor by 10-16 cm and reducing the height of the ceiling accordingly.
Below is the technology for installing a shower drain in the floor under the tiles:
Picture Actions First you need to make a markup. The ladder is installed in the right place, at a height that ensures that the above conditions for good drainage are met. You should add the height of the glass. In this example, it is 12 mm. When choosing the mounting point, take into account the dimensions of the ceramic tiles. It is best if you get a multiple of their distance so as not to trim. We must remember about the seams between the hotel elements. To maintain the exact distance (for example, 2.5 mm) will help special mounting devices, plastic crosses. To drain towards the drain from the farthest point of the shower floor, you need 14 mm. Mark the appropriate value. In the example, the value obtained is 21.5 cm. This is the total thickness of the layers that will be successively installed above the floor slab between floors. It is not advisable to make this gap monolithic. There is enough space for installing additional thermal insulation. If possible, water or electric heating can be installed here. This example uses a simple solution. The lower layer is formed from expanded clay concrete (11-12.5 cm). It is durable and inexpensive. Before pouring, a damper tape is installed around the perimeter, and polyethylene foam (4 to 5 mm thick) is laid on the concrete base. Formwork is made from cutting boards, drywall, and other improvised means. In this case, the load on it will not be excessive. Formwork can be removed after 24 hours. At this stage, you can try on the body of the drain and the tile, check the accuracy of the choice of the installation point. Next, polystyrene foam (4-5 cm) is laid. You should purchase quality products from a reliable manufacturer with a density of 35 kg per 1 cubic meter. and higher. Such plates have sufficient strength and low thermal conductivity. With proper installation, even without additional means, good tightness will be ensured. Expanded polystyrene is cut off effortlessly with an ordinary clerical knife. Therefore, the fitting of individual elements to the shape of a particular space will be done accurately. In polystyrene foam make the necessary cutouts. After - install trapiki to drain the water, connect the drain to the sewerage system. The holes between the parts of the structure are filled with mounting foam. For the next step, a special device is needed. This is a set of rails and a ring element with plastic grooves. Each of the guides is created with a variable height. They are installed with a bevel towards the drain. The screed is poured at these levels. This will ensure an optimal height change (about 10-11 mm per 1 m of floor length). It will be enough to quickly move the liquid, but there will be no feeling of discomfort due to an uneven surface. During filling, the final level is controlled. It should turn out below the ladder by the total thickness of the adhesive and ceramic tiles. Do not remove plastic parts from the solution. They will perform the functions of expansion joints that prevent the destruction of the structure when the temperature changes. For laying use tiles that are resistant to high humidity. Its installation starts from the drain and further - to the walls. This technique will help to minimize errors and limitations of certain sizes. Cut tiles near the walls will be less visible than in the central area. Small tiles (mosaic) are better suited for such projects. With such products, it is easier to create the correct slope in the right directions. The cut parts at the joints look less noticeable. The gaps between ceramic tiles are rubbed with specialized mixtures of the desired color. The gap between the plastic drain body and the finish coat will be filled with a water-resistant sealant. At the last stage, the temporary plastic cover of the drain with a dry shutter for the shower is removed, and the grate is installed. After - check the performance of the system.
Article