Novice photographer where to start training. With these recommendations, learning photography starts from scratch. What is a diaphragm?
This article is intended primarily for those who first came to the site with the desire to learn how to take pictures. She will act as a kind of guide to the rest of the materials on the site, which you should pay attention to if you suddenly decided to "pump" your skill as a photographer.
Before listing the sequence of your actions, I will say that photography consists of two large areas - technical and creative.
Have you ever tried to be a disaster? Believe me, manual photography is extremely simple, anyone who has the desire and passion for getting good photos can get it. Everything is based on 2 or 3 elements that need to be adjusted in the camera, and this should already begin.
From there, the photographic possibilities are endless. One of my main goals on the photographer’s blog is to photograph the photographer on foot. For me to “bring” something should make it accessible to everyone. Manufacturers write them in the most inaccessible and gentle way. They don't seem to want us to read them. But we must also be fair: we cannot complain that we don’t know how to use something until we refuse to even open the instruction manual. However, you do not need to read the manual from top to bottom.
The creative part is born of your imagination and vision of the plot.
The technical part is a sequence of button presses, a choice of a mode, setting of shooting parameters in order to realize a creative idea. Creative and technical photographs cannot exist without each other; they complement each other. The proportion can be different and depends only on your decision - which camera will you photograph (DSLR or smartphone), in which mode (auto or), in which format (), will you later or leave it as it is?
For the first few days of using the camera, try looking at the pages that you see are relevant, those related to manual mode. Believe me, if you haven’t read or consulted with any of the five options above, just shooting in manual mode, one after the other, just don’t move to the right, you take pictures there every day, every time you give, give it to please view your results and change some settings to see the difference between one result and another, believe me, only after that you can do a great job with manual mode.
Learning to take pictures means learning to determine which work you will do on your own, and which - trust technology. A real photographer is not the one who shoots only in manual mode, but the one who knows and knows how to direct the technical capabilities of the camera in the right direction and get the result that he planned to get.
Understanding the word "Photography"
This is the “zero” level, without mastering which it makes no sense to move on. Photography is "drawing with light." The same object in different lighting looks completely different. Light is relevant in any genre of photography. If you know how to catch an interesting light, take a beautiful shot. And it doesn’t matter what you have in your hands - an amateur compact device or a professional DSLR.
In fact, the principle of manual mode in photography is very intuitive, and discovering it yourself by practicing photography every day is often a very rewarding experience. Many have invested heavily in a good SLR camera, to which they give full automatic use, as if a compact digital camera were involved. This is because at first we want to buy a good camera, and we chose a SLR camera, but as soon as we hold it in our hands, we respect a little, both buttons, so many acronyms and technical terminology.
The choice of technology
For training in photography, it is absolutely not necessary to purchase expensive equipment. Now amateur technology has developed so much that with a large margin it meets the requirements of not only amateurs, but also advanced photographers. It makes no sense to strive to buy the most modern model of the camera, since everything that is needed for high-quality photography in cameras appeared 10 years ago. Most of the innovations in modern models to photography are only indirectly related. For example, a huge number of focus sensors, Wi-Fi control, a GPS sensor, an ultra-high resolution touch screen - all this improves usability only, without affecting the quality of the result.
How to take a picture with a reflex camera? Some practical examples
They are designed to take photos automatically and during periods. If you feel identified with the previous paragraph, continue reading the rest of the article. Today we will get rid of this fear of our SLR camera. You will see how easy it is to use it manually or semi-annually as soon as we understand its operation.
Your first SLR camera
Not for this, the photos will be of poor quality. On the contrary, the one created for beginners makes the task easier.
What is your SLR camera
The first step to losing fear of the SLR camera is to know what it is made of. The body is the camera itself, with all its components, except for the lens or lens, which are separated and that are interchangeable. For SLR cameras, there are an unlimited number of lens types. There are more varieties, but the most common is that.I do not urge to buy "junk", but I recommend a more sober approach to the choice between the new product and the camera of the previous generation. Prices for new items can be unreasonably high, while the number of really useful innovations may not be so great.
Introducing the basic camera features
It is advisable to be patient and study the instructions for the camera. Unfortunately, it is far from always written simply and clearly, however, this does not eliminate the need to study the location and purpose of the main governing bodies. As a rule, there are not so many controls - a mode dial, one or two dials for setting parameters, several function buttons, a zoom control, an autofocus and shutter button. You should also study the main menu items to be able to configure things like, image style. All this comes with experience, but over time there should not be a single incomprehensible item in the camera menu for you.
Available modes on the camera
Just turn on our camera and take a picture to select a mode. Most, if not all, SLR cameras offer the following modes. With automatic and predefined modes, we can only take ordinary photos, usually good ones, but nothing impressive. If we want to go a little further and get a great, impressive, original and outstanding photo, we will need to take control of our camera and tame it so that it can control it as we please. The difference between automatic and manual modes is to leave the plane on autopilot or pilot it manually.
Exposure exposure
It's time to take the camera in your hands and try to portray something with it. First, turn on auto mode and try to take pictures in it. In most cases, the result will be quite normal, but sometimes the photos for some reason are too light or, on the contrary, too dark. It's time to get acquainted with such a thing as. Exposure is the total luminous flux that the matrix caught during the shutter release. The higher the exposure level, the brighter the photo. Photos that are too light are called overexposed, too dark are called underexposed. You can manually adjust the exposure level, but you cannot do this in auto mode. In order to be able to “turn up or turn down the brightness”, you need to switch to P mode (programmable exposure).
Update. We have already published the next chapter of this series of basic dedications in the use of SLR cameras, this time: on. Perhaps you recently bought it, it was provided to you or you have it for some time, but you never thought about enjoying photography. It is clear that with your new camera you can do much more than anecdotal or souvenir photos. Moreover, if you are serious about learning, you can connect to photography more than you think right now.
For all those new to digital photography, the hands of a digital SLR camera who want to learn how to take good photos and express something with them, here are some tips based on an amateur experience. Of course, automatic modes are more convenient. But with automatic modes, the camera software decides which photo to take without knowing what it is actually taking, or what you want to express with it. However, manual mode is used for complete control over your photos and for exploring the photo.
Programmable exposure mode
This is the simplest “creative” mode, which combines the simplicity of auto mode and at the same time allows you to make an amendment to the operation of the machine - to make photos forcibly lighter or darker. This is done using exposure compensation. Exposure compensation is usually used when either light or dark objects predominate in the frame. Automation works in such a way that it tries to bring the average exposure level of the image to 18% gray tone (the so-called “gray card”). Please note, when we take more bright sky in the frame, the earth turns out to be darker in the photo. And vice versa, we take more earth into the frame - the sky brightens, sometimes even whitens. The exposure compensation function helps to compensate for the departure of shadows and lights beyond the borders of an absolutely black and absolutely white tone.
You cannot study photos with automatic modes! It is necessary to control the exposure parameters, make a mistake a thousand times, spoil a lot of photos and learn from it. Practice until you get good results, even if it means that you lose a lot of photos along the way.
Focus on learning the basics
Soon you will find something that many people don’t know about, and the fact that processing the camera using these modes is almost as simple as automatic mode and allows you to get the results you want to achieve. Your camera has many buttons and manual pages. However, many things are initially free, and it is worth progressing gradually and orderly. Start with the important, and leave the rest for later that there is no rush.
What is a shutter speed?
No matter how good and convenient, alas, it does not always allow you to get high-quality photos. A vivid example is shooting moving objects. Try to go outside to take pictures of cars passing by. On a bright sunny day this is most likely to succeed, but if the sun sets behind the cloud, the cars will turn out to be slightly blurry. Moreover, the less light, the stronger this blur. Why is this happening?
Moreover, to know how to leave them in their original configuration and not change them. On most cameras, if you press the shutter button halfway, the camera focuses on what is at the focus point. Leave the trigger in this position until you publish it and finish shooting. Try to keep this practice with every photo you take and get used to decentralizing the main subject of the photo. Forget about advanced options, image styles, print buttons, focus modes, endless menus, bracketing, flash compensation, etc. the composition itself is important, although it is not controlled by a single button. Do not leave the main subject of the photo centered on the image. Describe this a bit, trying to balance with the rest of the elements. If you propose this as a basic principle in all your photographs, you will soon notice big differences in them. Learn to focus and redraw. . Using the flash is not prohibited, and even more so.
The exposure of the picture occurs when the shutter is opened. If fast-moving objects fall into the frame, then during the shutter opening they have time to shift and turn out to be slightly blurred in the photo. The time for which the shutter opens is called shutter speed.
Exposure allows you to get the effect of "frozen motion" (example below), or, conversely, to blur moving objects.
Moreover, it is a very useful resource for certain photos. But initially it’s better to forget that it exists. Your camera’s flash always shoots at the appropriate intensity, so this particular photo displays well. However, the light that it casts is ugly, tough and artificial, and in very rare cases it really needs to be used.
It is also important to know the minimum shutter speed with which you can shoot as much light as possible without jitter. Your photos will be more natural and aesthetic. Just use the flash later, and only when you want to change the lighting of the scene for aesthetic reasons, if you have a separate flash, you can bounce, shoot from the outside of the camera or at least soften the diffuser.
The shutter speed is displayed as a unit divided by some number, for example, 1/500 - this means that the shutter opens by 1/500 of a second. This is a fairly short shutter speed, in which traveling cars and walking pedestrians will be clear in the photo. The shorter the shutter speed, the faster the movement can be “frozen."
If you increase the shutter speed, say, to 1/125 of a second, pedestrians will still be clear, but the cars will already smear noticeably. If the shutter speed is 1/50 or longer, the risk of getting blurry photos due to photographer’s hand shake increases and it is recommended to mount the camera on a tripod , or use an image stabilizer (if any).
What shooting mode to choose?
Do not take 10 photos of the same scene. Try to make one or two at best, but make them good. Although it’s very tempting to take a lot of photos, so be that as it may, some of them will work out well, as the months pass, you still need 10 shots to get a good photo.
What you need to know about focus
It is advisable that you be forced to make no more than one or two pictures of the scene, from which you can find out that you failed if they didn’t do so, to make 20 of which only one was saved by chance. When you take a good photo by accident, ignore those who did wrong and why they did wrong and don’t recognize anything the next time. When one, without using the camera correctly, takes a bad photo, which could be good, he can take advantage of the situation to learn from her mistake and not stumble upon it again.
Night photos are taken with a very long exposure of several seconds and even minutes. Here it is already impossible to do without a tripod.
To be able to record shutter speed, the camera has a shutter priority mode. It is referred to as TV or S. In addition to a fixed shutter speed, it allows you to use exposure compensation as well. Exposure has a direct impact on the exposure level - the longer the shutter speed, the brighter the photo.
Get to know the software
Seeing good photos can be a source of inspiration or even see what you could do if you dumped this hobby. Do not give in to the light impression and try to attach more importance to what you like than to what impresses you, not knowing how to achieve it.
Be humble and try not to stop learning
As much as you want to avoid this, it will soon begin to increase your ego exponentially, believing in a very short time that you have an innate talent.What is a diaphragm?
Another mode that may be useful is aperture priority mode.
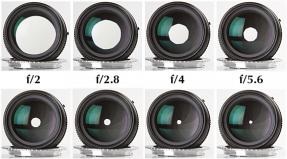
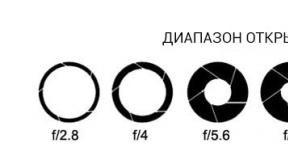
Diaphragm- This is the "pupil" of the lens, a hole of variable diameter. The narrower this aperture, the larger DOFis the depth of the sharply depicted space. The aperture is indicated by a dimensionless number from a number of 1.4, 2, 2.8, 4, 5.6, 8, 11, 16, 22, etc. In modern cameras, you can select intermediate values, for example, 3.5, 7.1, 13, etc.
These compliments in many cases come from other amateurs who also begin, whose criterion can be very controversial, and the main motivation for writing which is to receive a comment from your respondent. It is not possible that in a few weeks or months you have developed a style, or you have reached the zenith of your training. It is much better to enjoy all this with some humility, giving the social communities of the Internet the meaning that they have, but nothing more, and avoid sows in the style, process or type of photo, but it’s amazing and shocking about your contacts.
The larger the aperture value, the greater the depth of field. Large depth of field is relevant for when you want everything to be sharp - both foreground and background. Landscape is usually shot with an aperture of 8 or more.

A typical example of photography with a large depth of field is a zone of sharpness from grass underfoot to infinity.
Don't think about photographic equipment anymore.
Take photos that you like, not those that will have the greatest impact among those around you. That your main criterion is not public recognition! With your new SLR camera, lens, battery and memory card, you will have more than enough to start learning and take great photos for a long time. You don't need a better camera, no lenses, no flash, no tripod or anything else. Experience, with months or years, will tell you what you are missing.
The meaning of small depth of field is to focus the viewer's attention on the subject, and to blur all the background objects. This trick is commonly used in. To blur the background in the portrait, open the aperture to 2.8, 2, sometimes even to 1.4 - the main measure is to know, otherwise we risk to blur a part of the face.
Small DOF is a great way to shift the viewer's attention from the colorful background to the main subject.
To control the iris, you need to switch the command dial to the aperture priority mode (AV or A). In this case, you indicate to the device with which aperture you want to photograph, and he selects all other parameters himself. In aperture priority mode, exposure compensation is also available.
The aperture has an inverse effect on the level of exposure - the larger the aperture value, the darker the picture is taken (a clamped pupil transmits less light than an open one).
What is ISO sensitivity?
You have probably noticed that sometimes ripples, grains or, as it is also called, digital noise is present in photographs. Noise is especially pronounced in photographs taken in low light. For the presence / absence of ripples in photographs, such a parameter as iSO sensitivity. This is the degree of susceptibility of the matrix to light. It is denoted by dimensionless units - 100, 200, 400, 800, 1600, 3200, etc.
When shooting at a minimum sensitivity (for example, ISO 100), the picture quality is the best, but you have to shoot with a slower shutter speed. With good lighting, for example, in the afternoon on the street this is not a problem. But if we go into a room in which there is much less light, then we won’t be able to shoot at the minimum sensitivity - the shutter speed will be, for example, 1/5 of a second, and the risk is very high ” move", So called because of hand trembling.
Here is an example of a photograph taken at a low ISO with a slow shutter speed:
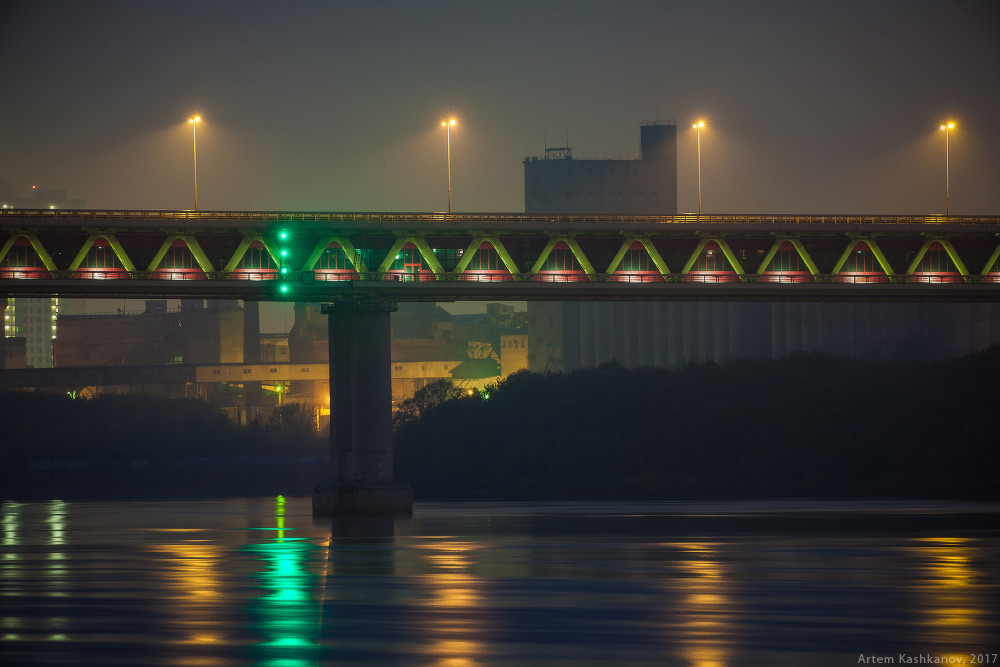
Please note that the excitement on the river blurred in motion and the impression was that the river was not ice. But there is practically no noise in the photo.
To avoid “shaking” in low light, you must either increase the ISO sensitivity in order to reduce shutter speed to at least 1/50 second, or continue shooting at a minimum ISO and use. When shooting with a long exposure tripod, moving subjects appear very blurry. This is especially noticeable when shooting at night. ISO sensitivity has a direct impact on exposure. The higher the ISO speed, the brighter the image will be when the shutter speed and aperture are fixed.
The following is an example shot taken at ISO6400 late in the evening on a street without a tripod:

Even in web size it is noticeable that the photo turned out to be quite noisy. On the other hand, the effect of grain is often used as an artistic technique, giving the photograph a “film-like” look.
Relationship between shutter speed, aperture and ISO
So, as you probably already guessed, three parameters influence the exposure level - shutter speed, aperture, and ISO sensitivity. There is such a concept as “exposure step” or EV (Exposure Value). Each next step corresponds to an exposure 2 times larger than the previous one. These three parameters are interconnected.
- if we open the aperture by 1 step, shutter speed is reduced by 1 step
- if we open the aperture by 1 step, the sensitivity decreases by one step
- if we reduce shutter speed by 1 step, ISO sensitivity increases by one step
Manual mode
In manual mode, the photographer has the ability to control. This is necessary when we need to firmly fix the level of exposure and not allow the camera to show "amateur". For example, darken or brighten the foreground when more or less sky falls into the frame, respectively.
Author - Artem Kashkanov
With the advent of digital and SLR cameras available to the general public, photography has become a very common hobby and even a source of income for many people, so more and more people are wondering how to learn to take pictures. We will tell you what you need to do to reach a level higher than just shooting family feasts and photos with attractions.
Start with the basics
Learn the basics of photography, which include knowledge about composition, exposure, shutter speed, aperture, photosensitivity, etc. Information on this can be found in specialized literature or on Internet resources. We suggest watching the following video about the basics of photography.
Understand what features your camera has and how it works - read the user manual.
You need to learn how to hold the camera correctly. Usually they hold the carcass of the camera with their right hand, the index finger is within reach of the shutter button, and the lens is supported from below with the left hand to avoid shaking.
Genres of photography
The main genres include such as landscape, portrait, still life, reportage photography. Starting to take pictures, decide which genre you like best and develop in this direction.
Scenery
When looking at a good landscape shot, the viewer should have an understanding of what made the photographer stop at this frame and take this landscape.
Portrait
The most attractive subject was and remains a person. Ideally, the task of the portrait photographer is not just to show the person, but to learn how to convey his image, mood, inner world.

Still life
This genre is designed to present various household items and art in an elegant form. And by depicting objects belonging to a particular person, you can reveal his inner world and character.

Report photo
The photo story is intended to capture the natural course of an event, enclosed in a certain time frame. Such a shooting implies the absence of a production; as a rule, a report is taken offhand. You can rent concerts, holidays, sports and much more.
Tips for a novice photographer
A good photographer always thinks before pressing the shutter button, so everyone who wants to learn how to take pictures, regardless of the chosen genre, is advised to pay attention to the following recommendations:

To learn how to take pictures, you need constant practice. Shoot every day. Take your camera with you everywhere and do not miss the opportunity to capture the moment you like.
At first, you can photograph at least everything in a row, but after you get used to the camera, do not wait for a good story to come to hand - look for this story. When an idea arises in your head, find a way to translate it.
These tips are useful for those who want to learn how to take pictures for themselves, and those who want to take a photo