What is time lapse? Timelapse - how to shoot or frame-by-frame in examples
Timelapse - this is sequentially taken, with a certain interval, photos, summarized later in the video.
Creating a time-lapse includes two and a half stages:
- Directly shooting.
- Post-processing and video mixing.
- The publication of his masterpiece in the video repositories, in order to boast to relatives, friends and acquaintances.
Currently, almost all SLR and mirrorless cameras, the latest generation compacts, and even some smartphones have the “interval shooting” function. So, for some time they postponed the article and opened the instruction of their device in search of the treasured function.
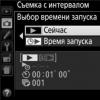
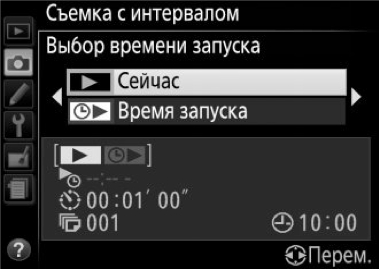
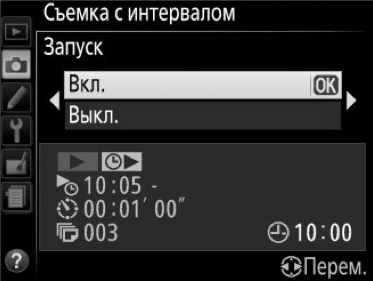
I will show it on the example of my Nikon D5200 camera. Select this function:
Then we determine whether we will begin to take pictures right now or at a specific time. The second item is usually used when you have the exact time of sunrise and sunset on your hands. Most often they use the first item - since we’ve come out to do a time-lapse, now we’ll click.
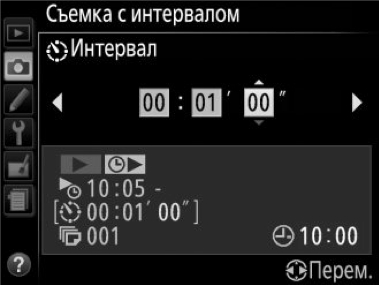
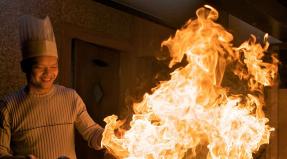
- From personal experience:1 second interval is most suitable for the movement of people, cars, trains, etc. An interval of 2 seconds is more optimal for cloud movement. Longer intervals in timelapse are very rare, although I have come across such ones. For example, surveying the movement of fog over a river used an interval of 28 seconds.
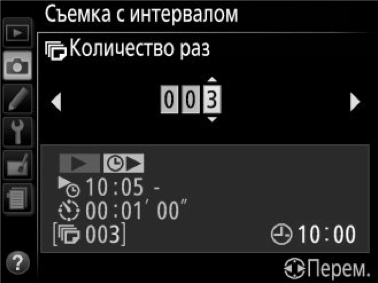
The next window asks how many shots we want to take. The calculation for this window is simple. Let's say we want to make a 10-second time-lapse movie with a frequency of 24 frames per second. Accordingly: 24 x 10 \u003d 240 frames. This is the figure we set in this window.
Well, and finally, the final window is the launch itself. If you select the “Now” option, shooting will start 3 seconds after clicking on the “OK” button.
So, I think that you have already studied the instructions of your device. And, if you have detected the “interval shooting” function, you can breathe calmly. But what if your camera is “not trained” in this?
Two options are possible here:
- Buy a little thing called INTERVALOMETER. And it does not have to be “branded” at all. Now the Chinese market supplies such a device, for almost all camera models at a very reasonable price of 20-25 euros. In general, for comrades whose hands grow from where they should, on the Internet you can find many options for homemade intervalometers.
- This is an “alternative firmware”. The thing is that the manufacturers of devices, to reduce the cost of production, use the same chips and software in different models at a price, simply making a number of functions unavailable in cheaper models. So, by installing an alternative firmware, for example, on your compact disc, you can make it shoot not only at intervals, but also get a number of useful functions: shooting in RAW format, creating HDR, etc., down to simple toys and reading electronic books. Owners of Canon can easily find alternative firmware for their models on the Internet. But the owners of cameras of other companies will have to make an effort in the search, but I saw alternative firmware for Nikon, and for Sony, and for Samsung.
This is how professionals go to time-lapse surveys.
But we are simple people, so let's get by with a minimum. All we need is a camera and a good tripod. By the word “good” I mean tripods that do not swing from the light breeze and do not flinch on all three legs after each click of the shutter.
Static timelapse looks “dull”. Therefore, a large number of various devices (sliders) were created that move the camera from picture to picture. But their prices ... Below in the article, when we analyze the post-processing, I will show how you can simulate the movement. However, we will not spend a penny from our budget.
So, we got to the bosom of nature, to the roof, to the observation deck, to the side of the road. They installed a tripod, placed the apparatus on it, and chose the angle. Now is the time to talk about the camera settings.
The parameters listed below are optional and are described here more in order to make your life easier and try to avoid elementary errors.
- From personal experience:Be careful when taking time lapses from the side of the road. For some reason, all motorists passing by think that they are photographing them with their lovers or lovers.
We transfer our camera to the “M” mode (manual), i.e. fully manual installation. This is done in order to ensure that all time-lapse frames are the same, not prone to any cataclysms (for example, the sun has set behind a cloud), and to avoid flickering when viewing.
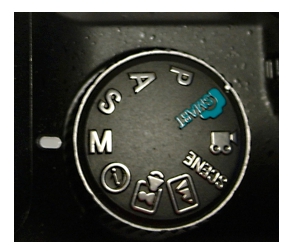
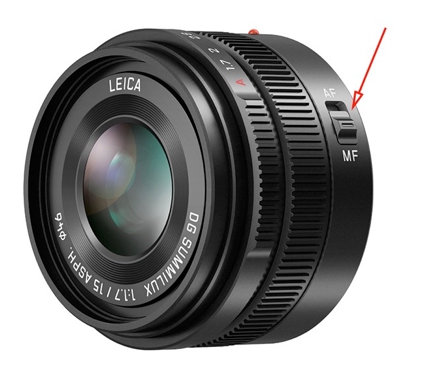
If your lens has a switch between manual and auto focus, do not forget to set it to “M” mode too
ISOIf set to AUTO, then switch to a specific value. I won’t discover America if I recommend low values \u200b\u200bof 100-200. However, I met night time-lapses of ISO values \u200b\u200bwhich reached up to 1600. Modern devices have high-quality noise reduction, so at high ISO values, do not forget to turn it on.
Wb. The white balance also needs to be switched from the AUTO value to a specific value (“sun”, “clouds”, “shadow”, etc.). Otherwise, in automatic mode, the unit may make small white balance shifts that, when viewing a finished video, will flicker.
ExposureFor daytime shooting, short and ultra-fast shutter speeds are desirable. The sharpness of moving objects is the “trick” that distinguishes time-lapses from video. But for night shooting can be used and quite slow shutter speeds. For example, when you want to show not the cars themselves, but only the track of the headlights and turn signals.
JPG or RAW? In what format to shoot? There is no definite answer to this question. Many recommend it in the RAW format, explaining this by the fact that later in the post-processing phase, you can fix the flaws, “stretch” the details. Their opponents are camera owners with old slow processors and slow memory cards, the JPG file is much smaller in size. With good coverage, I did not notice any difference in the final result of the time-lapse. If you are shooting in JPG format, pay attention to the compression and size of the image. Compression should be set to minimum (“Excellent” or “Fine” quality). The final video size is 1920 x 1080 pixels. In order to have a “backlash” during processing (cropping unnecessary, simulating movement, correcting perspective, etc.), it is not advisable to set JPG sizes lower than 2500 x 1500 pixels.
The camera is on a tripod, the settings are made, the focus is manually adjusted - now is the time to start the “interval shooting” function (or turn on the intervalometer). We ourselves can now smoke, drink coffee or just relax.
As we have already calculated, for a 10-second clip with a frequency of 24 frames / sec, we need to make 240 frames. With an interval of 1 second, the shooting time will take 4 minutes (240 frames divided by 60 seconds). With an interval of 2 seconds, respectively 8 minutes, etc.
- From personal experience: Do not go far from the apparatus during shooting. There will always be passers-by who will definitely look into the lens - “and what does he click on there on his own?”
Phew! With the shooting finished! We came home and first of all, dumping the results of our work on the computer, do not forget to put a series of pictures for each time-lapse in a separate folder.
Timelapse is an intermediate state between photography and video. And if before the post-processing was carried out exclusively in video editors (Adobe Premiere Pro, Sony Vegas Pro, etc.), now it is available in Adobe Photoshop, starting with version CS6. Here I will show the post-processing using the example of the Russian-language Adobe Photoshop CC 2014.
Open the program, select the menu: File - Create ... In the dialog box, in the Set drop-down list, select “Movies and Videos”, and in the Size list - “HDTV 1080p / 29.97”. In general, this is not necessary and you can enter all the parameters yourself; I just, for example, like the prepared guides for the screen in this template.
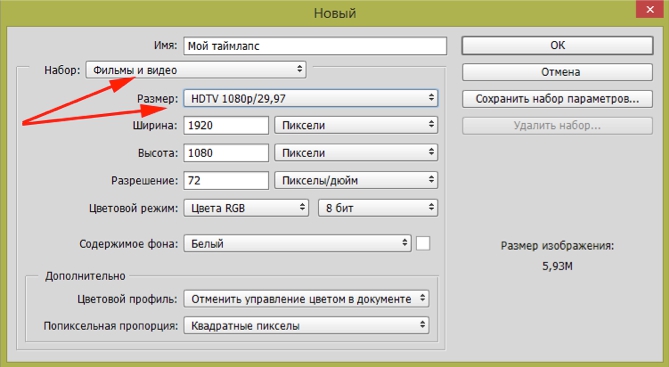
And a little bit more about time-lapse standards. “De jure” they are not. So you can choose a 720p template (just for training; if you have a slow computer; or if I like it more). Standards for de facto timelaps are as follows: dimensions - 1920 x 1080 pixels, frame rate - 24 per second, video compression - codec H264.
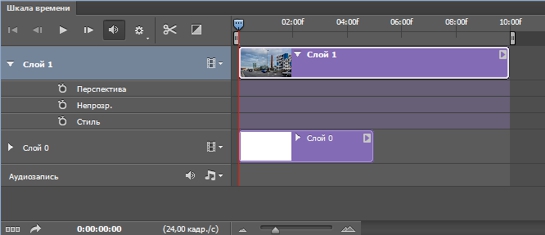
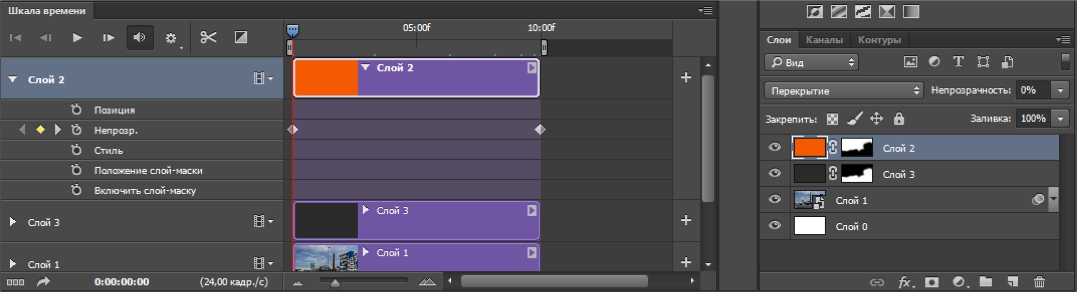
Next, go to the menu: Window - Timeline. At the bottom there is a panel for working with videos and animated GIFs. Click on the button Create a timeline for the video.
Working in Photoshop’s with photos, few people accessed this panel. So let's get to know her quickly.
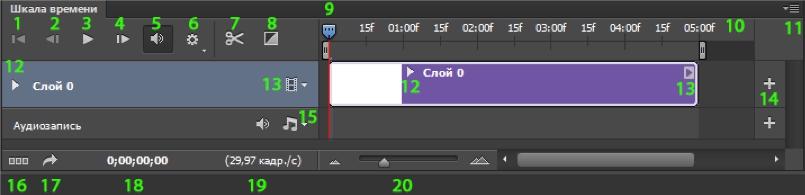
- Return to first frame
- Go to previous frame
- Start video playback
- Go to the next frame
- Sound attenuation
- Setting the video playback quality at the creation stage. Does not affect the final quality of the video
- Scissors. Cut video or audio parts
- Effects of transition from one video to another
- A slider indicating which part of the file is currently displayed on the screen (you can also drag it manually)
- Scale of seconds and frames
- Drop-down menu of this panel
- This triangle opens up additional possibilities for creating effects by key frames (we will use it later to create the effect of the slider)
- Additional menu for working with video
- Use to add video or audio parts to the same track. It makes sense when creating a slide show and is not at all acceptable for timelapses if we want to use button 12
- Menu for working with audio, also serves to add the audio track itself
- Button to convert video to frame-by-frame animation
- Invokes the export (create) video dialog box.
- Exact time (to frame) where the slider is currently located
- Frame rate indicator
- Scale for increasing / decreasing the video part in the panel
While sclerosis has not been tortured, it's time to change the frame rate, which was on the template (29.97), to a more standard 24 frames per second. We go to the menu of the time panel (button No. 11) and select Set frame rate on the timeline ... In the dialog that appears, select a frame rate of 24 and click OK.

Well, now that we’ve got acquainted with the video panel, we’ll move on to the most interesting, direct creation of our time-lapse. We go to the menu: Layers - Video layers - New video layer from a file ... As a result, the standard file selection dialog box opens. We are looking for our folder with time lapse photos and select the very first file. And click the Open button.
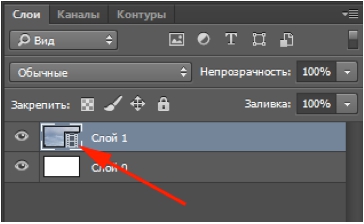
And now we already see that a new layer with a film icon is created in the layers palette. Those. A set of our photos is assembled in a video sequence. True, there was one “hitch”. Due to the fact that initially the size of the photos exceeded the size of the finished video, then, of course, everything did not fit. To transform, we need to first convert this layer into a smart object.
To do this, go to the menu: Layers - Smart Object - Convert to Smart Object. Now the order! Press the key combination Ctrl + T to transform and reduce to the required size, do not forget to press the Shift key to save the proportions.

Do not reduce the size in width to the size of the frame, leave a small piece. It is due to it that we will imitate the movement of the device along the slider.
In general, if everything satisfies us, we can end this with processing and proceed to rendering to get a ready-made time-lapse. But that’s why the time-lapse processing in Photoshop’s is good, which allows us to make the most incredible corrections of color, shape, noise reduction, etc. It is especially pleasing here that we will do all this with a smart object, i.e. no matter what we think of source files (photos) here, they will remain untouched.
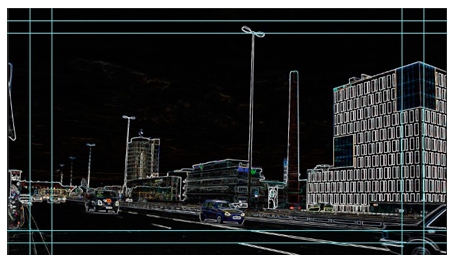
In addition, all the filters applied to the smart object can be recalled by clicking on them in the layers palette and adjusting what does not suit you in them. If you want to make it original, the Filter Gallery is at your service. Here is an example of applying the Edge Glow filter. Well, isn't it original?
Personally, I like the Camera Raw filter, which appeared in Photoshop CC and allows you to process JPG files in the same way as RAW’s. In it, I saturate the color of the clouds, suppress digital and color noise, correct the perspective, change the temperature of the image and much, much more. If you like to do all this with the help of other filters and tools - do it! Photoshop allows this.
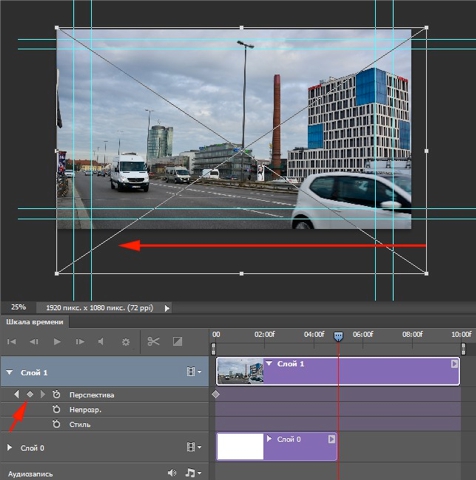
Finally, we got to imitate the movement of the camera on the slider. Photoshop allows you to do this in two ways: the first is completely automatic (so if we have a fantasy going on, it will limit it) and the second is arbitrary (this is where you can go for a walk).
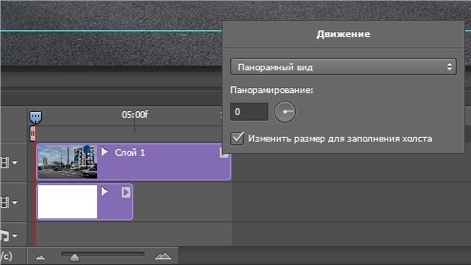
Let's start with a simple one. When we studied the Video panel, at the end of the video layer (under No. 13) there is a triangle, by clicking on which we will call up the “Motion” dialog box. In the drop-down list, select “Panoramic view” and indicate the number of degrees. 0 ° - the clip will move from right to left, 180 ° from left to right. Another number of degrees will make the clip move along an inclined, or generally vertical (-90 ° and 90 °, respectively).
But if we want our clip to move horizontally first, then vertically, and finally turn upside down, then we can’t do without the second way. On the video panel (under No. 12) there are triangles, by clicking on which we get access to key frame management.
Keyframes are fixed values \u200b\u200bfor position, opacity, style, etc. Everything that is between them, the program automatically smoothly transfers from one to another.
To create a keyframe, you must first set the slider (No. 9) to the desired location. After that, click the stopwatch icon and change to the value we need.
Let's look at a specific example. Our slider is set to the position of the first frame. Click the stopwatch icon in the line “Perspective”. The first keyframe was created.
Move the slider, say, to the position of 5 seconds. After that, we shift our picture to the left to the border. A second keyframe is automatically created. For a period from zero to fifth seconds, Photoshop will smoothly move the picture from right to left.
Now move the slider, for example, to the position of 7 seconds and move our picture up. A third keyframe has been created.

So, between zero and fifth seconds, the image moves from right to left, and between the fifth and seventh seconds, from bottom to top.
In fact, time lapse does not imply audio accompaniment. But we do for ourselves loved ones.
In the video panel in the audio recording line, call up the menu (button No. 15) and select Add audio file.

Well, and finally, let's portray the “zoom in" of the camera. Set the slider to the very end, press the key combination Ctrl + T, and holding Alt + Shift proportionally increase our image. Press Enter. Last keyframe created.
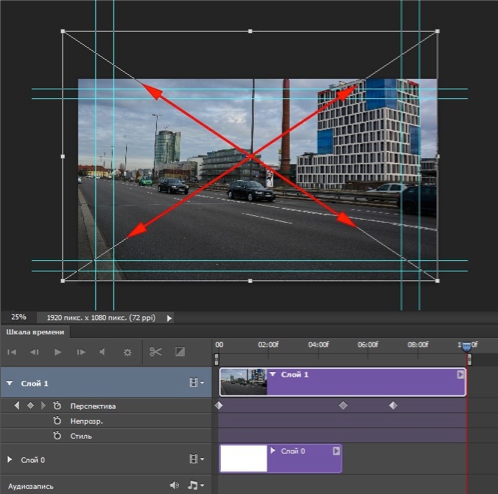
So simple. And do not need any expensive sliders!
In the standard dialog box, select the track we prepared, and click OK.
- From personal experience:Photoshop does a great job with MP3 files, but for some reason it starts to grimace when you palm off an AAS file.
If it is necessary to trim the excess, set the slider (No. 9) to where we want to cut and press the “Scissors” button (No. 7). Select the unnecessary piece and press the Delete key on the keyboard. By the way, the video track is similarly cut.
Now that we have everything ready, you can Export our time-lapse. To do this, select the menu: File-Export-Export video (or even easier, click button No. 17 on the video panel).
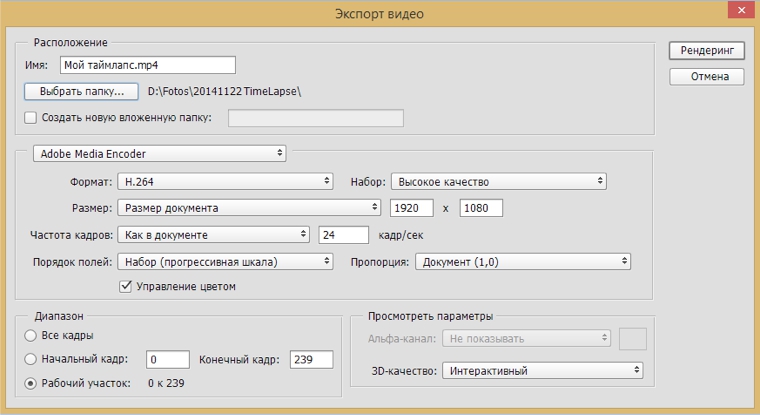
Here we can change the name of the file and select the folder where it will be saved. I recommend to leave all other parameters as is. Press the “Rendering” button and go to drink coffee, smoke, watch TV. On my not the slowest computer, the process takes 10 seconds. Roller takes 7 minutes.
Attachment to the article or a little more
And let's create a sunset in our timelapse. To do this, create a new empty layer in the layers panel and fill it with orange (# d8670c). Blending mode for this layer will do “Overlap”. True, not only the clouds turned red, but the whole picture. To fix this, add a mask to our layer. And on it with a large black brush (approximately 200-300 pixels) with soft edges, paint over everything that does not touch the sky. Special accuracy is not required here.
Then go to the video panel and open access to key frames for this new layer. Only now we will change not “Position”, but “Opacity”. Set the slider to the beginning of the time lapse, click on the stopwatch icon in the “Opacity” line. We have added the first keyframe. Go back to the layers panel and set the opacity for this layer to 0%. We returned to the video panel, moved the slider to the end of the time-lapse and again to the layers panel - set the opacity to 100%. A second keyframe has been created. Now, when playing a time-lapse, the sky from the usual at the beginning will slowly turn purple towards the end.
Oh yes! Forgot that dusk is approaching at sunset. Add a new layer and do everything exactly the same as in the previous case. There are only two differences: we will fill the layer with dark gray color (# 323232), and we can not paint the mask again, but simply copy it from the previous layer and then invert it.
So lovers to go to bed early, now can not suffer from unrequited sunsets, and just then finish it in Photoshop’s.
This is where I end and wish you success in creating brilliant time-lapses!
* The article used a number of photos of Colin Rich
Tips from photographer Christopher O’Donnell (Christopher O "Donnell)
If you are not familiar with the concept of “video time-lapse”, then at least on the Internet you had to see these great videos.
Theoretically, “video time lapse” is easy to do. - you just need to take a few hundred photos and then build them in the right order during post-processing. However, in order to achieve an impressive seamless time-lapse video effect, this will require much more resources than just a few hours spent with the lens in hand.
What is needed to create a time-lapse?
Time Interval Meter - This hand-held tool allows you to take a certain number of shots at intervals and even exposure — meaning you don’t have to sit with the remote control and take X number of shots every second.
The amount of time for each exposure will largely vary depending on the lighting, but a time meter is necessary in order to capture an extended time-lapse while maintaining a uniform exposure in intervals.
The fantastic advantage of time interval meters is that you can adjust the length of the delay between each exposure. This is very important, especially if you are shooting in RAW format, since in this case it only takes a few seconds to shoot and prepare the buffer for the next exposure - if you are in burst mode, shooting will be periodically interrupted, which will reset the shutter speed between each frame and so your “time lapse” will look intermittent. Therefore, in order to achieve adequate intervals, you need a venting system.
Most modern single-lens reflex cameras have built-in time interval meters, so you don’t have to worry about that anymore. Therefore, when purchasing a camera, just read the user manual to make sure that you have purchased the camera you need.
Alternatives to time interval meters.
As an alternative to measuring a time interval, you can connect the camera to a laptop; in this case, the computer will perform the work of the time interval meter.
Sofortbild Is a free Mac tethered software that can be used as a time meter. In addition, there are various programs for various cameras designed to create a photographic time-lapse.
Tripod
- You need to stabilize the camera in the hope of working for many hours and a reliable method of such stabilization is a tripod, which can guarantee that the camera will not move between the frames.
Technique for creating photographic timelapse
As already mentioned, large gaps between exposures are a problem when trying to create a seamless time-lapse video - it takes too much time, and the result is intermittent video.
Flickering and the importance of manual mode
It is very important to set the camera to manual mode and not to change the settings even if the lighting changes periodically over a period of time - for example, sunrises and sunsets. Assuming automatic exposure control, it is most likely that you will encounter the so-called flicker effect, which is a consequence of a sharp change in exposure from one frame to another.
By shooting in manual mode, while avoiding exposure changes, this kind of flicker can be avoided. Even in situations of significant changes in lighting from start to finish, such as during sunset, for example, it’s best to leave the camera in manual mode to prevent flickering.
Another reason for jitter is the presence of large gaps between exposures - this leads to the fact that the video clip is jumping and looks torn. The best way to solve this problem is to minimize gaps between exposures, while keeping them long enough so that the image can be read onto a memory card - in particular, this is a very important factor when shooting in RAW format. Finding a good balance can be difficult, but the result is worth it.
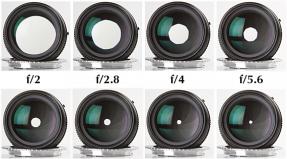
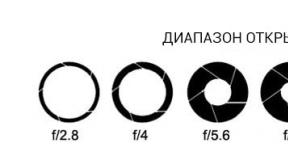
Aperture tremors and how to get rid of it
In addition to jitter caused by changes in exposure and gaps between photographs, there are other reasons. If a small aperture is used - such as f / 8 or higher - a large number of shutter movements occur from one photograph to another, when moving from an inactive wide aperture to a smaller aperture - the higher the aperture number, the more movements the shutter makes. With each movement, the shutter never returns exactly to its original place as a result of minor miscalculations. When creating an ordinary photo, this does not really matter, but when creating a time-lapse, this can lead to a jitter effect.
To eliminate such a defect, it is necessary to choose a diaphragm that will keep the shutter in the correspondingly open state - this means that it is necessary to reduce the distance that must be overcome during the photograph. The wider the better, but most photographers point out that f / 8 I is enough to eliminate the effect of diaphragm jitter.
Shutter jitter and how to get rid of it.
There is another type of jitter that needs to be taken into account - shutter jitter, which is the result of inappropriate exposures that are caused by too fast movement of objects - this phenomenon is also known as high-speed shutter.
Most professional time-lapse photographers take pictures with a slower shutter speed to ensure that there is no shutter jitter effect, namely up to 1/50 thousandths of a second for reliable playback, although some photographers exceed the limit of 1/100 thousandths of a second with good results
How to get the best exposure
Obviously, finding a middle ground with respect to exposure is difficult - taking pictures at a slower speed may be more problematic compared to taking pictures with a normal shutter speed in combination with a wide aperture, especially in the daytime when lighting is plentiful.
Time-lapse photographers use simple techniques to reduce exposure time by using ND filters - this is a practical necessity if you plan to take time-lapse photography in the daytime without the effect of jitter, as this will help slow down the shutter speed if necessary.
Choosing the right white balance.
There is another step that must be taken to avoid the effect of jitter, and this step consists in setting the white balance in manual mode. As with the automatic exposure setting, the camera selects the white balance based on each image, if the white balance has not been selected manually. This can cause a certain color flicker - in case the white balance changes in the image from frame to frame.
Another advantage of setting the white balance is the fact that in the process of post-processing images there is no need to change it. Editing several pictures can be done quite quickly - especially in RAW format - however, if you have to deal with several hundred photographs for time-lapse, you can easily spend several hours in a row to adjust the white balance.
How to achieve good stream processing
Do not start time-lapse photography with the thought, “First, I just take a RAW photo and then edit it.” When you have to deal with hundreds of photographs, you can skip any step in line processing, thereby saving your time.
For example, I want to photograph the sunset and so that the foreground and the sky are in the appropriate exposure (i.e. without silhouette images). Instead of manually mixing exposures during post-processing and automatic auto-bracketing, it would be more prudent to use an ND graded filter - this will reduce the number of shots you take and thus simplify in-line image processing.
The advantage of shooting a time-lapse video using a single-lens reflex camera is that you can use a wide selection of specialized lenses, which gives a unique perspective when shooting video:
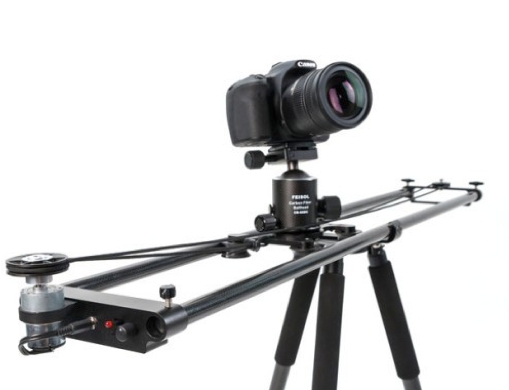
Rails and Motion Control Systems
Once you have mastered the art of static time-lapse - that is, a camera and a tripod without movement - you can add another element that will help recreate a sense of continuity of movement by combining a slow-moving camera and a fast-moving subject.
A motion control system for time-lapse photography attaches the camera to the rails and, when shooting each frame, facilitates smooth movement of the camera in a certain direction. The actual distance of such movement is not very long, but the result is a fantastic sight.
Timelapse is one of the most interesting techniques for photographing long-running processes for fairly quick viewing on the screen. Such processes include flower opening, sunrise and sunset, the movement of people and cars, construction. Timelapse allows you to "speed up" two-hour shooting up to one minute. The result, of course, is impressive ...
Time-Lapse (Time-Lapse) is a slow-motion movie or photo shooting with the exact number of frames per minute, which are then combined into one video sequence.
Time lapse used to be called time-lapse or time-lapse photography, it was considered very difficult. It was first used by the French director Marie-Georges-Jean Mellier in the movie “Carrefour De L Opera” in 1897. Today, in the age of rapid development of digital technologies, this technique has become much more accessible and easier. If you know a few simple rules, make a good time-lapse even a beginner can.
Work in manual mode
For this:
- Set the camera to "M" mode (fully manual), then your pictures will be the same in color, lighting, and so on;
- Set the lens to “MF" mode (manual focus mode) and focus on the desired object, then the camera will not be able to change the focus point itself and you will avoid distortion in the picture. Or use a fully manual lens, then you will get rid of the diaphragm problem in the future;
- Set a manual white balance so that the colors on all images are aligned, or shoot in RAW, then you can set the white balance during the subsequent processing of photos or directly when gluing pictures in a video sequence;
- Disconnect the stabilizer on the camera and lens.
You will need
- Strong tripod. A reliable tripod, such as the Manfrotto 55RC, is a prerequisite for quality time-lapse. If it is not stable enough, even a barely noticeable trembling can ruin all your efforts. If you don’t have it, and this is a very expensive pleasure, you will have to load your lightweight tripod. Surely there is a special hook on the bottom? There you can hang a load; women's bag with a full "ammunition" will do;
- Blank memory card. You may have to take more than a thousand shots in RAW format, and even if you manage with conventional JPEG, it will require a considerable amount of memory;
- Remote control or laptop connected to the camera. They are used to ensure that there is not the slightest swing during manual shutter release, so it is better to trust modern technology.
About shutter speed and aperture
The ratio of shutter speed and interval between shots should be 2/1, that is, if the shutter speed is 2 seconds, the interval between shutter releases should be 4 seconds.
Many professionals advise shooting in the “A” mode (aperture priority), and setting the metering over the entire frame, since you will inevitably encounter a flicker - flickering brightness from frame to frame. That is, if the camera calculated 1/60 second for one frame, and then the sun came out from behind the clouds and the shutter speed became 1/1000 second, then in the final video sequence you will find light and dark frames in a row and the overall image will flicker. Therefore, it is recommended to use the manual mode and shoot each frame with the same parameters.
Now about exposure and interval between shots. As mentioned earlier, it is best if the shutter speed is twice as fast as the interval between shutter releases. In other words, if the interval is 4 seconds, then the shutter speed must be set to 2 seconds. This is optional, but highly desirable, and is explained by the fact that movie cameras have a device called an obturator. This is the name of the disk, one sector of which is transparent. It rotates at a speed of 24 revolutions per second and every half-revolution gives light access to the film, that is, it is exposed 1/48 second at a speed of 24 frames per second. With such exposure, fast-moving objects are “smeared”, but we perceive it naturally. If it is larger, the time-lapse video sequence will become “twitchy", therefore, to ensure its smoothness, you need to set the shutter speed to half the time between shutter releases.
Approximate intervals between frames:
Fast clouds: 1-2 seconds;
- slow clouds: up to 10 seconds;
- starry sky: 20-30 seconds, pause - 1 second.
Do not take this as a law, the camera settings can be set correctly only at the place of shooting, because they depend on many light sources, both natural (sun, moon, sky) and artificial (lights, car headlights).
About photosensitivity
Do not set the ISO value more than your camera allows. By the way, the cameras are noisier when heated, so if you shoot a time lapse in the sun, you can cover it and the lens with a white or reflective opaque cloth. For example, for the Canon 5D Mark II, the ISO value should not exceed 3200 units.
Some more useful little things:
Use a lens hood to minimize glare;
- to save battery power, disable the function of viewing frames after shooting;
- shooting late in the evening, closer to night, enter a slow exposure compensation.
Shooting in the early morning, afternoon and evening
When shooting during the day, when the camera offers a shutter speed of 1/1000 of a second, it is better to use dimming filters similar in structure to polarizing filters. They increase the luminous flux to ND 400 depending on the rotation relative to themselves. If you want to remove the time lapse in the early morning, at dawn, or in the evening, at sunset, remember the so-called “golden hour”. This is the first hour after sunrise and the last before sunset, although its exact duration varies with the time of year. This time period, when the sun is low in the sky, giving a soft, diffused light, is a great time to take a time lapse.
Before shooting, check all settings again:
- fully manual mode on the camera;
- manual focus mode on the lens;
- disabled stabilizer on the camera and lens;
- manual white balance;
- RAW / JPEG;
- charged battery;
- free space on the memory card.
If everything is ready, or so it seems to you, take 10-15 test shots, then quickly scroll through them, and if everything suits you, then start shooting, if not, go over your eyes and see what you forgot to do or didn't So.
After you have shot all the material, a reasonable question arises: what to do with it? not manually insert all the frames in Windows Movie Maker? There are many programs for this, I personally advise you to Sony Vegas, but before that it’s better to batch process photos in Photoshop (insert a link to the lesson), because Sony Vegas will not allow you to experiment with colors and light in the same way as Photoshop ".
Create Time Lapse in Photoshop
Step 1. Create a new project
In the "File" menu, select "New ..." and set the settings for our video sequence. The resolution is better to take HD 1920 × 1080 24 p.
Step 2. Set a step between photos
In the "Options" menu, select "Properties", then go to the "Edit" tab and in the "New still image length" section, set the time interval between photos. To create time-lapses, I personally use the value 0.060, which is approximately equal to 24 frames per second.
You probably don’t need smooth transitions, but just in case, they are hidden under the “Automatically overlap multiple selected media when added” checkbox.
Step 3. Add photos to the time line
Since your photos are already numbered in the correct order, you just need to transfer them from the "Project Data" or "Explorer" to the time line, and they form a finished video.
Step 4. Render
Many people wonder: why do their videos “weigh” so much after being processed in Sony Vegas? The answer to this question is very simple: you need to choose the right codecs, and the size of your videos will decrease from a few gigabytes to 100-200 megabytes.
So, in the File menu, select “Calculate As ...”, in the column “Save as ...” we mark “Windows media video v11 (wmv)”, and in the column “Template” - “6.4 Mbps HD 1080-24 p video ". The “Custom ...” button allows you to select codecs for audio. After that, click the “Save” button and wait for the end of the render.
If the computer does not have enough RAM for processing, then I recommend that you first restart the computer by disabling startup programs, or lower the quality of the output video by lowering the bitrate or resolution to 720 p.
See the selection and be sure to try your hand at this unique technique!
Follow our news! Good luck to you!
Timelapse This video is created from a series of photographs taken with a fixed or smoothly moving camera over a long period of time. The result is an “accelerated shooting”I conventionally divide time-lapse photography into three stages:
Actually shooting
Editing photos in the editor
- "Build" video
.
Equipment needed for shooting
1. This is above all sLR camera. Some cameras have a built-in timelapse function, if you have one, you are in luck.
If you do not know if you have such a function, you should read the instructions. If your camera does not have such a function, then you will need a device called an intervalometer (in common use is a remote control with a timer).
2. The intervalometer allows you to shoot a series of frames with a specific time interval. There are many different models for different camera models; they can be purchased at almost any photography equipment store or ordered online.
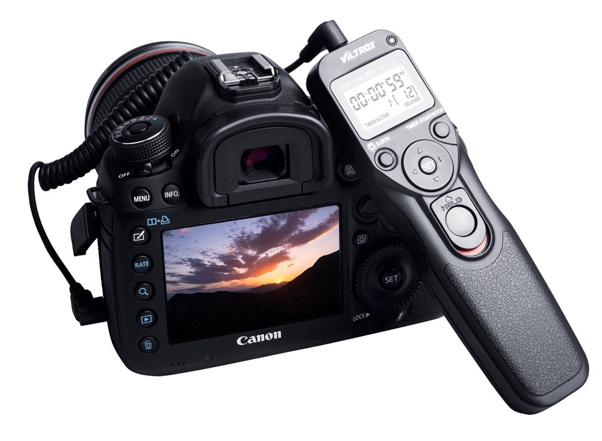
Since I myself shoot with a Canon Mark3 and a Canon 40D camera, I can recommend a remote control for such cameras (see the figure below)
There are similar remotes for other SLR cameras.
When choosing a remote control, make sure that it suits your camera specifically. Also make sure that the selected remote has a timer for interval shooting.
3. The cube-hydraulic level is very convenient and allows you to quickly put the camera in a horizontal position 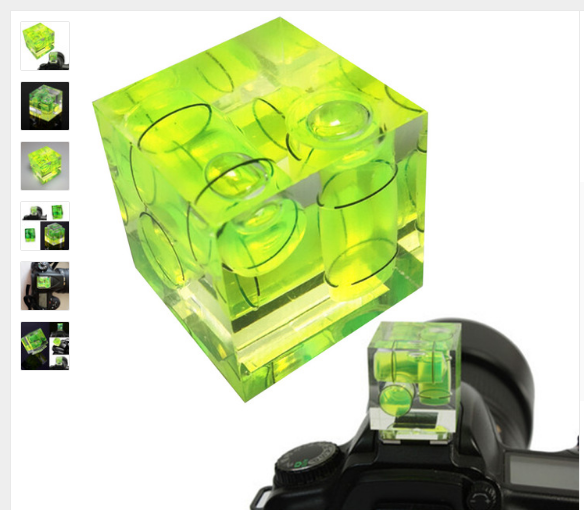
4. You will also need a memory card of a sufficiently large volume - 32GB - 64GB with a high write speed.
Before shooting, make sure that the battery is fully charged. Use a battery grip if possible.
And of course you need a tripod. Where without him!
Shooting
How to shoot?
You need to start learning how to shoot timelapse with something simple - a landscape with floating clouds, cars traveling along the road, a city street with pedestrians.
Do not try to shoot complex scenes with a fast-changing plot, as well as sunset or dawn.
Think over a plot, choose a shooting location.
Avoid shooting from bridges. The bridge shakes from passing vehicles, and with it a tripod and camera.
After you focus on some object, you need to turn off autofocus, because otherwise there is always a chance that focus will be lost during shooting and all the work will go down the drain.
Exposure (shutter speed and aperture) is also set in M \u200b\u200b(manual) mode.
Sometimes, despite the fact that all parameters are set in manual mode, the finished video still flickers noticeably. This is due to the difference in illumination of frames. Each time during shooting, the aperture closes to the set value, and then fully opens. However, the mechanics of the camera cannot set exactly the same values, and therefore the resulting frames, although they differ slightly in illumination, are quite enough for the flicker effect, which is called flicker - (from the English flicker - “blink”). There are several ways to solve this problem. You can shoot with completely open iris, or use old lenses with an aperture ring, also, you can get rid of flicker during post-processing.
For Canon SLR cameras, the flicker problem can be successfully solved as follows:
We put the camera on a tripod, adjust all the parameters, focus the camera on the subject, then very carefully so as not to touch the focus ring of the camera, switch the lens from AF to MF (manual focus) and twist the lens halfway (just enough to break the electric contact with the camera)
Be careful - do not drop the lens, and at the end of shooting do not forget to fix it normally again.
Since the process of shooting time laps is not fast, depending on the settings, we go to drink coffee, smoke bamboo or go fishing.
Important.
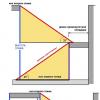
When choosing a composition, do not forget that part of the image in the final video will be cropped in height (see the figure below)
This is because the aspect ratio of the video is 9:16, and the SLR camera takes 2: 3 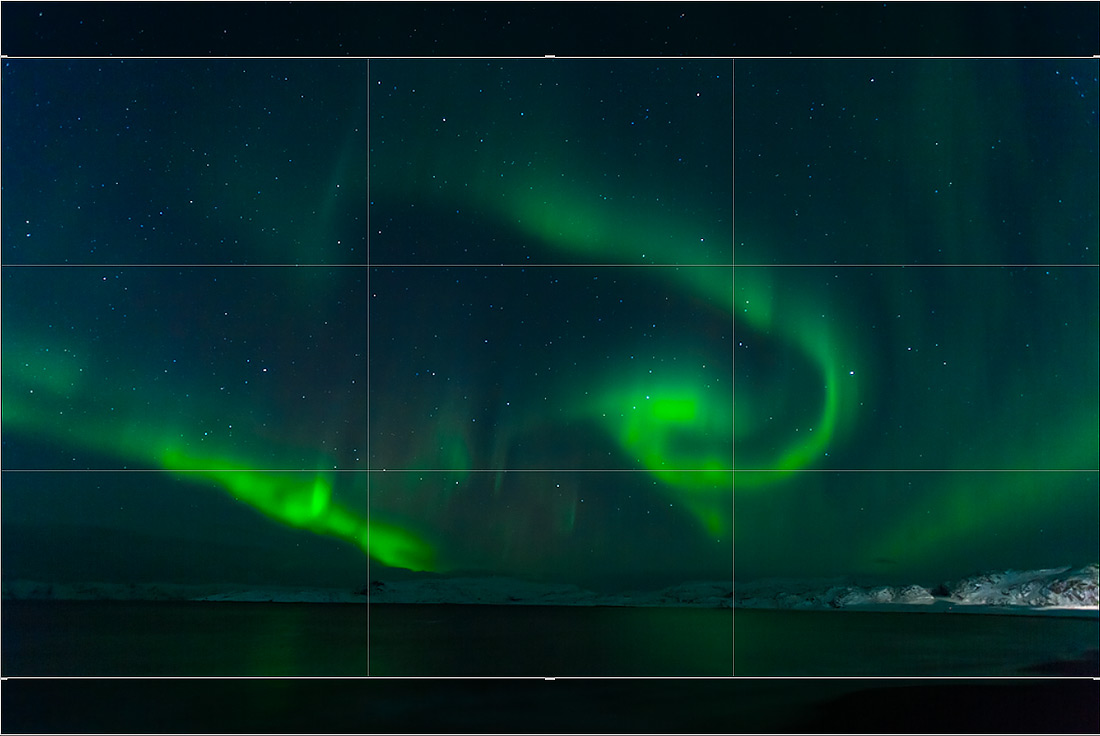
How to choose a shooting interval?
A very important question is what interval to shoot.
It is impossible to give a definite answer. It all depends on the conditions and subject.
If it is slowly floating clouds on a bright day - the interval may be 1-3 seconds. In the photo with aurora (see above), the interval is 6 seconds.
In each case, the interval must be selected empirically.
Experiment!
But still, some recommendations can be made. To begin with, we recall that in modern video, a frequency of 25 (30) frames per second is used.
To take 10 seconds of video, you need to make 250 frames. Suppose we want to shoot a story lasting 1 hour and insert it into a 20-second video. It is easy to calculate the interval using the following formula: (action time / movie time * number of frames per second), i.e. 3600 / (20x25) \u003d 7.2.
Do not make the interval too long, otherwise the video will be implausible, intermittent. When setting the interval, you should take into account the rate of fire of your camera and the speed of recording photos on a USB flash drive. It’s rare which camera can shoot at 1fps in RAW.
Select a photo. Make sure JPEG Sequence is checked 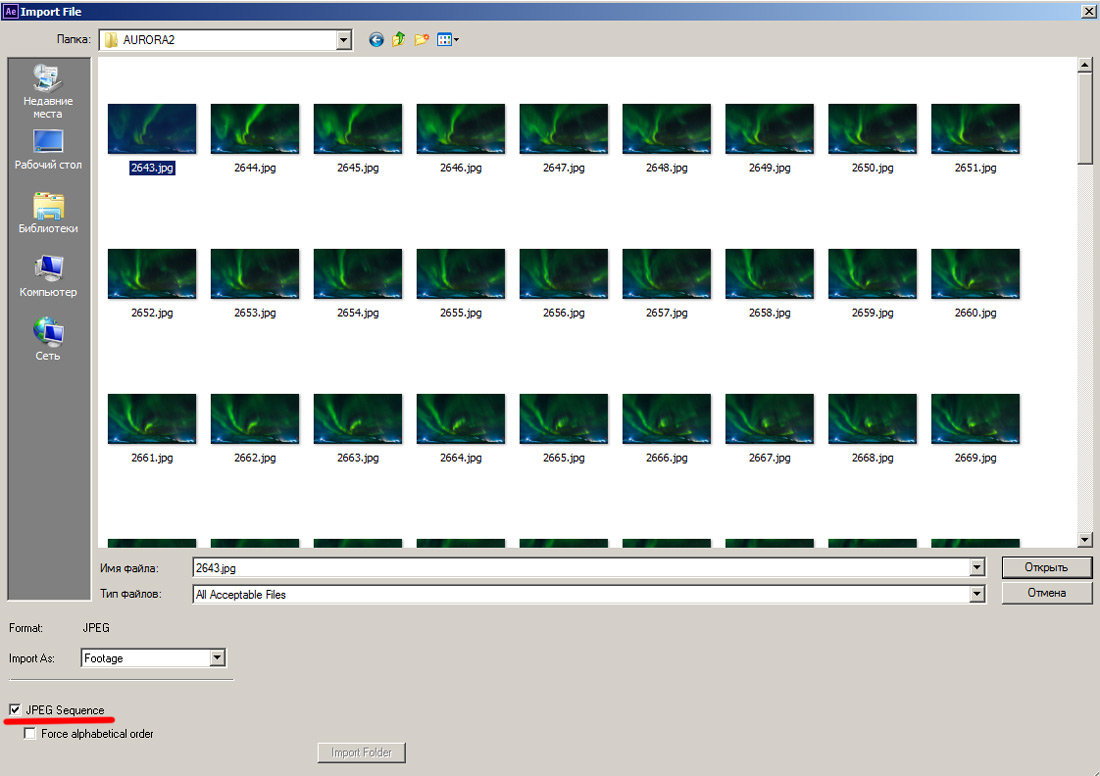
After downloading the photos, select Competition\u003e New Competition, and in the parameters window that opens, set the composition name, resolution, and frame rate - 25 fps 
AURORA-01 will appear in the Project window - that’s what I called the composition I just created. Select a photo and hold down the left mouse button and drag them into the Composition window 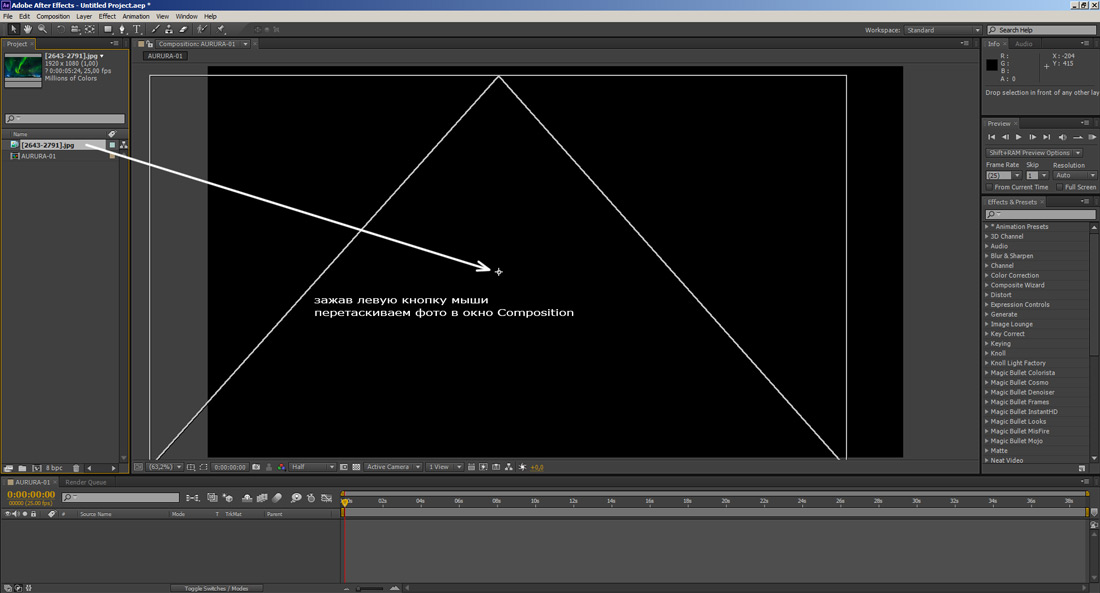
and call the menu item Composition-\u003e Make Movie, or just press Ctrl + M.
The Render Movie tab is activated,
Next, click on lossless, opposite the output, the settings window will open 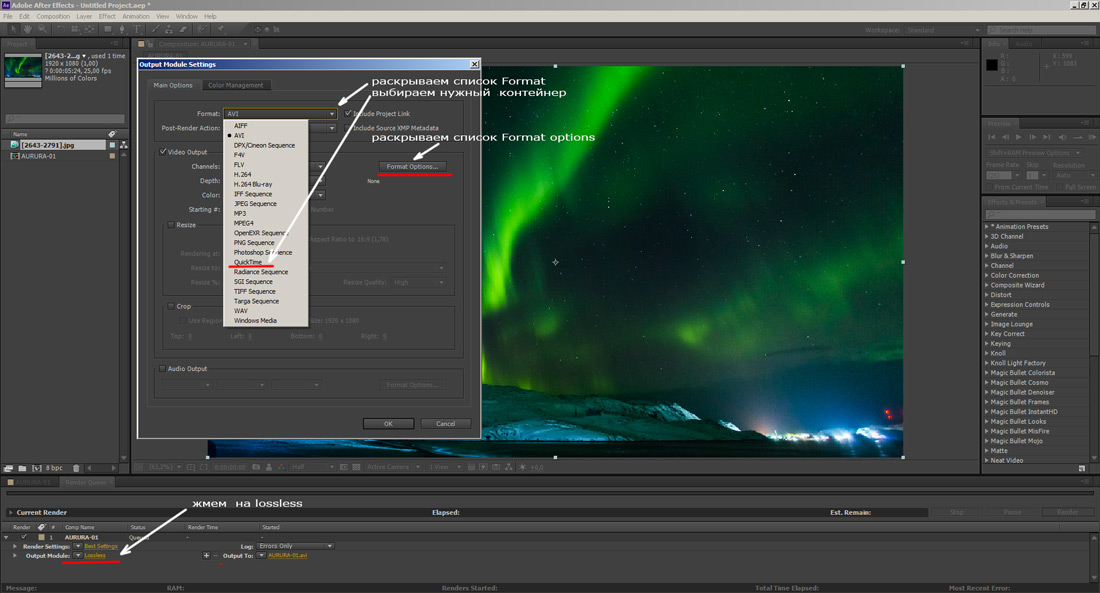
In the window that appears, open the list of Formats, select QuickTime
In the Formats Options, in the Video codec list, select photo-jpg
Quality 80-90% 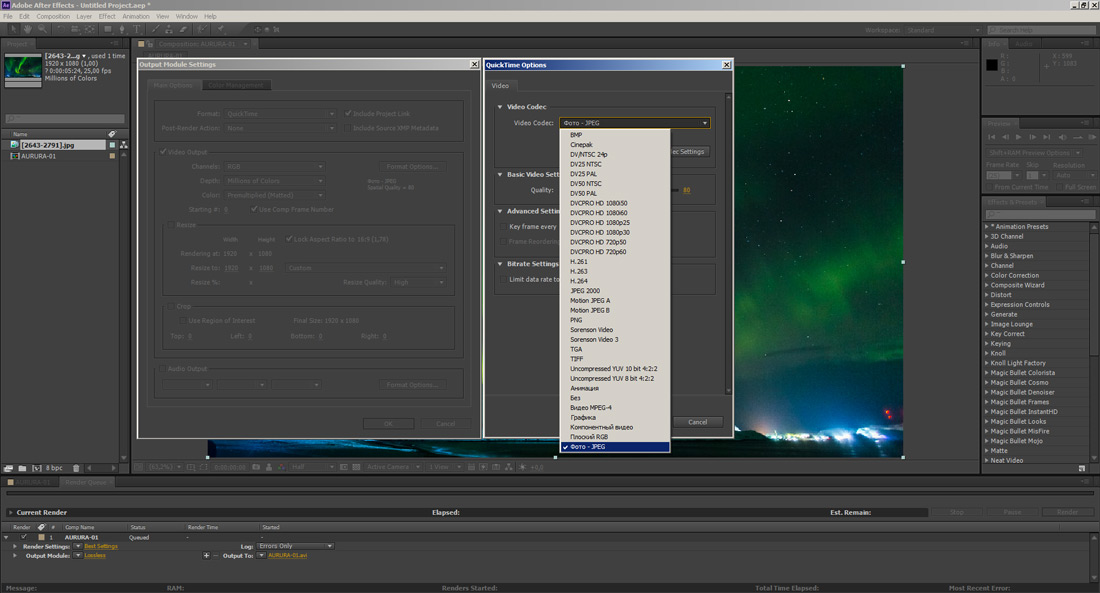
Click OK and OK again
In the paragraph Output to: click on the file name and in the explorer window that opens, indicate in which place and with what name to save our video.
Then press the Render button 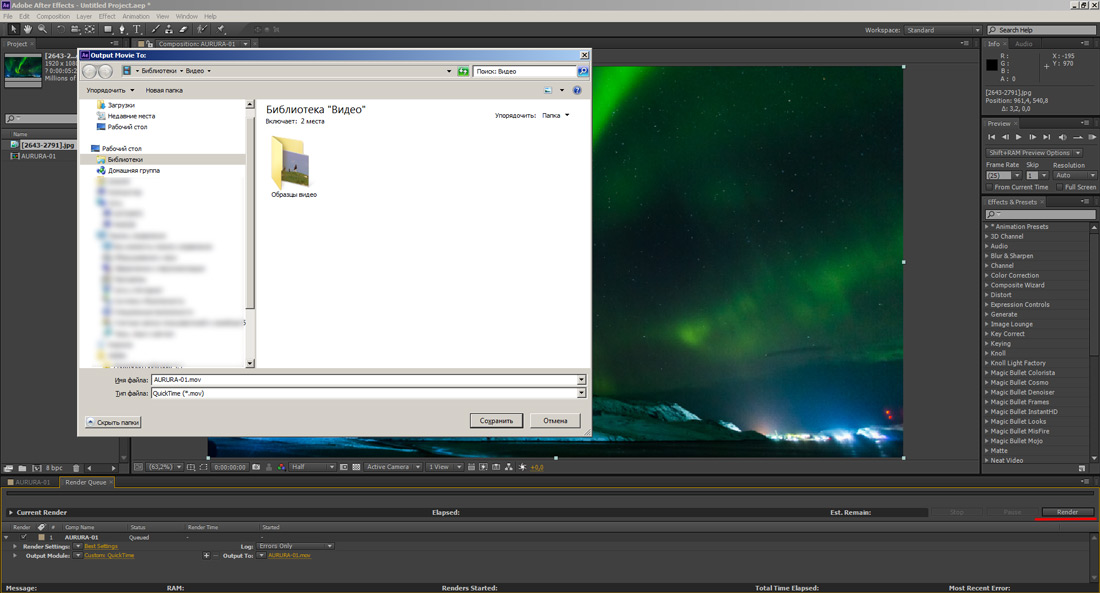
Voila! Done!
If you have any questions, ask, we will try to answer them.
![]()
Timelapse - how to shoot not many photographers know, despite the fact that single-frame shooting today is very popular. This bewitching video on which our life sweeps like an instant reflects our reality like nothing better. Timelapse in motion gives us the opportunity to experience the variability of our world in its entirety. In this article, you will learn what Timelapse mode is and get an idea of \u200b\u200bmaking movies in this mode.
The Chilean Skies great night sky video from Hernбn Stockebrand.
Timelapse or time-lapse photography, time-lapse movie (from it. Zeitraffer, Zeit - time, raffen - literally assemble, pick up, grab; figuratively - group, compact) - a kind of slow motion shooting, in which the shooting equipment mechanism is turned off for a significant part of the time, and the exposure and subsequent frame change are carried out periodically. In fact, this is a slow motion picture or a photograph with the exact number of frames per minute.
When demonstrating a film with a normal projection speed, acceleration of movement occurs - an illusion of a greater speed of the processes taking place.
Single-frame shooting is also used in artistic and especially widely in scientific and artistic cinematography, where it gives the effect of great expressive power. In English-speaking countries, it is called “motion picture photography” or briefly “photography”
As they say, it's better to see than to hear, watch Nature Time Lapse
How Timelapse + video shooting is shot
- Transfer the lens to the focus-manual M. This should be done because the camera will aim at different objects during shooting.
- Hook on the hood to get rid of glare.
- Turn off image stabilizers, better in the camera than on the lens.
- Switch the camera to M mode - Manual Mode.
- Always use M. If you still use AV or TV, make sure that the metering is set to Evaluative. It is preferable to use AV rather than TV (for a smaller flicker).
- Set the white balance to MANUAL and do not touch this setting while shooting a time lapse. When setting AutoBB and shooting in JPG, you simply lose time and you have to throw everything away.
- We recommend shooting in RAW. If this is one of the new Canon cameras, then you can install sRAW (half resolution), because even for FullHD-Video it’s enough to shoot at 5 megapixels.
- When shooting a new time-lapse, create a new folder on the camera where the photos will be stored, so you will not confuse photos with another shooting
- Now about the diaphragm. The fact is that the diaphragm cannot close to exactly the same position twice in a row, so there will be an inevitable flicker on the video.
- The ratio of shutter speed to the interval between frames should be 2/1. those. if the shutter speed is 2 seconds, there should be 4 seconds between shutter releases. This is not necessary, but try to strive for it. This is explained by our usual perception of a motion picture. Who cares, google the shutter device. When shooting a movie (24 frames per second), each frame is exposed 1/48 of a second. those. twice as fast as film speed.
- The average temperature in the hospital, the interval between shots is about 4 seconds (exposure, respectively, should be about 2 seconds). But usually in windy weather it is better to set 1-2 seconds, and closer to the night, when the wind calms down, you can set more than 4 seconds. Will come with experience.
- ISO - no more than 3200 (5d mark II).
- As you know, cameras are noisier from high temperatures, so if possible, hide the camera and the lens from the sun (especially when shooting at a long focus). In extreme cases, a cap, T-shirt, etc. Make sure that you do not fall into the field of view of the lens.
- To compose a frame, you can use LiveView, putting it in Exposure Simulation mode.
- Use a sturdy tripod.
- If there is time, take 20-40 trial time-lapse frames from the trial and using the wheel, scroll through them. This will be enough to roughly estimate the future result.
- To save energy, you can turn off viewing the frame after shooting.
- On the latest Canon cameras, you can save all the parameters in the C1-C3 installation and edit them locally on the spot
- Twice (thrice, four times) check all settings. Manual mode, IS, White Balance, RAW, save folder, battery power, free space on the map.
- Relax, relax and contemplate in the place where you installed the camera
- Remember that a person will be bored to watch more than 30 seconds of the time-lapse of one location if no serious changes occur in the frame.
30 seconds \u003d 750 frames with the final video 25k / s.
Preparing for Timelapse Photo Shooting
Preparation begins with the main thing - making a decision about what exactly to shoot. One of the simplest and most popular stories, shooting the life of the city. There is always dynamics, and you can shoot at least from the roof of your house, at least from your own window. Therefore, if you decide to practice, then you should start with a similar plot. But if you want to do something truly original and exciting, then you have to strain your imagination.
Most importantly, the final video should not be a chaotic bunch of moving objects, but a full-fledged mini-film with a smooth development of events.
Timelapse is entirely based on the dynamics in the frame, and the dynamics are consistent. Otherwise, the whole point is lost. Make hd timelapse on static pictures, where nothing changes over time, of course you can, but few people will be interested.
Therefore, before you start shooting, think three times - what kind of dynamics will be in the frame. The simplest thing that comes to mind is the movement of cars, people, clouds, some other objects. But the dynamics may lie in another. Remember the scientific videos that you probably saw in your childhood, because these were all time-lapses that took off physical processes - how a piece of ice turns into a puddle, how a grain sprouts and a plant appears, how the shape of an object changes over time, how a piece of bread left on a table turns into cracker, etc.
Necessary equipment for timelapse?
Firstly with timelapse function or without it. Contrary to some opinions, a super expensive camera with a bunch of devices is not required to take a time lapse. No, of course, those who are professionally shooting timelapse will argue the opposite and will be right in their own way. Special devices and expensive cameras will allow you to do something special and facilitate the work of the photographer. But you can remove the time lapse with a very simple camera. This is the same as with regular photography. In order to shoot an excellent landscape or portrait, you do not need to have an exclusively top-end full-frame camera, sophisticated lighting equipment and a bunch of assistants.
So for starters, almost any digital camera can be used. The main thing is that they have the opportunity to take pictures at a certain interval, timelapse mode. Some timelapse guides provide instructions that the shooting should correspond to the video frequency - 24 frames per second. But this is not so. Firstly, there are not many such quick-fire cameras, and secondly, why turn time-lapse videos into a complete analogue of video? This makes no sense. The meaning of time-lapse is precisely to fit a long process in a very short period of time. Show a whole day from the life of the city in just 10 seconds or how a plant grows not in a month, but in just a minute.
Another important component is remote control remote for timelapseto minimize possible camera shake during shutter release. Ideally, a programmable bullet with a built-in timer. Remote controls can be searched both original (Canon, Nikon) and third-party manufacturers.
In some cameras, there is the possibility of interval shooting directly in the camera settings. For example, there is such an opportunity in Nikon d200 / 300/700/7000, read the instructions for your camera carefully, maybe you will be pleasantly surprised by the presence of such an opportunity
If there is no such function, there is another way - you can search for alternative firmware for your camera, implemented timelapse technology. For example, for Canon, such firmware is on the site. But this is a dangerous way - since unofficial firmware from someone unknown, it can easily ruin your camera.
The third way is connecting the camera to a laptop or computer and remotely controlling it using proprietary utilities. For example Canon EOS utility. Can also help you time-lapse program. It all depends on whether your camera has the ability to remotely control from a computer.
If you have none of this, then do not despair. You can always just gently press the shutter at a strictly defined interval. Yes, it's boring, dreary, but "art requires sacrifice." Come up with a shooting scenario where you do not need too short an interval between frames and the task is greatly simplified.
One of the most essential items for shooting time lapse is a tripod. Since if the camera does not even shift much, this can lead to disastrous consequences for the final video.
You should also think about the size of the memory card, especially if you shoot in RAW and decide to create a large time-lapse for hundreds of frames.
But the most important thing is to have patience. Especially if you plan to shoot timelapse somewhere outside your comfortable apartment. Consider weather conditions as well, especially if you decide to shoot time-laps in winter or autumn. After all, you can freeze corny, batteries can quickly be discharged in the cold, in the fall it may suddenly rain and wet the camera, if you do not think in advance about how to close it.
Enjoying videos using the Timelapse technique:
New York City HD Timelapse
Mushroom time lapse
Time Lapse Flower - Compilation