The turn signal of the VAZ 2114 does not light. The turn signal flashes quickly. Determine the cause of this malfunction
Some kind of breakdown often happens with cars, both serious and minor, but all of them make the car owner nervous. One of the trivial malfunctions is the case when the indicator on the car flashes very quickly, and only on one side: either on the left or on the right. What this can signal, what causes may precede the occurrence of this problem will be further described in our article.
Why is the turn signal blinking fast?
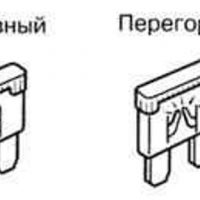
Such a small nuisance can happen to everyone and, in most cases, this is nothing serious. For example, the most common reason that the indicator blinks very quickly may be one of the bulbs that is blown out. For example, ate one of the indicator lamps burned out - front, rear, or additional - this is quite enough to change the current resistance in the network. Result - the whole side where the bulb is faulty will flash very quickly. It is enough just to screw in a new lamp, and everything will be fine.
If the left or right turn signal blinks quickly, but all the bulbs are working, then the problem is of a different nature. Alternatively, it is possible that soot, rust, or dirt has formed on the lamp base and in the cartridge contact itself, which makes the contact unstable. This may well be the reason that the turn signal of the VAZ 2109, or any other car, flashes quickly. To solve this trouble, you will have to disassemble all the turn signals and clean all the lamps and contacts.
The turn signal of the VAZ 2107 flashes much less often due to a malfunction of the turn signal relay. As a rule, relays have been living for more than a dozen years, so this reason can be considered as an exception.
Finally, another reason that the turn signal blinks quickly is the installation of not ordinary bulbs with filament, but LED. LED lamps have a completely different resistance, so their installation can also cause frequent blinking of the indicator.
If all these options do not fit your case, if the bulbs are new, the contacts are clean, the relay is intact, the fuses are intact, you are out of luck, because the problem is in the wiring itself. If you are not an electrician, then you will not be able to deal with this trouble yourself - contact a car service.
We hope that we were able to help you solve the problem of why the turn signal blinks frequently. Read more of our articles, improve your knowledge, because auto repair is easy.
I replaced the corner switch and it works poorly. I turn on the turn (right and left), it blinks once, 2 times there is a sound, but already without the blinking of the turn signal, there is no sound or blinking on the 3rd and forth. I disassembled it again and put it several times. The alarm is flawless; the fuses are also in order.
The power supply circuit of the VAZ 2114 turn signals includes a steering column switch, a relay, a fuse, an alarm key, lamps and wiring.
Each of these elements performs its function. The switch provides power to the necessary lamps. Additionally, the voltage can be supplied through the emergency button, bypassing the switch. To protect the wiring from a possible short circuit in the wiring of the turn signals, fuses are included in the circuit.
The relay is responsible for interrupting the burning of lamps, that is, this element ensures the blinking of the turn signals. In addition, it makes it possible to determine the serviceability of all lamps. If at least one lamp burns out, the blinking frequency of all the turn signals, as well as the control lamp on the dashboard, will double.
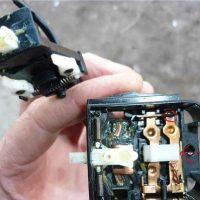
If after replacing the steering column switch there are problems with the operation of this light alarm, in this case, a one-time lamp operation is to blame for this relay.
Everything is simple here - if the switch were faulty, the turn signals either didn’t work at all, or they worked in one mode, for example, the right turn signals blinked, and the left turn signals did not.
Fuses also disappear, because if they burned out, the power would not be supplied to the circuit, that is, the turns did not work at all.
Relay - the part is not expensive, so it is easier to replace it than to repair.
And yet, before replacing this component, it is recommended that you first check its performance. To do this, you can borrow this element from another car or install your relay on another car.
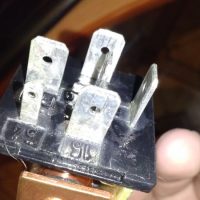
Replacing is easy. On the VAZ 2114, this element is located in the fuse box. Under the cover of this unit, an arrangement diagram of all the fuses and relays is plotted, you can easily find the necessary element on it.
If there is no scheme, then it is simple to determine what is needed - it is located in the upper row, the second on the left. He has no mount, it is simply installed with its plugs in the connectors.
It is worth noting that to purchase and install on a car only the relay recommended by the manufacturer is necessary, in this case the model is 493.3747. It is possible to install analogues, which are many on the market now, but you should first ask about the operating parameters, usually applied to the case. In the case of a failed and acquired element, the characteristics must completely match.
It remains only to install a new element in the fuse box and check the performance of the turn signals.
Turning lights must be operational in any car. This type of optics allows other road users to know about your intentions when making maneuvers, so the performance of turns greatly affects safety. What to do, if not the emergency VAZ 2114, how to identify the problem and replace the lamps? Read about it below.
Possible malfunctions: signs and causes
If you do not know how, then there is nothing complicated in this - you just need to close the contacts, but now is not about that.
According to what signs, it is possible to identify problems of turning lights (ON):
- The turn turns on, but does not work. A malfunction of such a plan may be caused by malfunctions of the relay-chopper.
- Turn signal light source does not work. With such a problem, the turn indicator will light up more often than usual on the car dashboard.
- The signal is triggered, but not turned off. The essence of the problem is a malfunction in the switch located under the steering wheel of a car.
- The light source in optics blinks more often than usual. Apparently, one of the lamps installed in the corners failed. Also, the problem may lie in the oxidation of the contacts, in particular, we are talking about the lights themselves or the contacts in the block with safety elements.
- The lights in the corners glow, but much dimmer than always. In practice, this problem usually arises after the installation of inappropriate lighting devices (lamps) in the headlights. There may be a problem in the contacts.
- When you turn on the software, the relay clicks loudly. The reason should be sought in bad or damaged contacts on the block, the relay itself may fail.
- Often the malfunction lies in the burnout of the safety device. This leads to a circuit in the software, and often this problem manifests itself in the rear optics. Specialists call this place a “disease” not only of model 2114, but also of other VAZs. Over time, the contacts oxidize, which leads to the formation of corrosion and short circuit (video shot by Vladislav Chikov).
How to check light fixtures in Chetyrka?
The verification procedure is as follows:
- First you need to make sure that you are using a working fuse. The fuse box is located in the engine compartment, in the compartment between the engine and the windshield, opposite the driver's seat. Bend the latches and remove the cover, and then carefully inspect its inside. It contains a diagram that will help you figure out which fuse is responsible for the operation of a particular equipment.
Remove the fuse responsible for the software functionality and carefully inspect it - if the fuse is melted or damaged inside, then the fuse must be replaced. But even in the absence of visible damage, you need to insert another with the appropriate rating into the socket of the removed fuse. - If this does not help restore the software, then check the relay, it is located in the same block. As a rule, there is an icon on the corner relay; you need to pull it out and replace it with a working one. To do this, it is not necessary to buy a new relay, you need to pull out another working device and install it. If the emergency and software do not work, then continue the test.
- Now you need to diagnose the bulbs, but such a check will be required if only part of the turns does not work. Open the hood or trunk and remove the headlight protection, then remove the light sources from the seats. Install a known working device instead of the removed lamp and check how it works. In the absence of changes, we move on.
- It is necessary to check the integrity of the electrical circuits. To do this, you need a test lamp with two wires connected to it. One end should be connected to the minus of the battery or the body of the “Four”, and the second wire is connected to the contact of the diagnosed circuit.
If the lamp starts to burn as a result of the connection, this indicates a serviceable section of the wire being tested. Similarly, the rest of the circuits are checked. If you find a place where there is no current, then this indicates a malfunction between the tested place and the last point where the voltage was. Damaged wires must be replaced. - You also need to check the quality of contacts on all circuits. Check the contacts in the mounting block, on the base in the car optics, on the light-on button and the steering column switch. Often the cause of the malfunction is precisely the oxidation, such contacts must be cleaned or replaced.
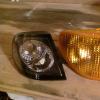
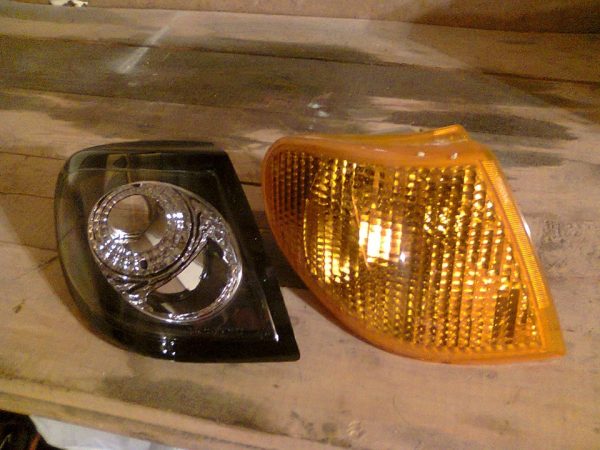
Photo Gallery “Turn Faults”
DIY repair and replacement instructions
Before you remove and replace the failed lighting devices with white or yellow, you must turn off the ignition and the battery. This will avoid a short circuit. Replacement work must be carried out with gloves in order to stain glass bulbs.
How to change lamps in software:
- First you need to disconnect from the optics connector with connected wires.
- Then the spring tip is released.
- Now click on the mount located between the optics and the rotation. Remove the light source unit from the seat.
- Bulbs that are not functional are replaced; assembly is performed in the reverse order.
- As for the repeaters, to replace, remove its body from the landing site along with the rubber gasket, about half a centimeter forward.
- Remove the back of the device from the installation location.
- Remove the repeater completely, then disconnect the wiring plug and remove the gasket. After that, the gasket itself must be installed on a new repeater.
- Now it remains to reconnect the plug with the wiring and install the repeater back.