What settings to set when shooting with a SLR camera. Learning to take pictures in the “Manual” mode. Setting exposure meter for exposure meter
Greetings, dear reader! You’re in touch, Timur Mustaev. So, you got yourself a photographic equipment. But what to do next? Of course, you must first configure! The instructions and this article will greatly help you in this. The article will answer in detail the question: how to set up a SLR camera.
Preparing and working with the camera
I have no doubt that you are eager to start shooting! Wait, first prepare the equipment for work. The interface and features of the camera device from top manufacturers may vary. For example, Canon from Nikon.
How to adjust white balance?
For example, if your color looks somewhat inactive - if it is yellowish or bluish, you may need to adjust the white balance of the camera to counteract the ambient light using a heavy color. Most cameras have adequate auto white balance for general, but require adjustments in low-light situations, such as incandescent lighting.
A quick fix is \u200b\u200bto switch to one of the predefined white balance settings. If the color is still off, you may need to set the white balance manually. You will need to provide a camera with white color for reference, like a blank sheet of white paper.
Important! Read your camera manual very carefully.
But basically they have similar functions and are configured in a similar way, so my tips are universal, no matter what camera you use. I present the steps of the setup process to help you. Here are some things to check:
- Battery
- Memory card
- Format and image quality
- Vibrations
- Focusing
- Metering Area
- Shooting modes and options
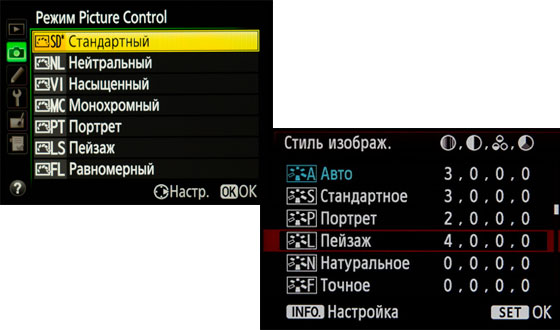
- Picture Control or Picture Style
Battery
Your camera must have a charge, most likely, is already included with your camera. These are not batteries, but a battery. Before you start taking pictures, you need to charge it well.
Depending on the model of your camera, this may be as simple as switching the white balance mode to “Custom” and shooting a reference image on paper to show the camera what “white” should look like. But these features can also damage your photos if you do not use them correctly.
First, we will give you a quick overview of the key controls, and then we will explain how to use them for different effects. Starting at the top of the camera, you will find the kit on the right side for a number of shooting modes. These are the ones you need to know.
In this case, usually a brand new battery for normal operation will have to be fully charged and discharged more than once. Carefully refer to the recommendations for its use in the instructions for the camera.
It so happens that if the battery is constantly re-charged without full energy consumption, it may gradually start to work worse, that is, it will last for less time.
How to set up the camera correctly, reducing noise during long exposure
The camera adjusts shutter speed and aperture and gives you the ability to customize several other settings. The camera will adjust the aperture to ensure proper exposure. The camera will warn you if the exposure is off, but it will not stop you. If you're a beginner, this mode often does more harm than good.
However, when you become more comfortable with photography, manual mode can help you get complex shots in which you want to get a specific effect that the camera cannot perform on its own. Use the smallest amount you can provide with adequate exposure.
Proper charging will help to avoid this. Also, it will not be amiss to purchase an additional battery if you plan to shoot a lot without the possibility of recharging.
Flash drive
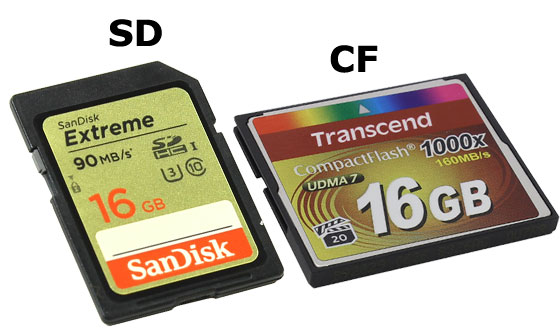
A flash drive, or memory card, is not for sale with the camera, it is bought separately, but you can’t do without it at all. It is on it that your photos will be stored. Much depends on: both the shooting speed and the speed of access to files. Therefore, you should not save on it, take a high class - not less than 10.
Some actions require higher settings. Set the zoom lens to about 35 mm and use aperture priority to control the depth of field. You set the aperture by turning the rear control dial. Having most of the scene in focus is also useful when shooting a group of people or any scene with important objects at different distances from the camera. This large aperture allows a large amount of light to shoot in dim conditions and to create a very shallow depth of field.
There are countless attempts behind the scenes to perfect the corner, the lighting, and what not. Which adds unfortunately, when this smartphone camera begins to show its limitations. However, choosing the right camera can be difficult if you don’t know what to look for. Moreover, most cameras cost more than a few hundred dollars. Therefore, you need to know what features you should look for in the camera and how they can help improve your photos.
Before you rush to try out the equipment, make sure that the flash drive is in place. Format it in advance by going to the camera menu.
Formatting will increase the free space for recording photos, as well as ensure optimal functioning. Do this procedure periodically: take a series of frames, fill out the card, then transfer the data to the computer and clean the USB flash drive.
Firstly, you should know that the only information cameras are going. Therefore, all cameras, regardless of whether it is built into your phone and placed in an independent chassis, depend on the lighting conditions so that they light up. There are, of course, settings to get around this. If you want to take high-quality night images, you will need a camera with equipment designed to make this a reality.
When it comes to choosing the right digital camera, there are three factors that you should consider. The aperture describes how wide the lens opening is, thereby controlling how much light is allowed. Finally, the shutter speed describes the time that your shutter is open to collect light, one of the key elements of photography. Shutter speeds are measured in fractions of a second, with higher shutter speeds absorbing light for shorter periods of time. Lower shutter speeds allow you to collect more light, which is especially valuable in low-light situations, but they are not very good for capturing bodies in motion.
Important! In the settings of your camera, set the settings so that, in the absence of a memory card, the camera does not take pictures. In Nikon, this feature is called - Lock the shutter release without a memory card.
Format and image quality
Any camera has the ability to save images of different sizes and formats, which determines their weight. Typically, this is JPEG, small, medium and large, but there are semi- and professional models where you can shoot in RAW - the highest quality or as it is also called digital negative.
Set up a camera for portrait photography
There are a huge number of additional features that are important to consider when using an expensive camera, which is too much to describe. But the list also includes some portable and convenient options that provide impressive results, perfect for difficult situations. The 2 megapixel camera is a great selling point, but truth be told, this camera does it all well. It captures action packed and beautiful shots.
Although relatively inexpensive, it still offers a number of great features that make it especially attractive for beginner photographers who don't want to spend too much on an introductory camera. This camera is compact and lightweight, which makes it easy and convenient to carry with you, unlike older cameras. Some of the features on the camera are pretty amazing. Let's start with the 84 megapixel camera. It captures an amazing level of detail and clarity that far surpasses any cell phone camera.
There is also the TIFF format, but it is mainly present on semi-professional and professional cameras.
Beginners most often start with medium quality. As soon as you master Lightroom or Photoshop, editors for image processing, you will understand the advantages of RAW. Despite the fact that such a format takes up a lot of space on the map, it will contain all the information for any frame, and in such a photo you can subsequently modify almost all the elements within reason.
The camera is also capable of capturing up to 40 minutes of continuous video recording. Although this should not be a mistake for a professional camcorder, it can certainly take some interesting shots. For example, the camera responds to simple voice commands, freeing up hands to make incredible shots. Advanced video stabilization allows you to take pictures on the go without much blur or distortion, which is extremely important for action-oriented people. Various settings allow you to optimize your photos in many ways.

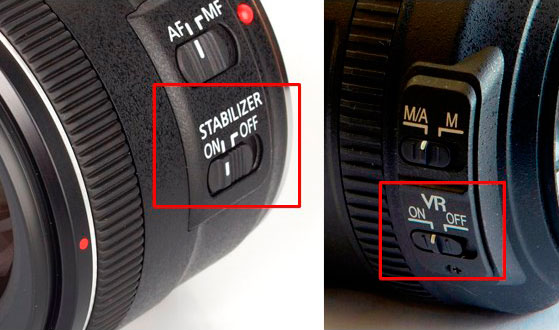
Vibrations
Did you know that our actual stability on site leaves much to be desired? If you didn’t know, then soon make sure - as soon as you start taking photos. Often or even constantly in the camera, you should enable the setting of additional noise reduction (stabilization), which will save the frame from vibrations. Vibrations naturally come from external conditions (wind, for example), from trembling hands, awkward movements and can make the image fuzzy, blurry.
First of all, you need to remember that
Of course, they had a lot of experience. There are also many shutter settings that provide endless possibilities for breathtaking and unique photos. The shutter can also slow down to 60 seconds, which allows you to capture in one image per minute of action, once again a feat that the human eye cannot capture.
Everyone knows that this is an amazing phone. What they may not know is that he can take some beautiful photos too. It also comes with a very impressive 12 megapixel camera, capable of shooting 4K video. This is a pretty serious business for a camera phone. However, take advantage of this 12 megapixel camera and practice your photo. Learn to look for beauty in nature, the city, your home. Develop a look at what distinguishes a good photo from a large one.
It is also necessary to turn on the button, which reduces vibration on the lens itself, if present (VR - on Nikon, IS - on Canon). If you do not have such a button, do not worry, it is not on all lenses.
Focus
In order for the optics to correctly recognize what exactly needs to be focused on and which object to make clear, it is necessary to vary the focus. In most cases, the manual mode will not be useful to you, so switch the focus button to auto. You can switch both on the lens itself and in the camera settings.
This will help you get the most out of your new camera when it's time to upgrade. The camera resolution is absolutely amazing. Using a 1 megapixel camera, your photos have never looked better or brighter than this model. In addition, the camera allows you to shoot images at a speed of 24 frames per second, which is quite surprising for a camera weighing just over half a pound. Drones have become one of the most popular new purchases. In fact, I have a friend who uses the drone to shoot footage from real estate.
Naturally, this dial tone will not offer the same level of photo control as a pocket camera. However, an unmanned aerial vehicle can fly in the air for up to 27 minutes. It can fly up to 40 miles per hour and has a transmission range of more than 4 miles.
Also, in the menu itself, you can also select the focus mode: single-point or multi-point.
I always shoot with the first option, since in the second the camera itself determines the points on which to focus. I don’t know about you, but I prefer to manage this process myself. Moreover, in the frame space, the focus area can be shifted in any direction, depending on the location of the main subject (with single-point focusing).
This unmanned drone, and both the photographs and the video materials that it can extract, came out of this world. This compact model is based on the best deals for the money. 45-point autofocus allows you to take great photos, making a lot of intellectual thinking for you, backed up by a stunning 2 megapixel camera that looks better than you ever imagined.
The viewfinder on this camera was one of my favorite features because the viewfinder covers almost 100% of what you see in the image. This provides unprecedented control over your art, because it allows you to see what exactly will be - and will not be - present in the shooting.
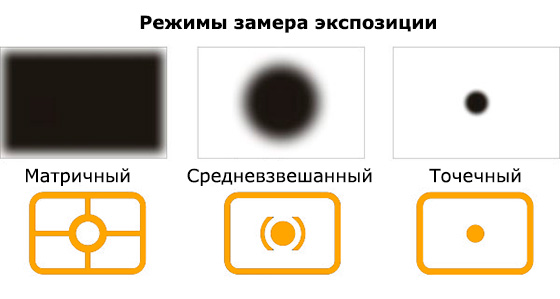
Metering Area
Of the three common metering options, I most often use matrix (multi-zone) and central. Matrix works well in many shooting situations: it measures the light conditions in several parts of the frame at once, which determines the exact exposure. The central one is more suitable when you need to evaluate the exposure in the central part of the photographed space.
What makes this camera so amazing is that at the same price as the base camera, you can also buy a camera with various accessories, including a travel bag, tripod, memory cards and others at no additional cost. Do not let its small size fool you, because inside this frame is a 2-megapixel camera. Of course, since technologies are not used for support, images are reset to 4 KB, but they support greater fidelity than support for smaller cameras.
Introduction Photo options. Diaphragm
The viewfinder allows you to shoot in real time up to 8 frames per second, which makes it easier to track a moving object, such as a butterfly or a gazelle. The only thing that disappointed me in this camera was the shutter speed. This camera is expensive. Nevertheless, for those who are serious enough about their art, there can hardly be a better camera.
More details about metering modes are described in the article -
Modes, shooting options
An important task is to choose the parameters. After all, they determine the whole picture! Of course, a lot depends on the composition and atmosphere, but the exposition and its components “create” the photo, they can both improve it and completely destroy it. I won’t write much about it, since exhaustive information about the exposure settings
It is difficult to explain the difference in quality without going down into many technical jargons. This camera is designed for a long time. Regardless of whether you work with a modest budget or whether you can get creative, there are a huge number of amazing cameras. Talk to people, find out your options.
First of all, refuse to be content with anything smaller than the camera, which really allows you to connect with the artist inside. Most new digital cameras have a high resolution for beginner photographers, which means that the maximum resolution in a digital camera is not as important as before. In other words, most new digital cameras can take what is considered high-revolutionary photos.
A very effective way to make the image more expressive and adjust to the shooting conditions. In addition, less time will then be spent on post-processing.
It will be very useful for you to watch a video course that will direct you to the right path, and in more detail will answer many of your questions about photographing. It is called " Digital SLR for the beginner 2.0"And is a well-chosen material, especially useful for a beginner.
This way you can be fooled by high resolution with high resolution when asking this question. Because there is no “standard” number for high resolution photography, the definition of what is considered high resolution will differ from photographer to photographer. Keep in mind that at the beginning of this decade, 10 megapixels of image resolution were considered many and may have been considered high resolution.
Now even the most basic digital cameras, such as, will often offer 20 megapixels of resolution. The purpose of what is considered high-resolution photography will change as camera technology improves in the future. Before moving on, we need to explain how megapixels work in cameras. One megapixel is equal to 1 million pixels.
It will also be useful to familiarize yourself with the video course dedicated to the powerful assistant of almost every photographer, Lightroom " Lightroom Sorcerer. Secrets of high-speed photo processing". This course will teach you how to work with photography correctly and make small adjustments to photos. With this program, you will understand why many photographers use the RAW format.
I hope the article was useful and understandable. More practice - and everything will work out! See you again on my blog! Share with your friends and subscribe to blog updates.
All the best to you, Timur Mustaev.
Probably every amateur photographer, heard or read about some magic called "fully manual mode." A photographer who uses only the manual mode from the point of view of an ordinary amateur photographer looks like a kind of enlightened guru who has reached such heights in photography that even eagles get sick! :)
The purpose of this article is to talk about the capabilities of the "fully manual mode", its advantages and disadvantages, and to analyze when it really needs to be used and when it is possible (and necessary) to use semi-automatic modes, for example, aperture priority (AV) or program exposure (P) or even auto mode.
The article will seem very controversial to many. I am sure that not all readers will support me. I consider it my duty to recall that everything that is written below is my personal opinion, based only on my experience, which I typed "from scratch" - I did not have teachers, I did not read teaching books on photography (printed albums of famous photographers - not count, there are only pictures).
What you need to know to shoot in manual mode
I entered the query “how to take pictures manually” in Google and “walked” through the top ten sites to find out what the authors of the sites about photography think about this (usually experienced photographers). As a rule, the authors of these articles immediately dig too deeply and an unprepared reader quickly loses the “thread” of the story and drowns in terms of exposure metering, shutter speed, aperture, iso, overexposure, underexposure, etc.
Of course, in order to mature before shooting in manual mode, you need a little theoretical knowledge and at least know the following things:
- Exposure - the time it takes for the shutter to open and light hits the matrix. It is measured in fractions of a second, but often only the denominator is displayed in the viewfinder. For example, the number 125 indicates a shutter speed of 1/125 second.
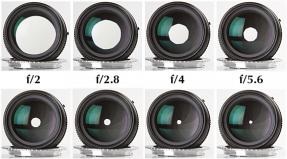
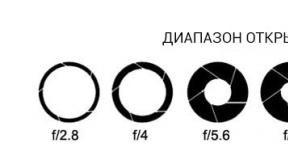
- Aperture - the pupil of the lens. When closed, it reduces the light transmission of the lens and at the same time increases the depth of field. It is indicated by the number "F", the larger this number, the "darker" the lens and the greater the depth of field in photographs.
- ISO sensitivity is a measure of the sensitivity of a matrix to light. High sensitivity allows you to shoot with faster shutter speeds, but leads to higher noise levels in photos.
You also need to know that you should not take a picture with a shutter speed longer than 1/60 second (with a telephoto - about 1/200 sec) without a tripod - while the likelihood of obtaining a blurry image due to shake increases. Moving objects are worth shooting with even more short shutter speed - a walking man 1/125 sec, a running man - 1/250 .... 1/500 sec, motorcycle racing - 1/1000 second. At the same time, do not increase the ISO sensitivity above 3200.
What is the advantage of manual mode
The main advantage of the M mode is a fixed exposure level in all photographs taken at the given settings. This is especially true when we photograph in conditions with variable lighting. For example, in a room with a window. If you shoot in auto mode, as soon as the window enters the frame, all other objects will immediately darken, and some of them will remain silhouettes. In manual mode, we rigidly fix the shutter speed, aperture and ISO - in which direction the camera does not point, the exposure level will still be the same.
This happens in the modes "Auto", P, AV (A), TV (S)
 And so in manual mode (M)
That's all! I think the pictures say everything. And there is no need to think about the fact that the manual mode allows you to accurately meter the exposure and send exactly the amount of light that you need to the matrix. You can dose the exposure in any semi-automatic mode - P, TV (S), AV (A) using the exposure compensation function. The only difference is that in these modes we work with relative values \u200b\u200bof the quantities (automation sets us the “reference point”, we can adjust the exposure to plus or minus), and in manual mode with absolute values. They set a fixed shutter speed, aperture, ISO, and automation can not affect them in any way. It turned out overexposed or underexposed photo - it’s their own fault. Although, sometimes "wrong" with t.z. Automation exposure is an artistic idea.
In what other situations do you need manual mode?
Example 1 - Night Scene ...

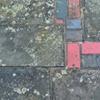
The peculiarity is that to get the "stars" around the lights you need to close the diaphragm as much as possible. Given the low level of illumination, automation will not do this for you at all! In principle, instead of the manual mode, you can use aperture priority (AV) and exposure compensation (make it a little darker so that the brightly lit building in the background is not knocked out in white) - you get exactly the same result.
Example 2 - shooting a house without a flash in low light, so that there is a large DOF and there is no movement
It is already quite difficult to solve such a problem in a semi-automatic mode (or even impossible at all). If you take pictures in AV mode, most likely we will get a shake because of the long exposure, even at open aperture. If in TV - the camera will open the aperture up to 2.8 and one of the faces will be blurry. But, you must admit, the task is extremely specific - quite rarely you have to deal with such. Or you’ll have to pull up the ISO very much - personally on my camera there is no such possibility, since the maximum that you can squeeze out of it is ISO3200. Although, if the camera has a “working” ISO6400, then similar scenes can be photographed on it almost in auto mode :) Unfortunately, most cameras cannot boast such a high “working” ISO, so it’s better to use manual mode, RAW and processing in Lightroom. This will, to some extent, make the impossible possible.
Still manual mode It is useful in studio shooting, in which pulsed lighting equipment is synchronized strictly at a certain shutter speed, and in order to change the exposure level, we only have to control the aperture. Unfortunately, I can’t give examples of such filming, because I do not work in the studio.
TO manual mode You will also have to resort to cases where the ability to adjust certain settings is insufficient (for example, maximum exposure compensation + -2EV, but this is not enough for you and you need to set the correction -3EV). Rarely, but it happens.
Manual mode It is actively used when shooting panoramas, where you need to fix the shutter speed and aperture tightly to get pictures with a fixed exposure level and the same DOF (so that later there are no "steps" when gluing the panorama).
Manual mode it is sometimes used to create if the auto exposure bracketing function is absent or its capabilities are not enough to implement the author’s idea.
Still manual mode needed when using optics that can’t transmit the aperture value to the carcass. These are "manual" lenses, for example,. For Canon carcasses with a closed aperture, the exposure meter does not work correctly and tries to set too slow shutter speed and highlights the pictures. Setting the shutter speed in manual mode helps to avoid this.
If you strain, then you can come up with some other situations in which only manual mode will save, but I’m sure it will be so untypical and sophisticated tasks that I can say with confidence that they will never arise in everyday life.
Alternatives to manual mode
Most modern cameras have the ability to flexibly configure shooting parameters in semi-automatic modes. For example, you can set the upper limit of the ISO sensitivity selected in Auto ISO mode, the shutter speed threshold that cannot be exceeded (for example, prevent the machine from setting the shutter speed longer than 1/60 second), and so on. By setting up the device in this way, we will provide ourselves with a generally trouble-free operation in P, TV, AV modes. For everyday “protocol” shooting, this is much more convenient than manual mode, since the device’s readiness time for shooting is significantly reduced - you do not need to desperately turn the wheel to change the shutter speed from 20 seconds to 1/200 second (if you’ve photographed from a tripod at night) .
Try manual mode now!
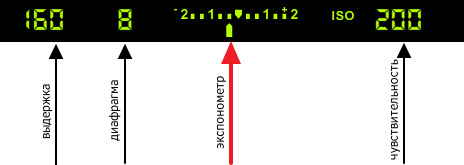
In fact, taking pictures in manual mode is easy. Switch the camera to mode M. If you look at the scoreboard in the viewfinder of the SLR camera, the exposure meter scale is displayed, which shows the exposure level of the picture with the current settings for shutter speed, aperture and ISO sensitivity. In the general case, your task is to bring the arrow of the exposure meter "to zero". About which buttons to press and which wheels you need to turn to change the shutter speed, aperture and ISO - read the instructions for your camera.
Learn more about manual mode
In fact, this article gives only a superficial idea of \u200b\u200bthe possibilities of manual mode. If you want to dig deeper, I bring to your attention my book "How and why to photograph in manual mode", in which all the details of manual work are set out in full detail.