We do paper crafts with our own hands. Crafts from paper for children. Master classes with photos for every taste. Unusual paper flowers can be made in different ways.
For many years, one of the most popular types of needlework has been paper crafts. With an enviable frequency, new approaches to it and the most various branches of this direction appear - here there are kirigami, modern papercraft and much more. Below we will talk about how to make paper crafts with your own hands using simple schemes.
Having devoted a little time to training, even any child can cope with the listed instructions without problems.

The first thing to do is prepare colored paper, any glue and small scissors. In addition, rhinestones and other materials can be useful for work in order to give the creation a complete look.

Simple paper crafts
Most often, from early childhood, all children show a special interest in precisely such material as paper, and this must be used for their own good. To instill a love for this kind of creativity, mom and dad can go to the trick and captivate the child by creating toys by showing photos of hand-made paper crafts that they themselves liked the most.


You can literally in thirty minutes or even less, cut out a cute bunny or, for example, a bird, with which the child can later play or use them as a decor for a children's room.

How to make a cardboard bird?
- Using the template, cut the bird in shape, draw feathers, a key and a tail for it;
- Fold a sheet in the shape of a square of any color in an accordion;
- Make a hole and finally secure the bird's wings in it.

If the child likes to make a bird, then you should not limit yourself to just one. Hanging a few paper birds on a simple wooden stick, you can turn them into an interesting craft for decorating an entrance, for example, a children's room or a corridor.

Please note that absolutely all complex work in which something is required to be cut must at first be carried out either personally by adults, or under their control.

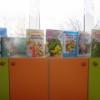
In order for the child to develop accuracy, it is necessary to ask him, after completing the work, to put all the tools in the prepared box.


How to make a three-dimensional picture using paper with cardboard?
The easiest paper crafts are applications that are taught to do in elementary school.

Of course, a beautiful and at the same time still voluminous picture made with your own hands from bright flowers can be an excellent gift for a sister or grandmother from a child. At the same time, it is not at all necessary to spend money on expensive colored paper, since today, according to the instructions, flowers can be made, in principle, from any napkins or even toilet paper.

If you decide to choose the second option and make your own craft from the toilet paper available at hand, then it is better to give preference to more expensive paper, on which there will be perforations. It will be possible to paint over it in the future.

As practice shows, it is even easier to work with napkins and it is only important to make sure that you do not accidentally break it during work.

The sequence of actions should be as follows.
- First, you need to fold the napkin four times, securing it in the very middle with a stapler.
- Secondly, a circle is neatly cut out of the napkin and, by lifting each of its layers in turn, a fairly lush flower is obtained.
- Thirdly, from prepared dark green paper, it is necessary to cut out about 10 leaves using a template.
- Fourthly, a basket should be cut out of brown paper and glued onto a thick cardboard sheet of any color.

All that remains is to place flowers with leaves in the basket. If you want something original, then you can try to make a basket, for example, from corrugated paper or foil, which is used for baking.

Paper crafts for the new year
Classic snowflakes can be an excellent paper decoration for the new year. There are a huge number of different options for how to make beautiful paper snowflakes, most of which can be easily done by a child, repeating simple steps after the parents.

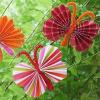
No less popular crafts are paper balls or a garland. To make them look more interesting and unusual, you can sprinkle the product with bright iridescent sparkles a little.


The balls will look interesting if you make them delicate. The easiest way to make such a ball with your own hands is to find its diagram, then carefully cut out the shape and glue it.

In conclusion, it is worth noting that any paper craft will look good if it was made with soul.

Photo of paper crafts with your own hands


Paper is the most demanded and affordable material for creativity. Making crafts from it is equally interesting for both children and adults. There are many options for work. Let's take a look at how to make the most fun and unusual items in this article.
Advantages of paper
Homemade decor from it has the following advantages:
- ease of creation;
- an exciting pastime;
- financial availability of the material;
- cost savings;
- uniqueness;
- no need to have work experience.

Such creative activities help to shape children's imagination and imagination, as well as develop fine motor skills.

Home Decorations
Interior designers have long been advised to look closely at paper decorations. This is quite rational, because the use of such a decor is the simplest solution if you need to update the appearance of the room. Moreover, hand-made gizmos are always highly valued. Here are some original ideas.

Paper baskets
Beautiful compact baskets are a great choice to keep things tidy. It is appropriate to store various small items in them. But it is worth remembering that such accessories have much lower strength and moisture resistance than traditional products, although the appearance can be almost identical.

For weaving baskets, paper twine or braids made with their own hands are used. On the Internet, you can find detailed master classes for any of the manufacturing techniques. All of them require only desire and free time.

Pyramids for the wall
This type of paper and cardboard crafts is a three-dimensional decorative element that fits perfectly into the modern stylistic direction. A monochrome surface is considered the ideal basis for this kind of accessory.

You will need to prepare:
- thick colored paper;
- cardboard;
- pVA glue;
- scissors;
- ruler.

Step-by-step sequence of actions:
- Cut out the base of the required size from the cardboard.
- Mark with a pencil the places for the pyramids.
- Cut the required number of paper squares and place them in the blanks for the pyramids using the origami technique. Fold each of them sequentially together to form a solid module.
- Fix the panel to the cardboard base. Fix the edges with tape.

The finishing touch can be a custom frame.

Touching butterflies
The area of \u200b\u200bapplication of butterflies is wide enough. They decorate both walls and other surfaces, for example, photo frames, paintings, mirrors, lighting fixtures, ceilings. Nice images are obtained from different types of "raw materials" (Whatman paper, tin). However, it is paper that is most in demand.

First of all, it is worth deciding on the concept and making stencils. Templates can be drawn by yourself or printed from the Internet. Further, with their help, you need to cut the required number of pictures. Elements are fixed in several ways - with glue, pins or buttons.

Exquisite lamps
Decorators often showcase custom lampshades. The price of the exclusive "clothing" for lamps is rather big. Therefore, it is much more profitable to try to design them with your own hands.

An impromptu rose garden, a Chinese lantern, wicker table lamps - all this can be made from plain paper.

Paper crafts for children
In view of the sufficient prevalence of this material, the technique of its use by babies is becoming more and more every year. Let's analyze some popular ideas for children's paper crafts.

Volumetric crafts
Cheerful cat. It is extremely simple to create. Kids will definitely be delighted if you invite them to bring to life such a voluminous craft from colored paper.

For older guys, there is a more difficult idea - to make an entertaining bird. The instruction in both cases is the same:
- Download, print and cut the template.
- Fold all the fold lines and glue the parts together in the required order.

Wall panels and applications
Application is a very useful thing. She develops hand-eye coordination, perseverance and imagination, and also teaches how to combine colors, shapes and textures.

In order for the child to enjoy the lesson, he needs to offer a topic that will suit his age and interests.

Children are always interested in animals, birds, insects, trees and flowers. They see them every day and will be very happy to translate them into work.

Options for paper toys
Craft paper "Pirate" for boys
Pirates, corsairs, filibusters - all these are the names of sea robbers. These people were famous for their fearlessness and love of freedom. A similar image can be easily realized using multi-colored paper. Here are the steps required:
- Cut a rectangle with sides of 120 and 70 mm from a pale yellow sheet. This is a body blank.
- Make a vest by gluing three black strips measuring 12 * 1.5 cm, 12 * 0.5 cm and 12 * 0.5 cm on a light rectangular strip 12 * 4 cm.
- Attach the resulting striped piece to the bottom of the body blank.
- Draw the corsair's face and roll the yellow rectangle. The hero's body is ready.
- Make a beard from an orange leaf. To do this, draw a silhouette, cut it out and cut the fringe. Glue the finished element to the character's face.
- Make a traditional corsair's headdress and put it on a pirate's head.
- Create handles (they will be dressed in a vest) and glue them to the sides of the body.
- Add plastic eyes - work on a children's homemade product for boys is completed.


Option for girls "Fairy Fairy"
This fairy will be completely made of paper circles folded by different methods. From the tools you will need a compass and scissors. First you need to find a scheme that suits you. Next, cut out the required circles. Five elements are shown here - dress, head, arms, wings, eyes. The color of the blanks is of your choice.
Stages of figurine creation:
- The circle for the dress needs to be folded 3 times and glued.
- The next step is to prepare 2 semicircles for the sleeves and 1 for the collar. Attach them to the outfit blank.
- Cut and glue the hands (2 white circles). Add wings to the back of the body.
- Design your head and create a hairstyle. Hair is also made from paper circles.

We have told only about a few entertaining things that can be made of paper for interior decoration and children's games. You can use them or come up with something else. Most importantly, do not be afraid to dare and fantasize. Create beauty around you and please your loved ones.
Photo ideas for homemade paper crafts


Fast navigation through the article
Making paper crafts with your own hands is a simple, inexpensive and very interesting activity for both children and parents. All you need is paper, scissors, glue and some cool ideas. In this material you will find 7 step-by-step master classes on needlework from different types of paper and 50 photo ideas for your inspiration.
Idea 1. Bulk crafts
We offer the smallest needlewomen to make a simple volumetric paper craft in the form of such a cat.

Materials:
- A4 sheet of paper;
- Scissors;
- Glue.
Instructions:
- Download and print the template (see the cat template below) on white or colored paper;
- Cut out the template with scissors, and then make 4 cuts in it along the outlined solid lines;
- Bend your neck along the markings with an accordion and twist the tail;
- Bend the dotted fold lines on the legs and glue them to the cardboard.
For older children, there is a more difficult task, namely a master class on making a volumetric paper craft in the form of a bird.

Instructions:
Step 1. Download and print the layout diagram (see below). Note that the file contains a colorless template so you can print it on colored paper.
Step 2. Cut all the details exactly along the solid lines using a breadboard knife.
Step 3. Fold all the fold lines according to the principle: bold dotted line \u003d fold inward, thin dotted line \u003d fold outward.
Step 4. Glue the parts together by glueing their corners (with the words Glue). Stick to the following order:
- First glue the beak to one side of the bird, then to the other.

- Glue the back of the bird starting from the beak, as shown in the photo.

- Glue the wings.

- Now take the part, which is the poultry breast, and at one end, fold and glue the triangle as shown in the photo.


- Assemble the legs, make sure the knees are at a 90 degree angle, then glue the legs to them.

- Well, that's all, it remains only to glue the legs to the body and your volumetric paper craft is ready. If you wish, you can make a whole flock of such birds in different colors with your own hands.


Idea 2. Wall panels, paintings and applications
It is known that you can draw not only with paints on paper, but also ... with paper on paper. Such classes are no less exciting and useful for the development of hand-eye coordination, fine motor skills, perseverance, the ability to plan their work, to combine colors, shapes and materials.
The following selection of photos presents ideas for paintings, panels and paper applications for children of different difficulty levels.


By the way, the applique can be made of parts of the same shape, but different sizes and colors. These can be circles or hearts. The next slider shows examples of such paper crafts and schemes for their manufacture.


And here are some more examples of interesting paper crafts of different types.

Now we offer you to get acquainted with a master class on making an original, but very light paper craft. We have no doubt that such cute figures will help instill an interest in reading books in your child.


Materials:
- 1 sheet of colored A4 paper;
- 1 sheet of A4 white paper;
- Scissors;
- Glue stick;
- Markers, pencils and paints.
Instructions:
Step 1. Bend one half of a white A4 sheet in half and let the child draw on it the cover of his favorite book on his own, also signing the title and author's name.
Step 2. Cut three long strips from a colored sheet about 2.5 cm wide. You will have 4 details: 2 stripes for the legs, 1 stripe for two arms and one rectangle to create the body of the figurine.

Step 3. Take two strips (for the legs), fold them like an accordion, and then glue them to the body-rectangle.
Step 4. Divide the remaining long strip into two equal parts, draw fingers at the ends and glue to the body.
Step 5. Bend the top of the figurine to the front side and make bangs with it using scissors as shown in the photo.

Step 6. From the remaining half of the white sheet, cut out circles and glue on the figure as if it were glasses.
Step 7. Draw the details: eyes, mouth, nose and temples with black marker.
Step 8. Now glue the book to the hands of the figurine and finally place it on the table or hang it on the wall, for example, near a bookshelf.

Idea 3. Hats
All children love transformation games and for this they use everything that comes to hand. To provide your child with props, you can make fancy hats with him. By the way, such colored paper crafts can be made for one or several children for a performance, masquerade, themed birthday or any fancy-dress party. In the next selection of photos, you can see examples of a wide variety of paper "hats" - from pirate cocked hats to wigs.


Today we offer you and your baby to make a hat in the shape of a dinosaur head. This master class is so simple that a child from the age of 3 will need very little help from you.

Materials:
- 3 sheets of colored paper;
- Glue stick or PVA;
- Scotch;
- Scissors.
Instructions:
Step 1. Cut 4 strips about 3 cm wide along the long side of the sheet of paper. Two of these strips will turn into a headband, and the other two - into “cap” crossbars, on which the dinosaur spikes will stick.

Step 2. Take two other sheets of paper and cut them into strips about 5 cm wide along the short side of the paper. You can measure and cut strips by eye, but in the end you should get 5 strips from each sheet. We need these blanks to make thorns.

Step 3. Fold each blank for the thorns in half and, stepping back about 1.5 cm from the fold, draw a marking in the form of a triangle up to the very edge (see photo). Next, just cut out the future spikes.

Step 4. Glue two strips-crossbars, and then glue spikes on them in a row as shown in the photo below.

Step 5. While the glue is drying, adjust the two pieces of the headband to fit the circumference of the child's head, then tape them together in a circle.
Step 6. Now let's get back to the spikes. Turn the crossbar over so that the spikes are on the table and bend each of them well (see photo). Form the first spike: cover one side with glue and connect it to the other. Use paper clips to secure the spike until the glue dries. Repeat these steps for the rest of the pins.

Step 7. After the glue is dry, remove the staples from the cleats and simply glue the crossbar to the headband at the front and back.

Idea 4. Toy figurines from a toilet paper roll
Toilet paper rolls are great kid's craft blanks that only need a little embellishment. For example, you can make such wonderful toys from them.


Paper is the most affordable and versatile material for creativity. Plain white paper and a set of colored paper for applique are available in almost all stores. In specialized salons, you can find dozens of different types of paper, differing in composition and texture.
Having conceived to make paper fakes with your own hands, you can give a second life not only to the magazines and newspapers you read, but also to the written-down notebooks and notebooks, as well as packaging from goods.
Using paper as an attribute for educational games with toddlers can train their fine motor skills, ability to concentrate and develop imagination.
Learning elements of varying complexity can be introduced into the content of the creative process of paper crafts for children, ranging from the study of numbers, letters, hours, arithmetic, the names of flowers, animals, etc. - in simple applications and mosaics, and uploading with the most complex origami designs for which you need to have an extraordinary gift of spatial imagination and remarkable patience.
Making volumetric figures in origami style, paper models of buildings, cars, ships, and mastering other types of applied paper art, when moving to a professional level, can become not only a hobby for life, but also bring a considerable income.
For starters, the simpler the better
When starting to work with paper at any age, it is better to start with light crafts: simple appliqués, openwork cutting and weaving, as well as master the basics of origami. It can be interesting to use the papier-mâché technique (multi-layer glued curly paper) and quilling - making figures from twisted strips of paper.
Paper butterflies - endless scope for imagination
The first experience in making a volumetric product can be a butterfly. The basis of this craft are rectangles of paper (equilateral or slightly elongated) folded diagonally like an accordion and fixed in the middle with glue or threads.
You can make the torso and legs using wire and the head from a bead. The surface of the wings can be painted, decorated with thin openwork cuts of colored paper or beads. By stringing such butterflies on one thread, you can make beautiful garlands. Or you can cover a part of the wall with such colorful flocks.
The same simple technology for making a butterfly using more (from 6) layers of corrugated paper can be used to make decorative balls. At the same time, not only the color and size, but also the shape of the balls varies, you can bend the edges of the blanks in different ways, rounding and pulling them in the right places.
Squares, circles, rhombuses and even triangles superimposed on each other and fixed in the middle can serve as a basis for such balls. The silhouette of the product can be changed using blanks of different sizes.
This simple paper craft technology is also at the heart of making paper flowers. You can start with simple stylized inflorescences, making appliqués fixed in the center with circles, and then try more complex three-dimensional models of artificial flowers, which are made from special textured paper.
Origami butterfly
In order to learn how to make an origami-style craft, you must first of all remember the simple designs: airplanes, boats, frogs, familiar to everyone from childhood, etc.
These traditional patterns can be given new life by using interesting paper textures, decorating products with paints and beads.

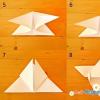
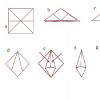
We have to admit that in our time paper butterflies have bypassed the popularity of the famous paper airplanes and are an integral decoration of any girl's room. Here is a step-by-step instruction for paper crafts using the example of such a butterfly:
- 1. fold the paper square horizontally and vertically, then fold it in the form of a diamond, according to two possible options, and also make clear inner folds.
- 2. Fold the workpiece in a double triangle with free edges in the form of a boat.
- 3. alternately bend the corners of the triangle to the top of one of the sides and bend this side so that a wing is obtained.
Combined applications - room for imagination
Using glue and scissors, you can make snow from rice, chicken from threads, a house and a fence from matches, a cat from cotton wool ... and the list can be continued indefinitely. The photo shows crafts in which paper applique elements are combined with other materials.
Paper is the most common craft material for several reasons: low cost, availability, ease of use. Of course, paper cannot be called a very simple material, because it all depends on your skills, the type of paper, and the complexity of the craft. It can be a simple applique for children, or it can be origami from modules that little children cannot cope with. In this article, I want to offer 10 crafts of varying difficulty for children and adults. They are made from several types of paper: plain white A4, colored, corrugated, crepe. He even eats one craft from leaves for notes. Let's get down to looking at the various options for work.
3D postcard for March 8
You always want to surprise with a gift for the holidays, and such an unusual postcard will not leave anyone indifferent. This craft can quickly and simply be done by a child from 9 to 11 years old with his own hands and presented to his mother or grandmother for the holiday. To learn how to make a 3D postcard, you can see a photo and video description with step-by-step instructions.
You will need:
- Colored paper (4 sheets of white and 1 pink sheet)
- Scissors
- PVA glue
- Ruler
- Pencil
- Double-sided tape
- Paint (lilac and green)
Progress:
- Divide the white sheet in half with a line, and then fold the 4 sheets together and cut along the line. We need 7 halves, set the 8th aside.
- Take half a sheet and fold it in half 2 times. We get a rectangle, two sides are closed and two are open.
- We bend the corners to the closed long side outward. We do this in both directions.
- Now the bent corners need to be bent again in the opposite direction, this is done only on one side.
- We get a reference point by which we will cut off. Cut along the folded line on one side, and then straighten the corner once and cut along the line on the other side. This will give us a leaf-like shape.
- We do this with the remaining six sheets. To keep the shape of all colors the same, just attach the first blank and cut along it.
- Take the resulting flower and cut out one petal from it, and then glue the gap by placing the side petals exactly one on top of the other. You should get 6 petals. We do this with all the flowers.
- Fold the flowers in half. On the side petals of the 1st flower, glue pieces of scotch tape on the very top of the petal.
- We glue the flowers on the side parts, only the side petals, gently applying the petal to the petal.
- Now we glue the 4th flower on 3 flowers, also only in the 4th all the petals should be glued.
- Glue the 5th and 6th flowers on top as 2 and 3 (only on the sides).
- Glue the 7th flower on top of all the others by 3 petals.
- Fold a pink sheet in half like a postcard, now we will finish our composition.
- We put the flower on the half of the postcard and attach the scotch tape to the upper central petal and close it with another sheet of the postcard. Glue the other side in the same way. Make sure that the sheet lies clearly near the fold line.
- The postcard is ready; all that remains is to paint the middle of the flowers. You can sign the postcard.
Caterpillar made of colored paper
Such a caterpillar is easy to implement and will take very little of your time. The craft is designed for children from 2 years old and their parents. You will be able to spend time with your child pleasantly and useful, and develop the motor skills of children's hands. Let's get down to making the caterpillar with our own hands. 
You will need:
- Colored paper of different colors
- PVA glue
- Scissors
- Ruler
- Pencil
- Markers
Progress:
- Make strips of paper 6 cm long and 1 cm thick (red, green, blue, yellow, purple, brown, blue). The colors should be different to make the caterpillar rainbow-colored and vibrant.
- We glue each strip to make circles.
- When the circles are ready, we glue them together, alternating colors, You should get a strip of circles. We glue the last one a little higher than the rest, it will be the head.
- With a felt-tip pen, draw a mouth and eyes.
- Cut thin strips out of colored paper and twist with scissors. Glue them in place of the antennae.
- From a green leaf, cut out the shape of the leaf, focusing on the caterpillar. Our funny caterpillar is ready!
Corrugated paper valentine
For Valentine's Day, ordinary cards in the form of hearts are always presented, but if you want to make a more original card, make it out of corrugated paper. And now I will tell you how to make a Valentine's card with your own hands in stages with step-by-step instructions. 
You will need:
- Cardboard
- Red corrugated paper
- Scissors
- Match
- PVA glue
Progress:
- Cut out a card in the shape of a heart.
- Cut the corrugated paper into squares a little more than 1 cm in size.
- We apply the square with the central part to the tip of the match and wrinkle the paper in a circular motion. Do this with all the squares.
- We put glue on the valentine's card and begin to glue our crumpled blanks. When the glue is dry, fluff the paper to make it fluffier. The postcard for the holiday is ready, you can present it to your loved one.
Bunny in 5 minutes
If you need a kindergarten craft that doesn't take long, then a voluminous bunny will be the perfect option. The most important thing is that you can connect your baby to the execution process. Let's see how to make a simple bunny with your own hands using the detailed instructions. 
You will need:
- Sheet of colored paper
- Scissors
- Ruler
- Pencil
Progress:
- From a sheet of paper, cut 2 strips about 1.5 cm wide along the length.
- Cut one strip into two different strips. The difference is about 3 cm.
- Glue both strips so that we get 2 circles.
- Glue them together.
- Cut the second strip into 3 equal parts. Cut one piece lengthwise. We fold each thin strip in half and glue the ends. These will be our ears.
- We glue the ears on our blank of two circles, on the smaller one.
- We also cut the remaining strips lengthwise. Legs are made like ears. Glued onto the bottom circle.
- From one more strip we make a small circle and make a tail.
- Fold the last strip in half and use scissors to round the edges. Spread and glue to the back of the bottom circle and twist them forward with scissors. The bunny is ready!
Video how to make a paper bunny in 5 minutes
Beautiful flower
To decorate the interior, you can make an unusual flower out of note paper with your own hands. For this, you do not need special skills; a child of 4-7 years old can help with implementation. To complete the craft, we have made a detailed description for you with step-by-step instructions. 
You will need:
- Note paper
- PVA glue
- Cardboard
- Scissors
Progress:
- Notebook paper is best used without the sticky edge. Take the sheet with the corner up and fold the side corners and sides towards each other. Glue them together. It turns out bags. Do this with all the leaves.
- Cut out a circle of about 7-8 cm from cardboard. This will create a small flower.
- Now glue the 1st row of petals on the circle with the short side up. The petals should be close to each other.
- In the next row, glue the petals into the gaps of the previous row.
- So we do the subsequent rows, gradually reducing the number of petals in a row.
- Fill the middle with petals without focusing on the rows, see that it is beautiful and voluminous. The flower is ready, you can hang it on the wall, or put it on the table.
DIY flower video
DIY book
If you want to make an unusual craft that will also come in handy for use, you can make a small origami book out of paper. You will not write down your poems or compositions in it, but it will come in handy for small notes, moreover, it will not take up much space in the bag. It is very easy to make such a craft, just follow the instructions with a step-by-step description. 
You will need:
- A4 sheet of paper - 2 pcs of different colors
- Scissors
Progress:
- Fold A4 sheet in half lengthwise. Open the sheet back.
- Next, fold the sides to the center fold.
- Along the folds, cut the sheet into 4 strips.
- Take one strip and fold it in half 3 times. You end up with a small rectangle.
- Do this with all the strips.
- Open the resulting triangle and now fold it accordion. Do the same with the rest.
- Now glue all the pieces, folding the last pages one on top of each other.
- Using glue, fold the sides that face each other and glue. In this way, we make pages.
- Fold A4 sheet of a different color in half in width, and then in length. You will have 4 rectangles. Cut out one of them.
- At the rectangle, fold the side long sides towards the center, but not reaching the center about 0.5 cm.
- Fold the rectangle in half and slightly outline the cent. Now focusing on the center, make two folds in the center, about 0.5 cm wide. The cover is almost ready.
- Now, trying on the sheets of the notebook for the cover, bend to fit the sheets inward. Then insert the last pages of the notebook into the cover. For better attachment, you can use glue. Our unusual notebook is ready.
Video how to make a mini book with your own hands
Butterflies for decor
Paper butterflies can be used to decorate walls, windows and gift wraps. They create a romantic and light mood, because butterflies are so graceful. A child starting from 3 years old, as well as any beginner, can make butterflies with their own hands. There are many options for making paper butterflies and we want to offer you one of them, quite interesting. Now let's create a beautiful butterfly decoration with our own hands. 
You will need:
- A4 sheet of paper - 2 pcs (yellow and pink)
- The needle is large
- Beads and beads
- Thin wire
- Scissors
- Double tape
Progress:
- We take one sheet and fold it in half, but the fold does not need to be selected too much.
- We cut off the corners, more on the lower side, and less on the upper side with a smooth bend in the middle.
- We open the sheet and, moving along the fold line, fold it with an accordion. We made the upper wing.
- For the bottom, we do the same thing only we will cut the corners of the same size. Next, fold it with an accordion.
- With a needle we pierce the wings of the butterflies in the center, so that in the future it will be easier to fasten them.
- We fold the wire in half and string the wings on it.
- Put a white bead on the wire near the upper wings, on both fibers. Then two gold pieces for each tendril.
- We decorate the rest of the wire with golden beads. To finish the antennae, we need to push the tip of the wire into the last beads two times. We cut off the excess. We also do it with the second mustache.
- Tape the upper and lower wings together with tape.
- On the lower part of the wire we put on white beads of a larger size, about 4 pieces, and then 2 more beads of a smaller size.
- You need to finish the tail like the antennae, but for reliability you can make a few twisting movements and cut off the excess.
- Now spread the wings of the butterfly and you can decorate the interior.
Origami tree made of paper
To decorate your home, office or kindergarten for the new year, you can make an interesting and unusual Christmas tree out of paper with your own hands. For those who love origami, this Christmas tree will love it. To complete this craft, read the step-by-step instructions, as well as a photo and video description. 
You will need:
- Colored paper
- Scissors
Progress:
- We make a square from a sheet of green paper.
- Connect two opposite corners to make a triangle.
- Bend the triangle back into a square and fold the other two opposite corners into a triangle.
- Along the folds along the sides, fold them in the middle, when you fold it into a triangle.
- Now we bend the sides of the triangle to the center, from the beginning on one side, and then on the other. Straighten it again.
- We straighten each resulting triangle along the fold, straighten along the central fold and fold and make a new fold to the left.
- Divide the resulting structure into equal sides.
- Fold the bottom corners up, and then hide inward.
- We get a blank that looks like a Christmas tree. We make three cuts on the sides, a little short of the center.
- Now we need to bend the corner to the inside of each incised piece. Thus, we get the corners of the Christmas tree. We do this work with all the pages of the tree.
- The Christmas tree is ready, you can decorate your home.
Chamomile paper
If you want to bring a summer and sunny mood to the interior, make paper daisies with your own hands. They can be used not only in the interior, but also as a gift to family and friends. Such interesting and beautiful daisies will not leave anyone indifferent. 
You will need:
- Crepe paper (yellow and white)
- Colored green paper
- Scissors
- Scotch
- Threads
- Toothpick
- Ruler
Progress:
- Divide a sheet of colored paper lengthwise into 4 parts and cut 1/4.
- Using a toothpick, twist our strip into a tube and glue the tip with tape. This will be our stalk.
- Cut out a piece of white crepe paper 10 × 25 cm and yellow 20 × 4 cm.
- Fold the yellow strip 2 times and cut the closed parts on one side with scissors. Now, on both sides along the strip, we make frequent cuts about 1 cm deep.
- Fold the white paper in half and cut the closed part.
- Place the white paper on the table, and the yellow paper on the outermost part of the long side, and relative to the width, it should lie in the middle.
- Starting on the other side, fold the paper with an accordion.
- We tie it in the middle with a rope for fixing.
- Round off the white ends with scissors.
- With the narrow side of the stem, go around the middle of the flower and secure it with tape.
- Spread the center of the petal towards the top to make it fluffy. Also spread the chamomile petals.