What kind of craft to make out of paper. How to make paper crafts for children of different ages with your own hands. Crafts from paper and cardboard. Volumetric paintings
Making out various crafts for children with your own hands together with your child is an exciting activity that significantly contributes not only to the development of the child, but also to the strengthening of your relationship with him. Any child will be very happy if he has the opportunity to do something beautiful with his parents. Therefore, even in the most busy schedule, try to find a piece of time to devote to activities with children. The sections of our article will provide useful recommendations on how to make a DIY craft from various materials, taking into account the age characteristics of children.
DIY crafts for children from paper
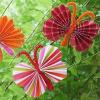
The most frequently used material for applied art is, of course, paper. Moreover, it is worth paying attention not only to the usual color sets, but also to its other types: corrugated, velvet, designer. You can create do-it-yourself crafts for children from paper flat (applications), as well as voluminous, using various techniques. For example, having learned how to fold a flower using the origami technique, form a beautiful bouquet of tulips.


The easiest DIY crafts for beginners
For those who are just starting to teach their child the applied arts, we advise you to start with the simplest solutions, making easy DIY crafts for children. Perhaps you will like examples of caterpillars made of paper rings, an applique made of colorful fish or funny mice on a piece of cheese.


DIY cardboard crafts for children
Cardboard is an easily accessible material, which is well cut, bend, painted, it is often used in children's creative works. In addition to a set of cardboard, purchased in the store, cardboard boxes, disposable dishes, packaging for cereals, egg "honeycombs", as well as toilet paper rolls are used. In our photo catalog you will see what craftsmen make from cardboard with their own hands for children. For example, a stand for pencils, funny animals, boxes.


Craft "house" with your own hands
Cardboard houses are made at will of any size - it all depends on their purpose. Perhaps it will be a large construction with a child's height, a "dwelling" for dolls, or a handmade "house" made as a New Year's decoration, gift wrapping. In any case, the manufacturing technology is the same, the differences will be in size and design. We have prepared some sketches for making blanks. If you are making small structures, there is enough PVA glue and tape holding the parts together. When building a large house, it is better to use a heat gun for reliability. A DIY Christmas craft "house" is complemented by a decor that imitates snow on the roof (cotton wool, foam balls), and the gift wrap must have at least one opening sash, for example, a door, a roof slope.


How to make a DIY craft out of fabric
Wonderful DIY toys are sewn using fabric. Moreover, not only a single cut, but various scraps, household napkins and even socks. Look at the photo, isn't it, a cute bunny came out of a sock? An older child will do it on his own, and the baby will have to help. Make the necessary cuts and seams, and instruct the child to fill the figure tightly, and also draw the muzzle.
You can also sew crafts for children with your own hands, which will become not only an ornament, a toy, but also a useful little thing, for example, a large soft ottoman duck, a photo of which is in our catalog, a star pillow.


Children's crafts with their own hands from felt
Felt is a wonderful comfortable fabric with a bright palette of colors. It allows you to sew a variety of DIY crafts for children, and then decorate the children's room with them. Use household napkins (usually sold in a set of four colors) to replace the fabric. Such crafts-toys are sewn with their own hands without the help of a sewing machine, by hand.
DIY children's crafts for the New Year
On the eve of New Year's holidays, children's matinees, rooms are decorated everywhere, lush Christmas trees are dressed up. It is quite possible to make a lot of interesting symbolic additions on your own, without spending money on purchases. It can be the most original balls for the Christmas tree, garlands, other decorations that a child can make.


DIY snowman craft
The snowman is a kind of symbol of winter and, naturally, his presence for the New Year's interior will come in handy. The photos of our selection show options for how to make such crafts with your own hands in stages, using foam balls, socks, pompons. A larger figure, decorated with thread, balloons, glue, is suitable for a kindergarten matinee. Inflate five balloons of different sizes (two are the same for the handles). Wrap each of them with a thread dipped in glue (PVA is quite suitable). When the blanks are completely dry, the balls need to burst, get out from the inside. Finished balls are fastened together. Craft "snowman" with your own hands, almost ready. It remains to arrange the eyes (beads, buttons), the mouth from the thread, the nose-carrot (sew from the fabric). Traditionally, the head is complemented with a bucket, the neck is decorated with a scarf.


Santa Claus do it yourself
You can't do without Santa Claus in the New Year's interior. The easiest way is to arrange it from thick paper (cardboard). Use a ready-made template, or make a cone-shaped shape from a sheet, which then, with the help of multi-colored paper, "dress", having decorated your face, beard, pens. They do such children's crafts for the New Year with their own hands using fabric (here you will find examples of patterns), plastic bottles, and other improvised means.


Crafts for kindergarten do it yourself
Various creative works for small children of kindergarten age should be distinguished by simpler techniques and materials. The child is just beginning to learn to do something beautiful on his own, so you need to choose the simplest, but interesting options.


DIY crafts for kindergarten children: applications
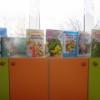
The most common way to teach children to create pictures is with applique. Such crafts for kindergarten with your own hands (photos are presented below) can be designed not only using colored paper, they also take dense fabric, artificial leather, velvet paper, improvised materials (cotton pads, cereals, etc.), natural raw materials (leaves, seeds) ... Children of older groups can start voluminous work, for example, make an applique in a box "aquarium" with hanging representatives of the aquatic world.


DIY crafts in a garden from natural material
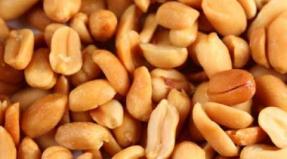
Often, especially in autumn, exhibitions of works are held showing do-it-yourself crafts for kindergarten from natural ingredients. Chestnuts, acorns, cones, sunflower seeds, pumpkins, colorful autumn foliage - all this provides a great basis for the development of children's imagination. To make various figures, compositions are additionally used plasticine, which holds the parts together or forms the base. Pictures of DIY crafts using natural raw materials are presented in our photo selection. Feel free to try using them by making a chestnut caterpillar, a hedgehog, and other samples.
DIY crafts for school
School work varies in complexity. If handicrafts in elementary school with their own hands have simple shapes, then high school students with enough skills are able to arrange more complex compositions, for example, a bouquet of roses from maple leaves, a cardboard town or a paper basket with asters.
DIY crafts to school, the photos of which are posted below, involve the use of a large selection of raw materials, including all sorts of improvised means (plastic dishes, DVDs, matches, buttons).


DIY crafts for schoolchildren using the facing technique
Facing is a rather entertaining creative process that is suitable for children of different ages. It allows you to create "fluffy" pictures that will decorate the room, as well as an original gift for relatives. Crafts in elementary school with their own hands have simplified options until the child acquires certain skills. For example, only the outline of the picture can be drawn in this way.
To make a lush applique, you will need corrugated paper, scissors, glue, a match or a toothpick with a blunt end, a sketch drawing on cardboard. Before making the craft with our own hands, we cut the paper into small squares (0.5 cm), which we sort by color. Grease the sketch with glue. We put the match in the center of the square, turn it (so that the corrugation is fixed on it), then glue it with its end to the sketch. Thus, we decorate the whole drawing, applying the necessary colors of the corrugated squares.


Teaching to create beauty on your own is the best way to develop a child's creativity. Children's crafts with their own hands significantly develop the imagination, giving the joy of an interesting joint pastime with adults.
DIY crafts for children: a selection of 50 ideas with step-by-step examples updated: May 2, 2018 by the author: Irina Kievskaya
Paper crafts can be made both for yourself and for sale In modern schools and preschool institutions, much attention is paid to working with paper. Both toddlers and schoolchildren love to create original paper crafts. Working with her, the child develops his imagination, learns to think creatively, and also develops fine motor skills of his fingers.
Simple volumetric gift boxes or volumetric numbers can be made by hand by drawing a diagram on a piece of paper. Many crafts are almost impossible to fold without schemes. Thanks to templates, you can create complex volumetric fakes from colored paper or cardboard. Beautiful knick-knacks, furniture models and much more - within the power of any lover of creativity.
Schemes and templates for creating paper crafts can be purchased online or at a craft store
To do this, you need to find on the Internet, for example, on the Country of Masters website, any template you like. Animals, birds, toys - everything can be created using ready-made templates and diagrams.
Each template is accompanied by instructions on which you will need to collect the craft. The template must be downloaded, printed on a printer, cut out along the contour of the figure. Each figure on the template will have dashed lines along which to fold the model. Glue the finished model with glue.
Easy paper crafts for babies
Children have shown an interest in paper since childhood. To instill a love of creativity, parents should enthrall their child by creating a variety of paper crafts. You can make a beautiful bright hand-made bird that the child can play with or use for bedroom decor.
Simple cardboard bird:
- Cut out the shape of a bird according to the template, draw a beak, feathers, a tail.
- Fold an accordion out of a square sheet of colored paper.
- Make a hole and fix the wings in it.
This paper craft in the shape of a turtle is good for children.
If you cut out a few birds, you can make a Chinese feng shui breeze. By hanging the birds on a wooden stick, you can steal the entrance to the nursery with such a craft.
All cutting work must be carried out by adults or under their close supervision!
After working with the paper, the child should put the entire tool in the box. This is how neatness is developed.
Stylish crafts from cardboard and paper: volumetric paintings
Application is considered the simplest paper crafts; it is often studied in elementary school. A beautiful three-dimensional picture of bright flowers will be an original gift from a child to a mother or grandmother. Flowers can be made from white toilet paper or tissues.
If you take toilet paper for crafts, it is better to use an expensive white paper with perforation, which can then be slightly painted over.
Working with napkins is very simple, but you need to be careful not to accidentally tear it. Therefore, you should be especially careful when creating such crafts.
The volumetric lock made of paper is a great toy for a child
Progress:
- Fold the napkin in four, fasten with a stapler in the middle. Cut a circle out of a napkin
- Lift each layer of the napkin in turn, forming a lush flower.
- Cut 6-7 leaves from green paper according to the template.
- Cut a basket out of brown paper, stick it on a thick red sheet of cardboard. Place flowers and leaves in the basket.
The basket can be made of corrugated paper of any color, but it is advisable to stick it in a couple of layers. Instead of paper, you can use baking foil or chocolate.
Interesting paper crafts: weaving
There are a lot of ways to weave paper crafts, this is a very interesting and original way to create crafts.
The simplest thing is to braid strips of paper in a checkerboard pattern, creating an object. A more complicated method is weaving from paper rolled into tubes.
Depending on which paper you choose, your craft will have special properties.
Using paper, you can make a practical chessboard
There are several options:
- Newspaper;
- Glossy magazine;
- Cash register tape;
- Plain paper.
Note that it is easier to work with paper that is durable - the craft will accordingly come out more durable. An original drawing will be released from glossy magazines.
Do not weave different types of paper together. Thick paper may not intertwine with thin paper, and sometimes it can tear it.
Finished products can be decorated with ribbons, beads, quilling flowers, whatever your imagination is capable of.
How to make a craft out of paper: preparing paper tubes
Weaving from paper tubes is a very interesting creativity. You can make tubes from the sheets of a magazine - the material is quite dense and bright pictures will become an original drawing on the basket.
For manufacturing you will need:
- Paper;
- Scissors;
- Pencil;
- Ruler;
- Glue;
- Knitting needles.
To prevent paper tubes from tearing, thick paper should be used in their manufacture.
First, we will prepare the tubes. We simply wind tapes 90 mm wide of any length on a knitting needle. We glue the edge, take out the knitting needle, leaving a couple of centimeters inside the tube, glue the second edge.
It is desirable to wind tightly, the accuracy of the product depends on it. Do not be distracted by extraneous matters, so the progress of work is lost.
By gradually pulling out the knitting needle and building up the paper on it, you can lengthen your tube to the desired size. To weave a basket, the length of the tube should be such that it is convenient for you to bend it.
Beautiful basket: paper crafts step by step
So, we made the blanks, in addition to this, you will need a piece of durable cardboard, scissors and glue. The bottom of the future basket needs to be cut out of cardboard. To do this, cut out two cardboard circles according to any template.
Now you can start weaving the basket:
- On the first cardboard circle, glue paper tubes around the circumference. Glue the second circle on the tubes.
- Lift the tubes up and fasten them with an elastic band.
- Glue the end of one tube to the base, then grasp the standing tube from the outside, lead it inside and grasp the second tube from the inside.
- We alternate "outside-inside" until the tube ends.
- To lengthen the tube, insert a new vine at the end of the previous one.
- In order for the basket to have a certain shape, it is better to insert a bottle or jar inside when weaving.
- We weave all the rows to the required height.
- If there is a piece of vine left, do not cut it, it is better to fix it inside the already finished basket. For fidelity, you can glue it to one of the tubes.
- The frame tubes can be glued to the sides of the basket.
- We paint the finished product with acrylic paint, wait for it to dry completely and paint over again.
A paper basket is a great decor element for any room
The decorative basket is ready, you can put a small artificial flower there or adapt it for hairpins and rubber bands.
Simple paper crafts: an angel on a Christmas tree
For the New Year, I really want to decorate the house with beautiful decor. The easiest way is to make beautiful paper crafts yourself with a little effort. Even a child of 4-5 years old under the supervision of parents can make an angel's craft.
How to make a Christmas angel step by step:
- Cut two 10x10 cm squares out of colored paper. Fold them like an accordion.
- Make a bend on the accordions, stepping back 3 cm from the end. Bend one accordion to the right, the second to the left.
- Glue the folded fold to the bottom of the fan.
- To make the head, you need to cut 4-5 strips of paper as wide as the edge of the fan. We wind the strips on top of each other, forming a tight circle. Fix the head size with glue.
- Direct the remaining piece of paper down.
- Glue the halves together. The angel is ready.
Using paper, you can make original decorations for the Christmas tree in the form of angels
If you want to decorate a Christmas tree with an angel, you can tie a serpentine to a halo and hang the craft on a branch.
You can also plant it on top of a tree. To keep it in place, just attach the craft to the branch with a regular clothespin.
Crafts from white paper: voluminous snowflake
Volumetric snowflakes look impressive, besides, they can decorate an apartment before the holiday and decorate a Christmas tree. To create such a craft, you will need paper, scissors, glue.
How to make a voluminous snowflake step by step:
- Cut 6 squares from sheets of paper.
- Fold the square in half to make a triangle. Make cuts from the bottom fold towards the top corner. The cuts should not meet, a small gap should be left between them. In this way, make 3 triangular cuts.
- Expand the sheet and put it in front of you in the form of a diamond.
- Fold the first inner row of strips together, fix with glue.
- Turn the craft over, repeat step 4 with the following strips.
- Turn over and fasten all remaining strips.
- In a similar way, make 6 pieces of a snowflake.
- Fasten together in 3 parts with a stapler.
- Glue the two ready-made halves together.
Bulky white paper snowflakes are good for decorating your home for the New Year
When working, it is better to use glue with a brush or glue stick.
If you place a loop-ribbon in the center when gluing, the finished craft can be hung anywhere.
White and colored paper is suitable for work. A paper snowflake will look very unusual, where one side is colored and the other is white.
The simplest children's paper crafts without scissors
Easy and beautiful craft for kids - "Universe through the eyes of a child." The figure can depict a month, stars and other celestial bodies. This craft can be done without cutting.
To work, you will need very few materials - glue, confetti (or small pieces of torn paper) and a dark blue sheet of cardboard.
How to do:
- Collect confetti from firecrackers or cut a bunch of small circles out of multi-colored paper with a hole punch.
- Take a stencil and apply a drawing on a sheet - a crescent moon, stars and planets.
- Paint over the drawn figures with PVA and until it dries, sprinkle with ready-made confetti.
The finished picture can be decorated with a shiny frame, for it you need to finely chop the New Year's rain and stick it along the contour of the picture in the same way.
There are a wide variety of paper crafts that can be done without using scissors.
Work with such a craft can be carried out even with preschool children - in kindergartens or early development circles.
This method can also be used to decorate appliqués. By decorating, for example, a Christmas tree cut out of a green leaf, you can make a beautiful New Year's craft.
Fun Paper Crafts for Kids: Movable Toys
Such toys are very interesting for children. You pull the thread, and the arms and legs of the animal or doll move. In fact, making such a figurine is pretty easy.
An entertaining puppet toy can also be made of plywood, but since cardboard is more malleable to manufacture, let's analyze this option better.
For work, you need cardboard, a couple of buttons, thin wire, scissors, strong thread and bars.
Movable paper toys are a great gift for a child
How to make a puppet dog:
- We draw moving parts (paws and tail) on cardboard separately and cut out.
- Subsequently, at these points, we make fastenings with the help of wire or studs-bards. Buttons can be used as a stopper.
- Glue the body and head with tape or glue to a bamboo stick.
- We insert into the pre-made holes in the paws along the mount and align with the body. We tie the legs together with a thread or elastic band. To do this, we make two additional holes in each foot so that they are closest to each other, and the thread is not visible from the front side.
- In the same way we attach the tail and connect it to the hind leg.
- After we tie another long thread to the one between the legs, it will set in motion all the moving limbs.
- The final stage is painting, at your discretion.
Having completed a cat, a fox, a hare using a similar technology, you can arrange a puppet theater for kids. A play based on a favorite fairy tale with the participation of animals will appeal to every child.
Crafts from paper without glue: the simplest origami for kids
The origami technique is quite complicated, but you really want to make your child an interesting volumetric toy with your own hands.
This chicken is one of the most interesting and relatively simple crafts. The sheet of paper should be square.
Tip: If you walk around when tearing off to avoid severely torn edges, bend the sheet in both directions.
When choosing a future composition for creating origami, you should choose crafts without complex elements.
You can use scissors or a ruler with a sharp clerical knife to cut.
Origami chicken step by step:
- Fold the square sheet diagonally. Expand, fold in half.
- Having expanded, we bend the left and right corners of the square inward, combining them in the middle of the square. It turned out to be a pentagon.
- Bend the top of the cone in the middle. Then we bend the same cone in the opposite direction so that a small angle protrudes beyond the border of the sheet - the future beak.
- We combine the left and right sides of the entire craft, put it so that the beak is on the left.
- Bend the upper right corner into the middle of the product.
- The lower right corner, it consists of two sheets, we bend them outward of the product. We do this by combining the lower sides, while we draw out a small corner beyond the extreme left border - these are the chicken legs.
- We turn out a small corner-tail.
- Lower the beak down a little. Can be painted over with regular red pencil for more realism. Draw the eyes.
You can surprise a child with such a craft, intrigue him. By arousing interest in the toy, you can attract the kid to help in creating such an origami next time.
Master class: DIY paper crafts (video)
In fact, you can make so many crafts from paper and cardboard that you can't even list - animals, birds, cars, dolls. They can be voluminous or plain, colored or white. The richer your imagination, the more interesting the craft turns out.
Crane
The art of creating paper figures by special folding of a sheet appeared in ancient Japan soon after the appearance of paper itself there and was originally endowed with a religious meaning, and therefore developed in temples and monasteries. This art, later called origami (literally "folded paper"), became widespread after paper became widely available and relatively inexpensive. The popularity of origami in Japan could only be compared with Chinese kites, it has survived to this day, spreading to the Western world along with other Eastern arts. We also offer you to try your hand at this fine art, which is actually not very difficult to master, the main thing is practice, study the manufacturing schemes with a sheet of paper in your hands, and very soon there will be no secrets for you in this matter.
There are several types of origami:
- classic (or simple) - performed by repeatedly folding a sheet of paper to obtain three-dimensional figures, the most famous example is an oritsuru crane figurine;
- modular origami - composite structures of simpler elements, folded according to classical principles and connected together by ordinary folding, without glue;
- kirigami (created using cutting with scissors), kusudami (volumetric structures assembled with the help of threads and glue), aerogues (well-known airplanes with many manufacturing options), "wet" origami (paper is moistened to give clearer shapes), etc. etc. - these are modern types, sometimes not very reminiscent of classical origami.
As usual, first we will prepare materials and tools. In this case, this is paper, scissors, glue (regular PVA or glue stick), a sharp stationery knife or cutter, pencil and ruler. Any paper will do, in principle, but experts strongly advise using white office paper, which has the required density and stiffness. For modular origami, office colored paper is good, while school colored paper is not suitable for origami at all. In the future, after gaining good skills, you can buy special sets with origami paper, use foil paper and glossy magazine pages, even banknotes are suitable - for example, for spectacular company entertainment.
Paper products in various techniques are created not only by children, but also by adults. Working with this material does not require special skills and abilities. At the same time, you can make a cute greeting card, an interesting toy, and a unique piece of furniture with your own hands.
DIY paper products are created using simple materials and tools, most of which can be found in any home.
Paper
The most popular types of paper raw materials are:
- White or colored office paper - the main material for making paper crafts. It can be used to create appliqués, origami, quilling crafts.
- Corrugated, tissue (tissue) and crepe paper are suitable for making delicate volumetric flowers, balls, applications using the technique of facing.
- Napkins used in cut-off applique, trimming, decoupage.
- Magazine and newspaper sheets used in the creation of collages, crafts using the technique of iris folding, papier-mâché.
- Cardboard - dense base and background for various paper products.
Craftsmen of paper handicraft also use various waste materials, paper ribbons, openwork napkins, sets of colored paper for children's creativity, the remains of wallpaper, and whatman paper.
Glue
The correct choice of adhesive affects the final quality of the paper product.
When choosing an adhesive, consider the following factors:
- texture and size of the surfaces to be glued;
- the purpose of the product;
- the age of the master.

The most popular adhesives are:
- Glue stickwhich is used to work with small details. It is suitable for use by children of early preschool age, as the convenient packaging and consistency prevent heavy contamination of the work surface. The disadvantages of glue in the form of a pencil can be attributed to the rather quick drying, which makes it impossible to adjust the craft.

- Starch (flour) paste - natural safe adhesive. It can be easily made at home by mixing 100 g of dry matter and 1 liter of water. Initially, the water is heated over low heat, pouring about 100 g into a separate container. This liquid is used to prepare a thick homogeneous solution, which is slowly introduced into boiling water and stirred thoroughly.
Important! The glue should not boil, so it must be constantly stirred, bringing it to a thick consistency.
The paste can be used in children's paper art, while it is not necessary to use a brush to apply it, in the manufacture of papier mache and paper figurines.

- PVA glue Is a universal glue widely used in handicrafts. It reliably glues various types of paper to each other and to other materials. But at the same time, working with him requires accuracy.
Scissors
A must-have tool for paper craft is scissors. Beautiful paper crafts can be created with only 2 types of them, but paper-plastic masters use many different cutting devices.

These include:
- Long scissors with straight blades, the shape of the ends of which depends on the age of the master. For safety reasons, young children should use a tool with a rounded blade no more than 10-12 cm in length. Straight blades are suitable for cutting paper and cutting large shapes.
- Small scissors with sharp ends used to make small patterns on paper. They are especially in demand when creating protrusions and volumetric pictures.
- Scissors with curly blades (zigzag, wave) are designed to create decorative edges on paper parts.

- Stationery knife used for cutting paper into strips or cutting stencils. When using it, it is important to remember the safety precautions and the need to work on a solid base (wooden, plastic or glass board of a suitable size).
- Figured hole punch quickly and easily makes a large number of identical decorative parts that are used to decorate paper products.
Additional elements
In addition to basic materials and tools, additional elements are used in paper art.allowing to facilitate the work and improve its result:
- simple and colored pencils;
- brushes;

- pens;
- paints;
- rulers;
- stencils;
- decorative elements (toy eyes, buttons, sequins, pieces of fabric, beads);
- threads and needles.
DIY paper products for children. Schemes, templates, instructions
Children of any age can make paper products with their own hands.
Fishes
Paper allows your child to develop creative skills, imagination and explore the world around them. With kids 3-4 years old, you can make volumetric figures of fish, which are then placed in the general application "Aquarium".

To create fish, you will need the following materials:
- double-sided colored paper;
- scissors;
- ruler;
- simple pencil;
- glue.
There are several ways to make a paper inhabitant of reservoirs, but the simplest is the following:
- A rectangular sheet of paper is folded in half along the long side.
- A rounding is made at one end of the resulting part. The opposite edge is cut at an acute angle.
- On the sharp side, two cuts are made, so that half of the part is divided into three equal parts. The workpiece is cut to the same length along the center fold line.
- The central stripes are crossed and fixed at the intersection with glue.
- In a similar way, the remaining symmetrical elements are fixed at the resulting central point.
- An eye is drawn on the concave part, and the tail is decorated with small dotted lines.

In the described technique, you can make crafts of various sizes.
Kusudama balls
Voluminous crafts made using the modular origami technique are an original and popular detail in a festive and everyday interior. Novice craftsmen should start making them with simple schemes.
Materials and tools:
- 60 squares 7 * 7 cm from double-sided colored paper;
- pVA glue.
The ball consists of 12 colors, each of which consists of 5 basic modules.


The manufacturing process consists of the following steps:
- The square workpiece is bent in half in the form of a triangle.
- The side sharp corners are connected to the top point to form a rhombus.
- The folded sides are folded to the middle. You should get a lily-shaped figure.
- The side petals open and smooth.
- The tops of the side petals are bent to the working side along the edge line of the main part.
- The side pieces fold in half towards the work surface, returning the workpiece to a diamond shape.
- The triangles formed on the working side are covered with glue and connected together.
- In a similar way, 4 more petals are folded, which are connected to each other, forming a flower.


The ball formation order is as follows:
- Hemispheres are formed from 6 colors. To do this, 5 similar elements are attached to the central flower. Glue is applied to the middle of each center petal.
- During the drying of the blanks, a fastener is made from a thin tape and a large bead. The ends of the tape are threaded into the bead and fixed with knots on both sides.
- The resulting loop is glued to the center line of one of the blanks.
- Then the second part of the ball joins. For a more reliable connection, the workpiece is fixed with clips, which are removed after the craft is completely dry.
Flowers
DIY paper products are the most relevant children's gift for any holiday or celebration. Among paper crafts, a special place is occupied by flowers, which can be made in the form of an independent product or a decorative element for decoration.
Option 1: crocuses
For a bouquet of 3 flowers, you will need the following tools and materials:
- corrugated paper in white, yellow and green;
- cotton wool;
- glue;
- wooden skewers:
- semolina;
- thin wire.

Progress:
- 15 strips of 20 * 4 cm are cut from white paper. The long side of the parts should be parallel to the corrugation.
- Twist each strip in the middle twice and give the blanks a convex shape, carefully stretching the upper part of the petal.
- The inner part is cut on both sides by 0.5 cm, and the outer part at the bottom is folded 0.5 cm to the center.
- A yellow square 3 * 4 cm is cut with a fringe 2 mm wide and 25 mm high. Important! The fringe is cut along the corrugation.
- Each strip curl up in the form of a stamen.
- The workpiece is wrapped around the tip of a wooden skewer, greased with glue.
- The stamens are greased with glue and dipped in semolina.
- Around the stem with stamens, 5 petals are sequentially fixed, fixing each of them with wire.
- The base of the flower is coated with glue, on which a thin green strip is fixed.
- Long sharp leaves are cut from rectangles measuring 10 * 1.5 cm, the ends of which are twisted.
- Finished leaves are fixed to the stems. Its lower part is once again wrapped with a strip of paper.
Option 2: rose
Rose is one of the favorite colors of paper craftsmen. It can be done in a variety of techniques. The simplest option is to twist the bud from a paper spiral.

To make it you will need:
- colored office paper;
- scissors;
- glue;
- thin wire wrapped in green;
- large beads;
- toothpick.

Progress:
- Colored paper is cut into circles with a diameter of 10 cm.
- Draw a spiral with a simple pencil.
- The workpiece is cut along the resulting line. In work, you can use scissors with both straight and wavy blades.
- The tip of the toothpick is gently split. The outer end of the workpiece is inserted into it and a paper spiral is twisted in the form of a bud.
- Glue is dripped onto the central part and the twisted part is fixed on it.
- A bead is fixed in the center of each bud. For this, a strong synthetic glue is used.
- The wire is cut into 20 cm long pieces and a loop is made at one of the ends, bending it to a horizontal position.
- The base of the flower is covered with strong glue and attached to the bud.
- The craft is dried in an upright position, setting it up with the stem.
Ready-made flowers can be collected in a bouquet, tied with a bright ribbon or wrapped in beautiful paper.
Papier-mâché egg
Do-it-yourself paper products can be an original gift for a child. Such a present is made in the form of a chocolate egg.

Materials and tools:
- newsprint;
- paper towels;
- flour paste;
- wide soft brush;
- large balloon;
- stationery knife;
- paper tape;
- paints.

Progress:
- Tear the newspapers into small pieces.
- Inflate a large balloon and cover it with a thin layer of baby cream.
- Pieces of paper are dipped in a bowl of warm water and cover the entire surface of the ball with them.
- Cover a layer of paper with paste using a soft brush. In a similar way, 2 more layers of paper are applied and the workpiece is left to dry.
- The described sequence is repeated three more times. The last three layers are made from paper towels. After applying the last layer, the product is left to dry, which lasts 20-24 hours.
- The egg is painted in the form of one of the popular brands of sweets, dried and carefully blown off the ball.
- The top of the egg is cut off with a clerical knife and filled with sweets and toys.
- The cut off part is fixed in place with paper tape and the cut is masked with a layer of paper, which is covered and, if necessary, painted with the selected color.
Dove of Peace by May 9
For the Victory Day with children 3-4 years old, you can make an application in the form of a flag.


Materials and tools:
- orange, black and white paper;
- dove figure template;
- glue stick;
- wooden skewer;
- black felt-tip pen.


Progress:
- Cut orange and black paper into strips 3 * 21 cm in size.
- To simplify work, a 5 mm wide line is drawn from one strip, which is covered with glue and the next part of the tape is applied.
- The resulting two-color fabric is dried. On the narrow side of the flag, a 1 cm wide strip is covered with glue.
- A wooden skewer is placed on the edge and twisted into glue-coated paper.
- The figure of a dove is cut out according to the template and glued to the center of the flag.
- A sheet of A4 paper is folded in half. Children independently outline and cut out the silhouette of their palms.
- One element is glued to the back of the bird, and a lush tail is formed from the rest.
- With a felt-tip pen, draw the eye and beak of a dove.
Fan
In the summer heat with children, you can make a simple paper fan.


To complete it, you will need the following tools and materials:
- a4 sheet of paper;
- felt-tip pens;
- glue;
- scotch;
- scissors;
- sushi sticks;
- dense hair tie.

The workflow is as follows:
- Fold a sheet of paper along the long side in half and cut along the fold line.
- Apply a pattern or drawing to each strip of paper.
- Fold the strips with an accordion, observing a step of 2 cm.
- The parts of the fan are glued together.
- Having retreated from the edge 2 cm, the base is fixed with tape.
- The sticks are covered with glue and attached to the fan on either side of the base.
- An elastic band is glued to the side of one of the sticks, which will fix the product in a closed and open state.
Optionally, the fan cloth and the handle can be decorated with additional elements (beads, ribbons, lace).
Paper gifts for March 8
The first spring holiday is a joyful event that brings many smiles and gives a good mood. On this day, children can present their loved ones with paper gifts.
Postcard "Sprig of mimosa"
Even the smallest child can make a cute postcard for a woman of any age with the help of an adult.

To create it, you will need the following materials:
- a4 paper;
- green paper;
- yellow paper napkins;
- felt-tip pens;
- thin paper tape;
- scissors;
- glue.

Progress:
- A sheet of A4 paper is folded in the form of a postcard.
- On the front side, with a green felt-tip pen, draw three stems and a silhouette in the form of an elongated oval for inflorescences.
- Napkins are torn into large pieces, from which balls are formed.
- The ovals are coated with glue and filled with balls.
- Three sheets are cut out of green paper in the form of a pointed oval. Their edges are cut into thin fringes.
- A sheet is glued to each stem, on which the fringe is slightly fluffed.
- The ribbons are tied in a bow and glued under the leaves.
If desired, the finished postcard can be decorated with sparkles.
Small items box
You can do it yourself from paper in the form of a box using the quilling technique.

Materials and tools:
- stripes of white and pink paper 0.5 * 20 cm;
- quilling tool;
- pVA glue;
- stencil with circles;
- round template with a diameter of 10 cm.

Instructions:
- Twist the elements from the strips in the form of a free roll, the diameter of which is 1 cm.To complete a small craft, you need to make 50 pieces of pink and white each.
- Fill the circle pattern with rows of white details, starting from the center. All elements are glued together.
- A strip of glue is applied to the outer row, on which white and pink circles are attached, placing them in a checkerboard pattern relative to the lower elements and alternating with each other.
- In the described way, lay out another 11 rows and leave the lower part of the box to dry.
- The craft cover is made in the same way as the bottom. The second row of elements is placed on the second circle from the edge of the part.
The craft is dried and decorated at the request of the author, using beads, paper flowers, rhinestones.
Volumetric snowflakes
The main element of decorating the premises for the New Year's holiday is a snowflake. Not only flat silhouettes can be made from paper, but also openwork volumetric crafts.

Materials:
- white paper;
- rhinestones;
- scissors;
- glue;
- simple pencil.

Performance:
- Fold the square 20 * 20 cm diagonally. Fold the resulting triangle in half along the long side 2 times.
- Draw 3 arcs on the fold lines.
- The figure is cut out and cut through the outlined lines, not reaching 1.2-2 cm to the center. Several figured cuts are made on the central part.
- The workpiece is carefully unfold.
- The middle part of all petals is folded to the middle and fixed in the center with glue.
- The second volumetric part is executed in a similar way.
- Parts of the craft are connected with flat sides, shifting the rays by 45 °.
- A large rhinestone is glued to the center of each part.
Jumping frog
An exciting paper toy can be made using the origami technique. To make it, you need a sheet of green double-sided paper and black felt-tip pens.

Assembly diagram:
- Fold the square along two diagonals. Then turn over and fold in half, first one and then the other side.
- Expand the sheet and turn it over to the other side.
- Fold the pyramid out of the workpiece, bend the opposite middle sides inward.
- The short sides of the upper triangle are connected to its midline.
- To form the legs, the resulting sharp triangles are divided in half and the inner side of both parts is bent outward.
- The workpiece is turned over and the side corners are connected to the upper one.
- The lower sides of the resulting rhombus are connected to the central line.
- The workpiece is turned over with its muzzle towards itself.
- Connect the sides of both small triangles, forming an isosceles triangle, and lift the resulting parts up.
- For the toy to jump, it is necessary to form a zigzag fold. Bend the workpiece in a ratio of 1 to 2. Then fold half of the bent bottom part in the opposite direction. Important! All folds must be ironed carefully to increase the bouncy of the toy.
Butterfly
A paper butterfly is a popular interior decoration. You can make such a craft using various techniques. One of the most popular options is the accordion butterfly, which is made from two identical squares of paper and decorative wire.
 DIY paper products: butterfly
 Step by step:
- One of the squares is folded with an accordion along the straight side.
- The second part is corrugated diagonally, starting from the bottom corner.
- Then the tip of the diagonal piece is glued to the middle of the square.
- The workpiece is clamped in the middle and tied with wire, the ends of which are twisted in the form of spirals.
The finished white butterfly can be painted with paint, slowly transferring the color from a saturated to a lighter shade.
Ship
There are many options for creating a boat out of paper. A classic paper craft is folded from a sheet of paper using origami technique.

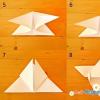
Its assembly scheme consists of the following stages:
- A rectangular sheet of paper is folded in half along the long side.
- In the resulting figure, outline the middle line, to which the upper corners are bent, forming a triangle.
- The lower parts are folded up on both sides of the workpiece.
- Small side corners are sequentially wrapped around a large triangle.
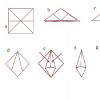
- The workpiece is straightened, giving it a diamond shape.
- The lower free corners are aligned with the upper right angle, first on one and then on the other side.
- The triangle is straightened again in the form of a rhombus.
- Gently stretch the upper corners of the workpiece in different directions until the model of the boat is formed.
- The bottom and sides of the craft are leveled.
The product can be supplemented with a mast made of a wooden skewer by gluing it onto PVA glue. A flag cut from colored paper is attached to the mast.
Christmas tree
A beautiful fluffy tree can be made of corrugated paper and thin wire.
 DIY paper products: corrugated paper tree
 In addition to the basic materials, you will need the following items:
- scissors;
- glue;
- thin cardboard cylinder;
- gouache.
Progress:
- Rolls with a width of 3 to 5 cm are cut from a skein of corrugated paper.
- Without unwinding the rolls with sharp scissors, make several cuts, creating a fringe 0.5 cm wide.
- Each strip of fringe is twisted by hand into a thin needle.
- The wire is cut into pieces, each of which is folded into a loop.
- The paper tape is fixed on the wire frame and wrapped in a spiral, fixing it at several points with glue.
- The required number of branches is made in a similar way. Their number depends on the size of the base and the desired fluffiness of the green beauty.
- The cardboard cylinder is painted green.
- The twigs are fixed on a cardboard base with a wire.
- The finished Christmas tree is decorated with bows made of paper tape and beads, which are glued to strong glue.
Crown
A paper product can be not only a beautiful interior detail, but also a stylish accessory.
A crown for a New Year's costume can be made using the quilling technique. To create it, you need 0.5 cm wide strips of white and silver paper, glue and a quilling tool.
To make a beautiful openwork crown, you need to prepare the following details:
- tight roll;
- free spiral:
- a drop;
- eye.
From free spirals, assemble a round base with a diameter equal to the size of the child's head circumference. The height of the rim is equal to 2-3 rows of parts. Elements of each row are staggered relative to each other.
As the rim dries, snowflakes are collected, which make up the main part of the crown. The element consists of a tight roll, around which 6 rays are located in the form of an eye detail. Tight rolls are located between the beams.
The required number of identical elements can be made according to a previously drawn scheme. The second prefabricated element of the crown - the lance - consists of two free spirals and an eye placed between them.
 DIY paper products: quilling crown
 Having completed the required number of blanks, they begin to assemble the product. To assemble one segment, it is necessary to glue two drops between two elements of the third row of the rim, placing them in the form of the letter V. A snowflake is glued above them, which is crowned with a peak.
The required number of identical ones are placed along the diameter of the base. At the junction of the segments, two eyes are glued, placing them on both sides of the point of contact. The finished crown is covered with glitter varnish. On the head it is fixed with small invisibles.
Rocking duckling
Children 3-4 years old can make a funny toy in the form of a duckling.
For this, an adult must prepare the following items:
- a sheet of yellow office paper;
- white and red paper scraps;
- glue;
- simple pencil;
- scissors;
- circle template with a diameter of 20 cm;
- ruler;
- felt-tip pen.


Sequencing:
- Draw a circle according to the template and cut out.
- Cut a 7 cm wide strip from the rest of the sheet.
- Perform two side folds, leaving the central part, the width of which is 7 cm.
- Form a cylinder from the strip and fix it with glue. This will be the duck's head.
- Glue white eyes with painted pupils and a red beak to the head, which is a narrow strip rolled in half.
- On one side of the round workpiece along the line of the side folds, make two cuts, the depth of which is 5 cm.
- Bend the middle part up and glue the side parts to it, forming the poultry breast
- Cut the opposite side into fine fringes.
- Cut out two wings from the remains of the yellow sheet and glue them to the body.
- Cut two elongated trapezoids out of red paper, adjust the narrow part a little and glue them on the side of the body in the form of legs.
- At the end of the work, connect the torso and head.
3D fungus
A voluminous mushroom is made from colored paper and white cardboard sleeves. In addition to these materials, you will need glue, scissors and compasses. Draw a circle with a compass. It is cut out and a small segment is removed.


The free ends are connected and fixed with glue. Several white circles are cut out of white paper and glued to the surface of the mushroom cap. A rectangle 2.5 cm wide and equal to the diameter of the cylinder is cut from the white sheet. The strip is cut with a fringe, not reaching the edge of 1 cm.
The upper part of the cylinder is cut in the form of teeth 1 cm high, which are slightly bent inward. A paper fringe is glued in the middle of the sleeve. The teeth are covered with glue and a cap is attached to them.
Shooting pistol
An original toy for boys 5-6 years old can be made from several sheets of paper.
The manufacturing sequence is as follows:
- Using a ballpoint pen, roll a sheet of A4 paper into a tight tube and fix its end with tape. Cut the ends of the tube straight.
- Remove the rod from the handle. Cut a sheet of paper to a square shape. Roll up the square in the form of a thin tube that easily passes through the first part.
- Wrap one end of the thin tube in the form of a loop. Two thin elastic bands are inserted into it and folded again. The loop is tightly fixed with several turns of adhesive tape.
- A tube with a loop is inserted into a thick workpiece and cut so that its length is 2 cm less than the outer part.
- Fold a sheet of paper along the long side in 8 layers. Then bend the part in half twice. Secure the resulting bracket in the form of a handle with tape around the barrel. Care must be taken that the handle does not deform the barrel.
- A paper roll 2-3 cm long is attached to the edge of the barrel. It serves as a front sight and a retainer for an elastic band.
- Bullets from g fall off from the thin tube thread.
Shooting:
- The bullet is placed in the barrel.
- The piston is pulled back.
- With a sharp lowering of the piston, a shot occurs.
Dolls
Decoration for a girl's or girl's bedroom in the form of a ballerina doll is made of wire and napkins. In addition to them, you will need paste, scissors and threads.


Instructions:
- The frame of the doll is twisted from the wire, making thickenings in the area of \u200b\u200bthe head, chest, palms and feet.
- A single-layer white napkin is cut into strips 1.5 cm wide.
- The frame is wrapped with paper strips, which are impregnated with glue. The figurine dries completely in 10-12 hours.
- To create a beautiful dress, take 2 pink and 1 white napkin. They are folded in the form of a sharp triangle, the lower part of which is rounded off. All blanks are twisted in a spiral, forming beautiful folds.
- Cut off the tip of one pink napkin and put it on the waist of the figure, fixing it with a thread.
- A white and a second pink napkin is put on the head, making holes for the hands in them. The upper layers are secured with threads that can be masked with a thin satin ribbon
Both children and adults can make paper products with their own hands. Possessing simple skills of working with various types of material, craftsmen create unique samples of paper handicrafts.
Article design: Natalie Podolskaya
Video about making paper products
DIY paper products:
Colored paper and thin cardboard are the first materials from which children begin to make flat or three-dimensional figures. Kids paper crafts develop creativity, spatial thinking and fine motor skills. This is the simplest way to keep children busy in their free time. They will be passionate about the creative process at any time of the year, especially in inclement weather. The ideas, schemes, instructions and templates offered in the article can be used not only by teachers, but also by parents of preschoolers and primary school children.
Making simple paper crafts yourself is fun and affordable. Every year experts offer new ideas and techniques of work that inspire exclusive decor in the interior.
Paper does not mean what can be done, thrown away and forgotten. If you prepare correctly and do everything very carefully, paper decor will not look cheap and trivial. From thin colored cardboard and thick office paper, you can make a lot of beautiful and useful household items with your own hands. They are suitable for updating the design in a children's room or decorating the whole house for the holiday:
- for the New Year;
- for Easter;
- by March 8;
- for Valentine's Day;
- for the birthday of each family member.

Designers use volumetric figures for interior decor in various styles. For example, twigs of delicate sakura with voluminous pink flowers made using the origami technique from modules are a great idea for a Japanese-style bedroom.
Panels with volumetric butterflies, appliqués in the form of birds or autumn leaves, a tree with owls - a simple and unique decor for a hallway or dining area in country style.
New Year's paper decorations are the best preparation for the long-awaited holiday.
Use all your unlimited imagination with enthusiasm:
- openwork snowflakes on the window pane, planted on soap;
- christmas angels;
- the moon and planets;
- garlands with colored paper additions;
- Santa Claus, snowmen, hares and other winter characters;
- volumetric and flat Christmas tree toys.
Children of different ages, girls and boys, are willingly involved in the work. Senior schoolchildren, having practice, on behalf of the mother, become "instructors" for the kids. They can make a complex base in the form of an accordion, fan, flower stem or supporting parts.

Tip: Teach your child to be neat when working with glue so as not to make spots and sagging. And before you cut something, let him measure it with a ruler, mark and make marks with dots. The lines from the pencil should go to the scraps, not to the main details. Under this condition, all work will be performed masterfully, and not like beginners.
Knowing how to make spherical tulips, voluminous daffodils, roses and other flowers, older children are able to make a gift for their mother or grandmother with their own hands. One of the parents will give the child an idea and teach the simplest skills of working with scissors, glue and thin cardboard.
A beautiful paper bouquet in an impromptu vase will stand on the window for more than one month, reminding of the holiday. And for parents there will be another reason to praise their children for their patience and perseverance, to remind when something does not work out.
It is better for beginners to master various techniques and craft according to the easiest schemes. Simplicity and affordability are the secret to the popularity of crafts from the cheapest material.

You can start with children 3-4 years old or when the baby begins to show interest.
Our experts will share their secrets on how to make interesting paper crafts with your own hands using various techniques.
Invite your students to watch a video master class on creating three-dimensional paper flowers.
How to make light paper crafts using different techniques?
- Making cardboard toys from a template is the easiest way, especially if the elders do the hard work for the baby.
Hares in the grass are a simple toy, it can be made "animated" if the characters are not fixed, but made in slots on sticks.
- Cut one hare (head and shoulders) as a template and multiply with the child, who can circle the cardboard blank several times with a pencil. Do not forget to teach your baby to save paper - to attach templates tightly to each other.
- These bunnies will need plastic running eyes, which are sold in handicraft departments.
- It remains to glue the eyes on the cut faces, draw the nose and mouth. If you depict them in different ways, you get bunnies with a different expression of the face.
- The length of the ears can be varied or even screwed onto a pencil to lower it.
- Next, you need a strip of cardboard with cut grass in 1 or more rows.
- Behind the grass it is necessary to cut holes along the width of the body of the rabbit so that they “sit” there tightly. And the bunnies themselves are best attached to sticks or paper tubes in order to control.
The toy is ready, now you can use it - the rabbits will tell the child a fairy tale before going to bed on the edge of the crib back. At the same time, mom will move these bunnies one by one. For completeness of the plot, you can make a wolf or chanterelle so that the bunnies hide in the grass (we lower or take out the templates).

In a similar technique, they do with their own hands any flat animated crafts made of colored paper. For example, in the window of a house cut from a template. You can put a doll or storyteller there. A grandfather and a woman with a samovar (other characters) can read stories or poems to children at night. Use an easy plot, understood by children, with famous heroes of fairy tales.
A dog and a whole family of puppies will look out of the booth, which are chased away by a cat or rooster. If you succeed in making the tower of the "stone" castle, let the princess and the dragon appear in the window with your dialogues - children love to watch this.
- Curled paper figures are an easy way to add volume to paper crafts. Experts suggest mastering this at an initial level, and the baby will make a whole animal world in the children's room in a few weeks.
The easiest way to do it from paper rings and cylinders:

- Bunny.
- A curly bird.
- Chicken.
- Kitten.
- Puppy.
- Frog.
- Owl.
A paper cylinder is a torso, depending on the design of the toy, it can be placed horizontally or vertically. Attach a paper-cut ponytail and legs to this base. It is most responsible to make a head or a muzzle - flat or voluminous (optional).
If you tinker with birds with a child, then it is better to open the beak. Use chicken feathers or down to make the chicken or cockerel appear more attractive. Eyes can be painted or glued, for this use:
- halved peas or beans;
- "Shifting eyes";
- black allspice;
- flat beads;
- black sequins.
In addition to the toy itself, it will be interesting for children to make the “habitat” of a character out of paper: grass, a lake, a house, a hollow, a tree, etc. ... This plot can be memorized and shown in roles to guests for a child's birthday.
- Paper doll outfits are a popular game for girls. You can buy them ready-made or make them yourself. For those who do not know how to draw, it is easier to cut a Barbie in a bathing suit from the "decoration" and stick it on a cardboard base.

Outfits are made from:
- white paper and decorate with pencils or markers;
- thin colored cardboard;
- velvet paper;
- foil;
- magazines (illustrations with the texture of fabric or fur).
If a mother or a girl has artistic skills, then a fashionista doll can be drawn independently or drawn from a sample you like. Such paper crafts are decorated with paper and fabric appliqué, feathers and a flower herbarium. The level is a little more difficult - fluffy dresses made of volumetric elements and pleated skirts made of fan folds.
Tip: Do not forget that each outfit must have holders (elements on the edges of the outfit) to cling to the doll's shoulders and waist. Advanced level - fix a flat magnet inside the cardboard template, and glue a light metal plate or a boot carnation without a cap under each outfit. Usually they turn to their father or grandfather for such help.
Add a Girlfriend and a Prince for the doll, a house or a whole street for walking. If we restrict ourselves to only one "fashionista", she needs a cardboard box or casket in any technique. It is no less interesting to weave a basket of rolled paper for a homemade doll and make a rug.
This is one of the easiest ways to create colored patterns. Even a child of 3-4 years old will master the wicker rug step by step.
In this technique, you can do:
- basket;
- bookmark for books;
- patterned rug for paper toys.
Several ways of color combination have been developed. For those who are interested in what crafts can be made from paper, it is enough to master three:

- plain weaving;
- two-color;
- multicolor patterns.
The lightest is a braid, where strips of two close or contrasting shades alternate.
For a rug, dolls will need:
- scissors,
- glue;
- ruler,
- pencil;
- 2 squares of colored paper.
We mark the back sides by 1-1.5 cm, but we do not cut it to the end - a centimeter border is needed along the edge. You should get one shape with not completely cut edges on both sides, the second - cut on one side to the edge. These stripes will simply thread through the first pattern step by step. Then the ends need to be glued. Finish with a border, curly or openwork edges of a different color.

Curled paper or newspaper toys
Another novelty for those unfamiliar with this technique.
Real hand-made masters use this technique to weave furniture from vines and rattan, and from newspaper tubes to make interior baskets. Light crafts from twisted white paper start with blanks, then weaving according to the pattern.
Newspapers rolled up in tubes will also become products: after painting with an aerosol, letters and photos will not be visible, but the secondary material will become a useful decor for an apartment. According to the general scheme, for example, you can weave baskets under old flower pots and flower pots that require updating.
Another great idea is the stationery basket on the computer desk to store small items there for general order.
Newspapers are cut with a sharp knife and wound on a thin long knitting needle, after which the edges must be fixed with glue. One sheet of newspaper will make 4 tubes if folded in half twice and cut into 4 equal pieces.

It is proposed to weave:
- A vase for dry ikebana or paper flowers.
- Jewelry box.
- Plafond for the kitchen.
- Frames for family photos.
- Stands for hot glasses.
- Interior inserts, etc.
In Russia, this type of needlework is not yet as popular as abroad, but the number of admirers of paperwork techniques is growing rapidly. This is twisting long narrow stripes to create three-dimensional images. They are combined into three-dimensional images or pasted on postcards.
The examples show how to make paper crafts using this technique.
First, make the lightest samples with your child - a bird or a flower. It will be something new and amazing for him, then his fantasy will develop. First, children need to be prompted for the density of the twist and the need for creases in certain places. Soon they will begin to understand and make new models from "paper filigree" on their own.
This technique is used to make full-fledged souvenirs or decorate the base. The most popular are:
- cards and invitations;
- photo frames;
- earrings;
- gift wrapping;
- christmas decorations for the tree;
- interior decor.
In needlework stores, you can find ready-made quilling kits, cut colored stripes for DIY paper crafts, diagrams and templates.

Facing
Another original way to create volumetric figures, which requires identical templates from soft paper. They are connected and unfolded, obtaining volumetric figures that can be used to decorate the interior or make a festive decor in the house.
Iris Folding
A new type of paper handling for Russia that develops creative potential. In principle, nothing new - paper spirals are twisted in a special way, which are used to lay out patterns. If you carefully think over the pattern and shades, you get masterpieces that have a place in a frame on the wall.
Invite your daughter to make a young lady in a fluffy dress, but help her complete the most difficult stages of the work.
Papier mache
This is the oldest technique that periodically comes into fashion and is forgotten again. To some, it will seem new, but to some it is known for the surprise balls that are hung for the holidays. They are filled with sweets and various sweets, and the birthday boy must knock them down with a bat, releasing the goodies.
A lot of interesting paper crafts are made by craftsmen from glue and torn newspapers. Translated from French, papier mâché is "torn" or "chewed" paper. By applying layer by layer of glue-based scraps, it is easy to get any shape.
The same "surprise balloon" is easy to make by wrapping a large balloon with tissue paper or newspapers and applying layers of papier-mâché. When the layer is ready, the ball is deflated, but the shape remains. It is filled with sweets and the hole is closed with the same “chewed paper” on glue. Decorate the top with colored blocks, foil stars. This is a popular Mexican party entertainment.
If solid figures and sculptures are created, plaster or starch is added to the base. It is easy to do anything with this technique - from fake party hats to decor items in the interior.
A piggy bank in the shape of a pig can be made using this simple technique under the original painting and varnished. You can fill it up for years, and then break it, and with this money go to the sea with your family.
Layer-by-layer pasting of an object - "waving". To remove the finished papier-mâché, you need to carefully cut it, and close the seams using the same technique. Sometimes they make a liquid mass based on shredded paper, which is squeezed out and made into a shape.

Accordion toys
For children, this is a more difficult level, but an excellent basis for the torso of crafts. Two strips of paper are placed on top of each other in a square at right angles until an elastic accordion comes out. It remains to glue the paws, tail and muzzle of funny animals to this base.
Try to make light three-dimensional paper crafts with your child: a caterpillar, frogs, or an arched yawning cat hiding in the grass.
Origami paper is the most popular technique for children's creativity
Many models do not involve working with glue and scissors - the figures are folded according to a certain pattern.
Advanced level - modular origami from triangular elements. Children with spatial imagination lay out entire zoos and cities in this way. Start simple by watching a video master class on how to make paper crafts using the modular origami technique:
To consolidate the knowledge gained, we suggest doing:
Paper bud (TULIP) step by step
- Fold a square of red paper (preferably double-sided) diagonally.
- Bend the second diagonal (see photo).
- Collapse with a triangle.
- Fold the corners to the center and top, as well as from the back.