DIY flat paper crafts. Paper crafts - step-by-step instructions on how to do it yourself (100 photos). Corrugated paper valentine
This is perhaps the simplest and least expensive type of creativity for children and adults. And probably there is no person who has never launched a paper airplane at least once in his life, and these endless ways to make your liner faster brought so much joy and the first childhood victories. In the article, we will look at some interesting crafts that you can easily repeat with your children. Classes in creativity with paper will be interesting not only for kids, but also for school-age children. Making paper crafts develops fine motor skills, teaches a child to work with scissors, to be neat, patient and attentive.
And just for the joy of children, we need scissors, glue, a couple of sheets of paper, for more advanced users, a couple of colored sheets of paper (cardboard). And you will undoubtedly make your baby happy. In the process of working with very small crumbs, you can remember colors, shapes in a playful way and just have a great time.
Today we would like to offer you some simple techniques that even the smallest can cope with in order to make their own origami.
For the first type of crafts we need
- Scissors;
- Glue;
- Markers or pens;
- Several sheets of colored paper.
The technique for making such paper crafts is very simple. All we need is to choose a favorite character or animal. Choose a suitable paper color and get started.
How to make a paper craft?
Below we will take a look at three simple paper crafts: a mouse, a bunny and a bee.
As an example, consider the manufacture of a mouse.
Step 1:
We need to prepare everything we need to work. To make a mouse, we need to cut out the following elements from paper:
- 1 rectangle (for the body of the mouse). Make the sides of the rectangle pointed, as shown in the example. (this will be the head of the mouse);
- 3 thin stripes (these will be antennae);
- 1 spout triangle;
- blanks for ears 2 larger ovals and 2 smaller ovals, glue them together;
- blanks for the eyes 2 larger ovals of white and 2 smaller ovals of black, glue them together;
- 1 ponytail, cut a slightly curled strip out of paper.
Step 2:
Now that we have all the elements of the mouse, we need to hold it together with glue. We bend our largest rectangle (body) in half, but do not press it, glue the front part. We are waiting for the glue to set.
Step 3:
We glue all the other elements of the mustache, nose, tail and eyes to the finished main part.
Examples of work in a similar technique.


For the second type of crafts we need
The next type of paper crafts is also very simple to make, but very colorful and bright. Such crafts will also look beautiful like bowls for pens and pencils.
- Scissors;
- Glue;
- Markers or pens;
- Cardboard cone.
For example, consider making a bee

Step 1:
We need to prepare everything we need to work. To make a bee, we need to cut out the following elements from paper:
- 1 large rectangle the size of the cone you have chosen to craft;
- 3 black stripes;
- blank for the wings, make it the same as in the example;
- 1 circle, this will be the face of a bee;
- blanks for antennae.
Step 2:
At this stage, we need to take a cone and glue it over with a large rectangle blank.
Step 3:
While the glue on our cone dries, we can prepare the face of our character. Draw eyes and a smile on the prepared circle, then glue the antennae.
Step 4:
We continue to work with the cone, glue strips characteristic of the bee on it, at approximately the same distance.
Step 5:
We collect our bee, glue all the remaining elements to our cone. The bee is ready.
Examples of work in a similar technique


For the third type of crafts we need
The third version of the crafts is slightly different from the first two. It will take a little more time and patience to make. But these types of paper crafts look very beautiful and stylish. And they are suitable not only for children's creativity, but also for decorating a room and many more different applications.
- Scissors;
- Glue;
- Pencil;
- Several sheets of colored paper;
- Ruler.
As an example, consider making a bunny.

Step 1:
We need to prepare everything we need to work. To make a bunny, we need to cut out the following elements from paper:
- circle, this will be a blank for the bunny's face;
- 4 oblong ovals for the ears (2 a little more, 2 a little less) glue them together to make the ears;
Step 2:
We need to make the base of our bunny. We take a sheet of A4 paper, now we need to make something that looks like an accordion. So that at the end, our bunny turns out to be even, using a ruler, divide the A4 sheet into even parts. Now, along the outlined lines, we bend our leaf into an accordion. To make the bunny bigger and more prominent, you can make several of these accordions

Step 3:
The next stage of our work, we need to glue our ready-made accordions together with glue to make a circle.
Step 4:
On the finished circle we glue the face of our bunny and the finished ears. You can make several of these bunnies and fasten them together using a thread, and decorate the room with such a cute handmade garland.
Examples of other works performed in a similar technique.


We hope our article was useful to you, leave your comments and send us photos of your work.
Creative people sometimes do not find ideas of what can be made out of paper. Each thing is an amazing and attractive subject to look at. The creations become the decoration of the living room. As a rule, these are diverse compositions and figurines.
The basic material for them is paper. Unfortunately, in the experience of many, ventures are exhausted. We offer several of them. They are multifunctional, designed for both professionals and beginners.

First, let's clarify that doing it yourself is good not only because it takes up free time, but also develops fine motor skills. It also improves memory and creativity.

Simply put, creativity develops the right hemisphere of the brain. Moreover, the general state of health also improves: pains decrease: aching or migraine headaches, moral stress and fatigue dissipate. It is a good rest that boosts self-esteem and mood. We offer to get down to business!


Materials
- Colored, white, corrugated paper. Get A4 size;
- Multi-colored cardboard;
- Scissors;
- Glue stick and PVA;
- Ruler (10-30 cm);
- If necessary, markers or pencils;
- If possible, select mini staplers to add originality to the product.

Purchase the necessary arsenal in office supply stores. Usually experienced creators have almost all things in the workshop.

Making bookmarks
Bookmarks are used to quickly read or study something. Of course, it is extremely pleasant to look at the attribute in the book, which is made with love by the reader. Let's look at a few ideas.

Heart shaped bookmark
- Use a square cut out of dense material as a base.
- Bend the workpiece from each of its edges to form a triangle.
- Fold each side up.
- Fold about 1 cm to form side triangles.

Corner bookmark
- Fold a square of paper in half vertically.
- Bend the side corners of the triangle up, return to the opposite position.
- Fold the top corner.
- Repeat the side manipulation. Tuck them into the fold.

The accessory is good for those who constantly lose everything. The bookmark will not subside; it is clearly fixed at the edge of the page.

Worm
- Print out a worm or snake pattern.
- Cover it with strips of excellent texture and shade.
- Make eyes or draw them.
- Punch a hole with a hole punch.
- Pass the tape. Attach it to the cover of your book.

So, you have familiarized yourself with the design techniques for book accessories. Agree, they are much neater in comparison with a sheet torn from a notebook.

Volumetric decorations
The 3D method allows you to make products that will certainly attract the enthusiastic glances of guests.

So you can decorate the room with dignity:
- Garland;
- Wall panel;
- Hanging decorations.

The period of making the craft, in contrast to the monotonous and hefty boring one, will take longer: both several hours and 2-3 days.

However, capacious multifaceted gizmos look much more interesting, they are noticeable and attract attention. They are light enough to make.

Paper garlands
In total, you need two layers of blanks. They can be of various shapes: circles, stars. The main thing is to observe their symmetry in a vertical section.

Cut out similar figures from cardboard, which differs in density. Those that will be on top are better to decorate or make from decorative paper.


The entire manufacturing process consists in connecting 2 layers between each other. Hang the resulting figures on a ribbon. Use a hole punch for easy attachment.


Paper panel
The technique of performing the panel is not very complicated. It is suitable even for beginners.
- Decide on the shape of the details: butterflies, hearts. Choose symmetrical ones.
- Cut out decorative cardboard blanks.
- Fold the pieces vertically in half. Carefully work out the fold, this is the place for future fastening.
- Use glue to secure the elements along the fold line.

Consider the fact that by gluing something to the wall with an adhesive liquid, you damage the wallpaper forever. In case you are not ready for such a crucial step, place the details on a piece of paper of any convenient size (choose A4 or A3). Decorate the product with a beautiful frame or baguette. This way you can save the wallpaper.

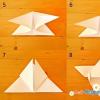
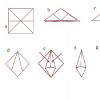
Hanging decorations. Manufacturing method
The rosette is a worthy example of such a decoration. We can often meet her as a Christmas tree decoration for the New Year.


Technique of execution - origami:
- Divide the square into 2 equal rectangles. One of them is again in two parts.
- Make a fold line from each side of the shape.
- The result should be an accordion. If it doesn't work out, finish the job.
- Fold the blank in half to make it look like a fan.
- Also turn the squares into an accordion.
- Connect all the parts along their edges with a glue gun.

The decoration can be hung over a work table, or used as a toy over a crib. Follow the analogy.

Take the base 25x25, 15x15, 20x20 cm. Choose the length based on the intended dimensions. Remember to think about every step. Wrong action contributes to redoing the entire work.

The glowing garland can also be made by yourself. To do this, make holes in the center, insert bulbs into them.

Hang the garlands from the tree branches. It will look unusual and original.


In case of difficulty, refer to the Internet, where step-by-step diagrams and master classes are given.


There are many interesting ideas for hand-made crafts to choose from. Each of them can be personalized.

Paper needlework will be useful for both adults and children. After a while, the job will be very easy. The process will bring joy and pleasure.

We recommend teaching children to creative work from early childhood. It is at this stage of development that you can develop attentiveness and hard work in your baby. Don't forget to help him. Thus, you will be able to combine the pleasant and the useful.


Useful Tips
Paper crafts with children is a great way to spend your free time with your family.
Take care of various crafts with children, and everyone will be very happy, not only with the result, but also with the process itself.
Take advantage of our tips and ideasto improve your craft making skills and acquire new ones.
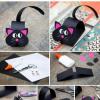
DIY paper crafts. Braided heart.

Such a beautiful heart is very easy to make. It can serve as both a decoration tool and a beautiful addition to a gift, especially if you made it for a loved one.
You will need:
2 sheets of A4 paper (colors: blue and red)
Scissors
Ruler
Pencil
1. Fold the sheets in half and cut them into 2 halves (the cut should be made perpendicular to the bend).
2. Take each halves and make 2 or 3 cuts on the side of the bend.

3. Start weaving a paper heart.
Insert the blue stripe into the red and the red into the blue.
Alternate all the strips to the end.
Cut off the ends to give the piece a heart shape.

4. Glue a strip to the paper heart so you can hang it.
* The simplest version is a heart of two stripes on each leaf. The more cuts, the longer it takes to weave, but the craft itself will look prettier and more interesting.

* You can put sweets, a postcard or another surprise in your heart.
Crafts from paper for children. Toys.

You'll need:
Old newspaper or paper
PVA glue
Paints (gouache)
1. Prepare a newspaper first and shred it. Children can help you with this, and such an activity will be interesting even for the smallest. It is not worth cutting a newspaper with scissors.

2. Cover the mass of crumpled newspapers with hot water and let sit for a few minutes.
3. Now crush the paper pieces into a homogeneous mass. If you want to speed up the process, you can use a mixer.
4. Drain off excess water and squeeze out the stock. You should have a wad of wet newspaper that you can sculpt from.
5. To start sculpting from a lump, you must first make it elastic.
For this:
Prepare the glue and gradually start adding it to the mass, remembering to mix thoroughly
The process of adding glue and mixing must be continued until the mass begins to resemble plasticine.
* It is worth noting that you do not need to overdo it with glue so that the mass does not turn out to be very liquid.
6. Now you have your sculpting material. You can, for example, sculpt cars and airplanes for boys or utensils for dolls for girls.

7. After you have molded the desired toy, leave it to dry.
8. When the toy is dry, you can start painting it.
Crafts from colored paper. Cylinder hat.

You will need:
Colored cardboard (or colored thick paper)
Colored paper
Plates
PVA glue

1. Place a large plate on the paper and circle it. Cut out the circle.
2. Place a small plate in the middle and circle. Cut out the middle. It is advisable that the circumference of the small plate is approximately equal to the circumference of your head.
3. Prepare a large sheet of paper (or glue several small ones) and cut it out so that its circumference roughly matches the circumference of your head. Next, make a few cuts along the edges.

4. Roll the sheet into a tube, and glue.
5. Insert the pipe into the margins and attach it to the circle by bending the edges and gluing them.
6. Glue the small circle that you cut out earlier to the top of the future hat (i.e. to the top of the tube).
How to make a paper craft. Apple with a worm.

You will need:
Colored paper
Scissors
Pencil

1. First you need to think about what color your apple will be (yellow, red or green).
2. When you have decided on the color, you need to crumple a sheet of newspaper into a tight lump, and then wrap it in a sheet of the color you have chosen.
* To prevent your apple from unrolling, apply glue to the exposed edges of the paper.
3. Prepare a small rectangular brown leaf and roll it into a tube to make an apple tail.
4. Prepare a green sheet of paper and fold it in half, then cut out the blanks for the apple leaf.
5. Use a pencil to mark the hole in the apple. After that, you can glue the ponytail and leaves.
6. Prepare black paper and crush 6-7 small balls out of which you will then make a worm. Make one balloon larger than the rest - this will be the head.
7. Start sticking the balls onto the apple. First, it is advisable to apply glue and wait a little, then press the balls.
Crafts from cardboard and paper. Magic castle.

This fairytale castle is made using cardboard and toilet paper cylinders. The author of this project is an Australian and a mother of two babies. She is the author of several books, the main theme of which is paper crafts.
You will need:
8 cardboard toilet paper cylinders
Cardboard box
4 straws
Colored cardboard
Scissors
Markers

1. Preparing the main building of the castle
Prepare a box and cut the top flaps from it. Next, cut the teeth of the lock along the perimeter.
2. Making towers
A paper cylinder (aka "tower") should be attached to the corner of the box so that it (the corner) is approximately in the middle.
Use a felt-tip pen to mark the places where the walls of your castle meet the edge of the "tower".
Make shallow cuts in the marked places - about 3cm.
Repeat the process for the other three towers of the castle.

3. We attach flags to the towers
Prepare colored cardboard and cut triangles out of it. Next, glue the triangles to the straws using tape. After that, glue (also with tape) the straws to the towers.
4. We make windows and doors
For windows and doors, you need paint - just paint windows and doors on colored cardboard and glue them to the front of the castle (you can use glue or tape).
5. Green surroundings
Prepare a sheet of green cardboard and draw 4 tree crowns on it. Take 4 loose toilet paper cardboard cylinders and make two cuts - opposite each other, then insert the crowns into the trunks.
That's all!
DIY paper crafts for children. Owl family.

All you need is a cardboard base for paper towels or toilet paper and paint.
1. First, paint each cylinder in its own unique color. Leave to dry after painting.

2. Bend the top of each piece as shown in the image to create owl ears.

3. You can draw or glue the eyes on plastic blanks.
4. Cut out the wings and beak from paper of a different color, which you then glue to the body of the owl.

Paper crafts (diagrams). Snake.

Using the "paper accordion" method, you can make such a cute snake.
1. Prepare a piece of paper and cut two strips of equal length.
2. Fold these strips into a shape resembling the Latin letter L.
3. Begin folding one strip on top of the other. In the end, you should have an elastic, elongated accordion.
4. Draw a funny snake face on colored cardboard and cut it out.
5. Stick the muzzle onto the end of the paper accordion.
Crafts for kids step by step for kids of all ages. The works are grouped based on the popular techniques and materials used.
For crafts, you can use a variety of materials (from familiar and popular, to unusual). In addition to paper, plasticine, chenille wire, you can create from styrofoam, cocktail tubes, beads and even pasta. At the same time, they use their own fantasies, modern techniques, and the achievements of teachers.
Crafts for kids: Top 200 ideas step by step
- Study the list of materials required for making crafts so that before starting work, prepare everything you need;
- Be careful with piercing objects. It is important to use scissors only for children with rounded tips. If holes are required, blunt punches should be used and always under adult supervision.
- Carefulness is important when working with materials. Paints, plasticine can plant stains on the surface, hard objects can scratch it. Therefore, you need to protect the work surface, cover it with oilcloth or put special plastic or wooden planks;
- When using paints, you should change the water more often, and then wash your hands and hands thoroughly. To prevent the paint from drying out, the jar must be closed tightly, like the box with paints.
- After working with clay and plasticine, so that they do not dry out, they are stored wrapped. It is better to wrap the clay in a piece of damp cloth, and the plasticine in plain paper.
- Pencils should always be well sharpened. You cannot use a knife or blade for this. Sharpening should be done with a special sharpener.
- The felt-tip pens must be closed with caps so that they are always ready for further work.
Crafts for children from paper
Paper is one of the simplest and most affordable, easy-to-process materials. Many different crafts can be made from it, which, moreover, can find practical application. Working with paper imperceptibly affects the general development of the child: his fingers become stronger, sensory impressions increase - at the level of sensations, he recognizes the texture, density and color of the paper.
A pencil, ruler, glue, scissors and, of course, colored paper or cardboard - everything you need for fun creativity. A little skill and patience - and you will get a wonderful character from a cartoon, fairy tales, and your own fantasies. It can be:


Crafts from stripes refer to volumetric modeling and paper construction. For crafts, strips of double-sided colored paper, 1 cm wide, are most often used, especially when creating paper balls, the base-body for animals and birds. Also, the stripes can immediately fold into a certain character, and from small stripes glued into a droplet, beautiful volumetric applications are obtained.

Crafts for children from paper accordion
There are two ways to create a paper accordion. Both of them are successfully used in children's art for making various paper toys and other interesting products.
- The way is simple. Small folds are created on the surface of the paper. Fold a piece of paper forward, then turn it over and fold the fold forward again in exactly the same size. For convenience, small children can draw parallel stripes on paper in advance.
- Method. Cut off two long strips of paper, glue their ends perpendicularly, and then, by weaving, create a small accordion, from which wonderful bodies of animals and birds are obtained.


Crafts for children from cones
Another great craft base is the cone. It is not difficult to make it out of paper or cardboard. To do this, draw a circle, divide it into sectors. For example, into 4 parts. If you cut off one part, the cone will be wide, two - medium, three - narrow. Depending on a particular craft, they make the desired cone, and then, with the help of small parts, they complete their personas, their work.

Origami technique
Paper toys, animals, plants, vehicles, birds, various items made using the Japanese origami technique will delight anyone to whom they will be presented - parents, close friends.
Origami differs from appliqués, cutting out silhouettes and many other types of art in that it is the art of the whole. You do not need to cut or glue anything, you need to use one whole sheet of paper. It is allowed to give expressiveness to the craft and individuality, by completing some details. For example, eyes, muzzles to animals, patterns on the body, clothing.
Recently, the popular modular origami, which is more difficult for children, and consists of several pieces of paper.


And various other ideas that can be found in the section.
Crafts for children from bushings
The core is the remaining roll of heavyweight recycled paper. It is also called a cylinder or tube. Thanks to the ready-made base form, strong and stable on the surface, the sleeve can be an excellent base for creating voluminous crafts for children. Also, colored paper or cardboard is used in the work, with which the sleeve is wrapped, and additional parts are cut out of them. In some crafts, the sleeve is painted with paints, felt-tip pens. In addition to toilet paper rolls, paper towels, parchment paper, and foil liners work well.

Crafts for children from chenille wire
Making and inventing wire models is no less exciting than folding origami, sculpting from plasticine, creating from paper. You can make many interesting and funny crafts for friends, parents, useful things for yourself from chenille wire. As a result of work, fantasy develops, children learn patience, perseverance.
It is not necessary to carry out crafts in the presented colors. You can take any wire according to your own idea, mood and preference.


Crafts for kids from cocktail tubes
There is nothing that cannot be done with cocktail straws. They can be weaved, the tubes are glued in the process of work, strung, cut lengthwise to make beautiful flowers, across to make a mosaic and even beads.


Crafts for children from plasticine
Plasticine is a great material for a novice sculptor! You can make real masterpieces from it, which will decorate the house, will be like a toy. You can mold many funny things from plasticine, animals, birds, people, everything that your fantasy tells you. Plasticine has bright saturated colors and an easy-to-handle form. The very name of this material speaks of its excellent plastic properties.
Modeling classes educate the child's artistic taste, the ability to observe, to highlight the main and characteristic. They teach us not only to look, but also to see, because the characters, objects and plots are literally next to us, they live in books and cartoons. It is only necessary to help the child find them - to find the wonderful, original and interesting in everyday life. And any creative work fosters perseverance, develops skills and abilities.

Plasticine sculpting rules:
- Before starting work, you should prepare the workplace and knead the plasticine so that it becomes soft, obedient and elastic.
- It is recommended to start making the craft from the main part, the largest, then smaller ones are molded and connect them together. Small details are created as the character is styled.
- It is most convenient to attach small parts in a stack. It can also be used to easily and neatly make various indentations.
- When designing crafts from plasticine from separate large parts, it is necessary to tightly press the parts and cover up the bonding point to increase the strength of the product.
- At the end of the work, you need to clean the workplace and wash your hands thoroughly with soap and water.


Crafts from plastic and paper plates
From this material, you can make a variety of crafts - simple and more complex. In the process of work, creative and spatial thinking, imagination, eyes, fine motor skills develop. Also, children learn new visual techniques, learn about the properties of materials and how to use them in creative work. All handicrafts made from plates can be a wonderful interior decoration, a funny toy and even a painting.


Crafts from natural materials
Natural material is a storehouse of ideas and opportunities for the development of children's creativity. Working with him has a great impact on the child's thinking and imagination. Here, novelty, creative search, the ability to achieve ever more perfect and original results are always possible. When walking in a park, forest, you can collect leaves from different trees, acorns, chestnuts, cones, herbs, interesting twigs for further creativity.


Basic rules for collection and preparation for work:
- Twigs or roots should be washed and dried in a cool dry place;
- Cones and chestnuts also need to be washed and dried;
- Collecting buds is recommended on wet soil.
- You can only collect fallen leaves. The best harvest time is late summer and early autumn. At this time of the year, the leaves are especially beautiful, varied and colorful;
- Fruit and vegetable products can be used for a puppet show, Christmas tree decorations and even as a gift to loved ones. The main thing is to fasten the parts with safe material so that in the future the food can be eaten. These can be skewers, toothpicks, thick starch glue.

The presented crafts for children use a variety of materials, as well as technological methods that serve the development of fine motor skills, which means they stimulate the speech and mental activity of children. But the most important task is to teach the child a creative vision. After all, it is precisely this skill that distinguishes a person-creator, a person-creator.
Paper is a popular material for children's creativity. She easily lends itself to the most incredible transformations, thanks to which even the most inexperienced children can make DIY colored paper crafts. The main thing is to find a task that is feasible for them.
So, for children 3-4 years old, crafts are available that do not require jewelry possession of scissors, the ability to handle glue especially carefully and great perseverance.
You can make a fish out of cardboard and revive it with cereal rings and voluminous eyes.

Here we have such a fish with scales!

You can decorate the paper fish with pieces of colored paper and foil.

Owl made of paper
From ready-made templates, kids can glue an owl.

It remains only to decorate her tummy with prints of bright paint, for which you can use any available means.

Owl application is ready!

Paper plate cow
As work with ready-made templates, a craft from a disposable plate is well suited. We cut out the cardboard parts in advance: muzzle, ears, spots, prepare the eyes.
 Blanks for the craft "Cow"
 It remains only to show the child how to glue all these elements to the base.

Paper birds in the nest
The craft of a bird in the nest is interesting for children. We make a nest from a paper cake mold and decorative shavings.

It remains to glue the beak and eyes to the template of the bird's body and settle it in the nest.
 Craft "Birds in the nest"
 Bird applique
You can make a bird applique without a nest. Cut out in advance her body, legs, beak, eyes, wings and jewelry for the breast.

It remains for the child to glue these fragments.

 Application "Birdie"
 If you use this option for crafts from colored paper for children 4-5 years old, then the children are encouraged to cut out all the details on their own. At this age, they can already cope with a similar task, as well as make many other interesting products.
A spider made of paper and yarn
For example, a funny black paper spider. It is only necessary to cut out two fused parts of the head and abdomen, glue the legs of yarn between them.

We supplement the spider with big eyes.

Mouse made of paper hearts
Or a mouse made of hearts. A large heart folded in half becomes her little body, two hearts of different colors, glued into one another - with ears.


It remains to glue a fluffy nose from small strips.

We glue the ears and factory eyes to the mouse. Our mouse is ready!

Hen and cockerel made of paper
A costume for a theatrical performance is made according to the same principle - for example, Ryaba chicken. The wings and tuft of the chicken become the baby's palms, circled on cardboard and cut out the contours,

we make the little body in the form of a silhouette of a matryoshka.
 The head and body of the "Ryaba"
 It remains only to glue the beak, eyes and legs from a paper accordion.

You can make a very cute cockerel with accordion paws from colored paper.

Paper penguin
It is convenient to use the contours of the palms to create an applique "penguin" - they become the paws of this cute bird.

Toy eyes and a bright scarf cut from felt or drape will complement the craft.

Volumetric paper craft "girl under an umbrella"
You can use accordion-folded paper to create a girl under an umbrella craft.

We form a fan out of it and glue it into a postcard over the image of a girl.


When the card opens, the girl is under the umbrella. Autumn paper craft is ready!

You can make not only an umbrella from a paper accordion, but also a beautiful bouquet:
Rainbow of colored stripes
The first option for making them is the use of paper strips.

For example, stripes of different shades easily turn into a volumetric rainbow.


The sun and a cloud will cover the tape and give the rainbow a festive look.

Apple made from red paper and cardboard roll
Red stripes and a cardboard roll will make a delicious apple. Cut bright scarlet paper into strips 1.5-2 cm wide. Glue them with tape to the inside of the cardboard roll at the top and bottom of it.

First, we glue four strips opposite each other.

Then we glue one more between the strips. We glue the handle and the leaf to the apple. The apple is done! The craft looks even more impressive if you first paint the cardboard roll red.

Apple tree made of paper and cardboard roll
You can make a wonderful tree from colored paper and a cardboard roll. Cover the green paper with red spots.

We make cuts on the cardboard roll and straighten them.

We crush the green paper with red spots and carefully glue it to the cardboard roll. We will get an apple tree with picturesque apples.
 Craft from colored paper "apple tree"
 You can make a very expressive craft out of colored paper and cardboard - "autumn tree".

And from yellow stripes glued in a circle to a paper filter or a disposable plate, you get a bright sun.


We decorate the sun with lumps of crumpled colored paper, fixing them with PVA glue.
 Crumpled paper in the center
 You can tie a string to the sun and hang it.

Balloon made of paper
Bright and cheerful paper craft - "Balloon". To make it, we need five blanks with a cut out balloon.

We need to glue the blanks folded in half with each other around the string - this is the future balloon. Now we are making a basket. For it, we need to fold a strip of cardboard around and glue small strings to its edges.


We decorate the basket with colored circles.

Frog from a cardboard box and paper
An equally attractive frog will turn out from two cells from the egg packaging. We paint them and fasten them with tape, glue the tongue and eyes.

We decorate the frog with a bow tie and a crown - and you get a real prince!

Crafts from paper glued by a roll
Crafts made of colored paper glued in the form of cylinders look interesting. By connecting these cylinders with each other, you can get different characters - hares, ducklings, chicks.
 Paper craft hare Chicken from paper cylinders Paper cockerel
 You can make a very beautiful rose out of paper. To do this, you need to cut a circle out of red paper. Draw a spiral on the circle with a pencil. Cut out the circle in a spiral.

Then we begin to twist a spiral from the edge, forming a bud.

Volumetric multilayer paper hearts
You can make a charming heart-pendant out of red tissue paper. We cut out at least nine hearts from thin paper.

We put the hearts together and sew them on a typewriter.

We straighten the craft. Colored paper hearts - ready!

Paper craft for February 23
A very beautiful craft made of colored paper can be made on May 9 or Defender of the Fatherland Day. Cut the red paper into strips and fold it in half. We make incisions at the place of the fold. We roll the blank into a roll - we get a beautiful flower. We rewind the lower part of the flower with green paper. We make three of these flowers.

We fold an asterisk out of red paper.

On a round base we glue flowers, stems, St. George's ribbon and an asterisk in turn. Our craft is ready!


Paper crafts for children of different ages can be so different and interesting in their own way. Improving their skills in handling colored paper, the child will be able to create more and more complex characters, thanks to which this material will not lose its relevance for a long time.