Crafts from paper and cardboard for children 10 years old. Interesting hand-made paper crafts: ideas, photos, a step-by-step master class. Frog from a cardboard cell and paper
Paper crafts are perhaps the most interesting hobby for children and adults. The manufacturing process is quite exciting, moreover, at the same time, children develop imagination and motor skills. Below we have selected several master classes that, in our opinion, will be of interest to you.
Paper butterfly
The butterfly is a bright summer companion, a symbol of beauty and lightness. Each butterfly is unique and inimitable in its own way. Nature has tried to mark each winged beauty with bright colors and patterns. These beautiful insects are a decoration of flower lawns, and in today's lesson we will try to decorate the room with a butterfly, which we will make with our own hands from paper. Making paper crafts favors the development of attentiveness, accuracy, perseverance and the manifestation of imagination in children. And what a surprise the kid will experience, watching how an ordinary leaf turns into an amazing creature before his eyes!
In order to make a paper butterfly, we need:
- Paper;
- Scissors;
- Paints;
- Fantasy and great mood.
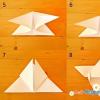
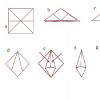
For crafts, an ordinary album sheet will work, but first you need to make it square. To do this, bend the upper left corner diagonally, cut off the section of paper remaining when folding with scissors. We got a square with one diagonal fold. You need to make another diagonal fold on the other side. To do this, bend the upper right and lower left corners.
At the resulting triangle, bend the lower ends up. Then turn the figure over with its wide side up and bend the top of the triangle so that its tip extends slightly beyond the edges.
We wrap the protruding tip. Fold the future butterfly in half.

The butterfly figurine is ready, but for now it is white and inconspicuous. Therefore, the turn has come for children - to show imagination and decorate the butterfly to their taste, using watercolors or felt-tip pens. Drawing can be the most unimaginable: from flowers, as in our example, to complex geometric patterns, the main thing is that the child enjoys the creative process. If you wish, you can make a few more butterflies, allowing the kid to make crafts without your help.


A boat made of colored paper
Of course, each of us loves when he succeeds. And especially, it is done by hand. And you do it just for yourself, for the soul, without even thinking about specific benefits. Although she will still be. Crafts are a great way to show yourself that the craft is fun and rewarding. Especially when there is no cost and it turns out to make something beautiful from scrap materials. And for children it is a great joy to do it yourself, even if it is not an interesting trinket for an adult, but to do it. And the task of each parent is to support his child, to praise for what he himself was able to create. And also to help, prompt and in no case scold if the conceived does not work. By doing this kind of work, the child tries to learn the world himself, using his imagination. He remembers everything he has ever seen and tries to reflect it in his products. For lovers of the marine theme, we have prepared a lesson on making a simple boat. Feel like a real captain of the most beautiful ship, moreover, made with soul and love. All we need is:
- empty matchboxes;
- colored cardboard and colored paper;
- scissors;
- glue;
- tubule.
Take the matchboxes and fold them so that two are next to each other, and the third is on top of them. In order to give the boat the desired appearance and the advertising inscriptions of the boxes, we did not spoil the future product, glue the craft with plain paper, as shown in the picture.

After that, we will make the stern of our ship. Cut out the base from the cardboard, and from two strips build the bow of our ship. Then, we will use the tube to build the sails. Take a rectangular piece of cardboard and attach it to the straw as shown below. Finish the look with small red flags at the end of the tube.

It remains to decorate the craft from the side so that the matchboxes are not visible. If you have small Lego toys, they can take a place on our beautiful deck with dignity.

Our boat is ready, it's time to hit the road!
Russian oven made of paper
The stove was the main attribute in the house: it heated the house, cooked food in it, and assigned it a special place. Therefore, the stove is always associated with satiety, warmth and comfort. In many Russian fairy tales, we come across a Russian stove. Let's remember Emelya, the fairy tale "Geese-Swans", Baba Yaga. The stove is also found in old proverbs and sayings. And if the child was asked to make a product - a Russian stove, then this is not a problem at all. They build a real brick stove, and we propose to create it from cardboard. With such a child can easily cope. A small Russian oven made of paper turns out to be very realistic.
To make it work, you need to take:
- a small package left over from toothpaste;
- colored paper (white, orange and black);
- some cotton wool;
- black marker;
- scissors;
- glue.
1. First, cut the toothpaste package into two halves, make one larger, the other smaller.
2. The larger one will stand vertically, the smaller half will be applied to the larger one horizontally.
3. We fasten the construction of the craft with glue.
4. After it dries a little, glue it over with white paper, imitating whitewash.

5. Prepare a pipe on the stove, for this we cut a strip out of cardboard, bend it to make a small pipe, glue it to the base.
6. Cut a small rectangular sheet of white paper. Prepare the firebox from black paper, the orange stripe will frame the firebox.
7. Carefully glue it all onto a white sheet. We are waiting for the glue to dry.
8. Glue to the oven in the appropriate place. Now we have a stove with a firebox!

9. The pipe must be pasted over with orange paper.
10. For naturalness, draw small bricks on the pipe with a black marker and insert a small piece of cotton wool into the pipe, straighten it out, depicting smoke. For strength, so that it does not fall out, it is better to glue the cotton wool on the inside of the pipe.

Here is such a Russian oven made of paper! I already want to warm my sides on it and remember my childhood, the village, my grandmother. Plus a paper stove - it is small, light and does not take half a house, but it gives a touch of comfort and warmth.
Chicken from disc and paper
How nice it is to receive gifts made by our close and dear people. Moreover, do them yourself, including imagination and creativity. With our own hands, from improvised means, we can prepare a wide variety of crafts and toys. This is a very exciting experience. And if you make crafts with your family members or friends, then you will definitely get a lot of pleasure from communication and the result of teamwork. Today we will try to make a chicken out of a disc and colored cardboard. It will not be voluminous, and therefore it will be possible to hang it over the table or even on the Christmas tree in the New Year. Let's start!
For our toy, we will need:
1. Old music or video disc,
- colored cardboard, we will need four colors - blue, white, yellow, red;
- scissors;
- pencil;
- glue;
- a small ball of yellow or beige woolen thread.
2. The first thing to start with is to cut finely the threads, but more. They will replace the feathers of the chick for us.
3. Then, coat the disc well with glue and sprinkle it with thick threads. After the disc is dry, shake it to remove the remaining hair.
4. Cut out oval eyes from cardboard paper - they will be white and blue. Beak and legs - let them be red. And we will make the wings yellow. Oh, and don't forget the scallop. Our chicken is small, but he already has a scallop. You can see each step in the photo.

The job is done, our chicken is ready. You can hang it on a string, as we said earlier. Ask your dad to make a hole in the disk, pull the thread and that's it. The craft turned out to be unusual, joyful. The chick seems to take off, wants to see what is happening there above! Or maybe he wants to see - where are his friends?

Like this craft, we can make a chicken mom or rooster dad. And if you dream up, then a bunny, and a pig, and a hedgehog, and a bear cub, and other cartoon characters, for example. Moreover, we did not spend a lot of time and money on this lesson. It remains only to find a place for her. Or maybe we will give our chick to someone?
Paper ball
The creative process of creating various crafts, paper designs will captivate both adults and children. After reading the following instructions, anyone can assemble a figure in the form of a beautiful paper colored ball.

Colored paper (two colors that can contrast with each other without breaking the harmonious combination, such as cyan and purple).
Quantity: for each of the eight modules (circles) that make up the final figure of the craft, you need five parts (if you plan to make the ball small, you can cut 2-3 such parts from one sheet of colored paper of about A4 size).
- 24 parts in blue and 16 parts - purple or equally - twenty parts of each color;
- Pencil;
- Ruler (in order to draw the sides of the cardboard template);
- A piece of cardboard (its size will depend on how large the shape of a wonderful paper ball is needed;
- A beautiful rope (not thick - with its help a ready-made volumetric figure can be attached to almost any place in the interior to decorate it);
- Scissors (preferably with sharp tips, especially if the figure is small, otherwise it will be difficult to cut).
At the first stage of the creative process, you need to draw a sketch on cardboard with a pencil, according to which all the details for the shape of the ball will soon be cut out. It should be noted that the sides of the depicted figure should be straight (for accuracy, use a ruler), and the top and bottom should also be completely the same.
Both parts of the patterned figure are similar to a chef's hat or a cake with cream, but the main thing is that the edges of the upper and lower parts, respectively, should form convenient “ears” for subsequent coupling into a three-dimensional figure. After completing the sketch, the pencil must be set aside, now it is time to carefully cut the template figure out of cardboard along the contour.
You need to take colored paper and draw the required number of figures and cut them out.

Next, you need to interlock the cut-out figures so that they alternate in color, with each subsequent figure turning about ninety degrees from the previous one, so that its narrow side can be inserted into the grooves of the long side of the previous part. Thus, you need to link five such parts in one circle.


If two purple and three blue parts were used to construct the circle, now, you need to link two purple parts together (provided that the sequence rule was followed).
All modules are connected so that in each recess there are five "roundings", that is, the joints of the parts.


Card for mom
The most memorable and expensive gift is a handmade gift. An original postcard will be an excellent gift for mom, grandmother or sister, because in addition to a postcard made by yourself, you give a part of your soul, according to the belief of many nations, in every thing created by us, we put a part of our soul. And this is the most valuable thing!
And so let's start, for the craft we need the following materials:

- Glue, preferably paper;
- Colored paper;
- Scissors;
- Marker;
- Unnecessary magazines with pretty pictures.
We make a blank postcard from cardboard, draw a semicircular pattern along the edges of our postcard. You can come up with another ornament, show your imagination.
Carefully cut out our workpiece along the lines.
On our blank, we glue a sheet of colored paper, distribute the glue carefully so that the colored paper adheres well to the cardboard.

It is necessary to make blanks of daisies. We cut out two small circles from white cardboard - these will be the petals of our future chamomile, and from yellow cardboard it is necessary to cut two circles of a smaller diameter for the middle of our flower.
We collect our daisies, glue the yellow center of the daisy to our white petals. Thus, we collect four flowers.
Now for our daisies, we need to make stems. We will make them as follows: on a sheet of cardboard, green, we draw lines at a distance of 2-4 centimeters, we have three daisies, therefore we need to draw three lines.
We cut out our stripes exactly along the contour. The stalks for our daisies are ready.

Next, the fun begins, the assembly and design of the postcard. To our cardboard blank, we glue the daisies and stems we made earlier, we place the flowers slightly at an angle so that they fit onto our postcard.
We cut out beautiful pictures from old magazines for decoration of crafts. On the corners of the postcard we glue the ornament found in the magazine. And we will plant a beautiful butterfly in the right edge.
Now the most crucial moment, we make an inscription with wishes for a loved one. Cut out a blank in the shape of a "cloud" from colored pink paper. We write on it the inscription "Mommy" and glue it on our postcard.
The original postcard is ready, all that remains is to present it.
Origami paper pencil
Origami is a fun technique that can interest all family members. It's amazing how a familiar object suddenly appears from one flat sheet of paper at the next fold, without glue, scissors, or something else.
You will need a little perseverance and accuracy, and you will definitely be able to create a voluminous paper craft, for example, a pencil.
Necessary materials:
- Color double sided square sheet
We used yellow and green colors to clearly show that it is a pencil. And you, too, can make the first option so as not to get confused in the description, and then, when you learn how to do it, you can use any colors. Or use one-sided colored paper, then the shirt of the pencil and the lead will be colored, and the rod will be in a contrasting white color.
Put the sheet on the table with the yellow side up. We apply the right corners of the sheet to the left ones, and making sure that the line is straight, we make a fold. Without changing the position of the sheet, we unbend it again with the yellow side up.
In the same way, we carefully apply the two upper corners to the lower corners and bend the sheet in half, carefully forming a fold line.

Expand the sheet with the yellow side up again. Now our square is divided into four equal squares by perpendicular fold lines.
Again, take the square by the upper corners and bend our upper small squares in half. Drag the top corners to the center fold on the square. Straighten the full square again with the yellow side up. And again we bend the upper corners so that the green color does not even reach the very top fold strip. We get a yellow square with a thin green stripe on top, as in the picture below.

Let's pay attention to one fold, which runs vertically in the center of the leaf. We take the sheet by the squares on the left and bend it to this center. We repeat these actions with the right corners. Now we have a green rectangle in front of us with two horizontal fold lines.
We take the upper inner corners (which are at the vertical fold) and bend them to the edges. You should see pieces of yellow with green stripes around the edges. As shown in the image below, we will bend these stripes out to the sides as far as the paper will allow.

Now we bend the right and left upper squares alternately diagonally back. The pencil is ready.

There are many different uses for such pencils: use as a bookmark, as a decorative element in the design of a school office, as a children's toy, etc.
Christmas tree made of paper
The main attribute of the New Year is the tree. Everyone decides for himself to dress up an artificial or live forest beauty. But in addition to the main tree, you can make several small ones with your own hands. With the help of such a craft, we can decorate rooms or present it as a small souvenir that will surely raise the festive mood.
Required inventory:
- colored paper;
- glue;
- wire;
- stand;
- pencil;
- ruler;
- scissors;
- compass;
- beads for decoration.
Twist one end of the wire into a spiral and glue it to a small, stable block.

Using a compass, draw circles on the back of the colored paper. The diameter of the largest should be 20 cm, and the smallest - 6 cm.Reducing the size of the circles in 2 cm increments.Total, you should get 16 circles, plus one circle, the diameter of which is 5 cm.It will be needed in order to make the top in the form of a cone ...
Each of the blanks must be divided into segments. And inside, draw a circle, the diameter of which will, on average, be equal to the radius of the workpiece. The centers of the circles must match. Use scissors to cut to the beginning of the inner circle.

Grasp the edges of the segment and roll it up with a tube, while securing the ends with glue. Hold each section with your fingers until the glue sets. We do the same with each section. In the center of each workpiece, make a hole for threading onto a metal frame. Assemble the tree, starting from the largest diameter to the smallest.

Cut a segment from the remaining circle and fold it into a cone, securing the edges with glue. Place the cone at the top of the tree. Now it's time for the most creative part of the process - decorating the Christmas tree. Children like this procedure very much, so you can safely involve children in this activity.
Use bright beads, seed beads, tinsel, rhinestones and other colorful elements as decor. You can fix them with glue, silicone glue is very suitable for this procedure, it sets as quickly as possible and has a transparent texture, which makes it completely invisible.


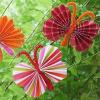
Christmas garland made of paper
New Year is a bright and long-awaited holiday for all children and for many adults. The smell of pine needles hovering in the room, gifts under the spruce and a decorated house. A large number of people are buying Christmas decorations, because it is faster and easier, but you can get creative and decorate the house with your own hands. For example, make a New Year's garland out of paper. Many people remember garlands and flags from childhood, they are light, comfortable, it is not difficult to make them ourselves and are convenient to store after the holidays. A fun, colorful garland will help decorate a simple gloomy wall, a long curtain, and a regular chandelier.
1. What is useful for us for making paper garlands:
- colored paper;
- scissors;
- compass;
- glue;
- rope.
2. Draw neat circles of different sizes on the back of colored paper with a compass. Some circles will be larger, others will be smaller.
3. Using scissors, cut out the resulting multi-colored circles.
4. Combine several circles of the same shape, but different colors. They need to be laid out on top of each other and bent in the middle. It turns out one big and dense circle.

5. Now let's prepare the circle of the largest shape.
6. Carefully make three small holes in it with scissors. We make sure that the round pieces do not move.
7. We pass the rope through the resulting holes.
8. We have the base of the garland ready.

10. String circles on the rope in descending order from larger to smaller.
11. Let's fluff up the garland so that you can see all the colors of the paper and make it seem more voluminous.
12. We stretch the balls along the rope evenly, at the same distance from each other.

13. You can also decorate the garland with paints - put bright dots in the form of multi-colored scattered confetti. It is better to do this on large circles, since it may not be noticeable on small ones.
14. We ended up with a fun, fluffy and colorful garland. Now you can hang it on the wall at home and admire it all the New Year's holidays!

Volumetric paper snowflake
Outside the window - the wizard-winter, New Year is approaching, the most favorite holiday of children. Everyone, especially children, lives in anticipation of a miracle, and it is in your power to give it to them. It's simple - you need to pay more attention to them, spend time together, and do your pre-holiday chores together. Children will love to do festive New Year's decor with their parents, one of the integral elements of which is snowflakes. Everyone knows how to cut them, but for children who will definitely want to participate, it will be more interesting to make volumetric snowflakes, which are appropriate to decorate a Christmas tree, or to make a mobile out of them by adding different figures (Christmas trees, balls, angels, etc.) or to combine them into a garland. The craft is simple in execution, a child of 4-5 years old can easily make it.
For work you will need: a sheet of double-sided blue paper (any shade can be), a ruler, scissors, glue. Colored paper should be cut in half. Then each half must be folded like an accordion: we put a ruler on the edge of the sheet and make a fold - this is the first strip, the rest are equal along it (you should get an accordion of 7 strips 3 cm wide). We cut the accordions and get 14 strips. From each strip we form a "needle": as shown in the photo.

Cut off the protruding ends of the strips. You will get a cone with a sharp ledge. For the base, cut out a circle of paper with a diameter of 3 cm.

We glue the "needles" to the base with a cone to the center, as shown in the photo. First, on the one hand, then, when the glue dries, on the other, making sure that the "needles" are staggered. You should have a snowflake about fourteen centimeters in diameter.

Give free rein to your imagination: use white paper or paper of two different shades, additionally decorating the snowflake with sparkles, sequins, etc. If you want a bigger snowflake, take two landscape sheets, and double the width of the stripes.
Do New Year's crafts with the children, give them and yourself the joy of communication, and then this New Year will become truly unforgettable for you and for them.
Paper crown
The carnival costume of a little prince or a capricious princess is inconceivable without an elegant shiny crown. A headdress suitable for a young crowned person can be bought in a toy store, but if it is evening outside and the crown is needed for tomorrow's matinee, then there is no choice but to build it yourself.
To make such a homemade attribute of royal power, you will need:
- a roll of thick food foil;
- a sheet of thin and dense white cardboard;
- glue heat gun;
- scissors;
- several packages of glue rhinestones of different colors;
- half a meter of narrow metallized silver braid;
- half a meter of white linen or a hat elastic;
- ruler and pencil.
Making a crown
1. On a piece of cardboard, draw a 25x12 cm rectangle and, with a line parallel to the long edges, divide it into two strips measuring 25x7 and 25x5 cm.
2. Divide the narrow strip into five squares with 5 centimeter sides and write in these squares isosceles triangles with a height and base equal to 5 centimeters. These will be the teeth of the crown.
3. Attach a 1.5 cm wide fastening tab to one of the side short sides of the larger strip.
4. Cut out a cardboard blank of the crown and wrap it in foil.

5. To do this, first, with allowances of 1-1.5 cm, cut out the "metal" facing of the outer part of the royal headdress, attach it to the cardboard and fold the excess foil onto the seamy part of the crown.
6. Then cut out the inner liner (its dimensions should be slightly smaller than the cardboard base).
7. Place the purl foil lining on the glue and snap the crown into the ring.

8. Having stepped back 1 cm from the bottom edge of the crown, glue the edging of silver braid on it and decorate it with crystal rhinestones.
9. Decorate each prong of our craft with a flower made from multi-colored rhinestones and pearl half-beads.
10. From the elastic band make (glue, or even better - sew) a ring of such a size that it is quite tight, but not tight, put on the child's head (in the position over the crown and under the chin).
11. Glue the crown to the rubber ring and try the finished piece on the head of "Their Highness".

If you find an error, please select a piece of text and press Ctrl + Enter.
For many years, paper crafts have been considered one of the most popular types of needlework. With an enviable frequency, new approaches to it and the most diverse branches of this direction appear - here there are kirigami, modern papercraft and much more. Below we will talk about how to make paper crafts with your own hands using simple diagrams.
Having devoted a little time to training, even any child can cope with the listed instructions without any problems.

The first thing to do is prepare colored paper, any glue and small scissors. In addition, rhinestones and other materials can be useful for work in order to give the creation a complete look.

Simple paper crafts
Most often, from early childhood, all children show a special interest in precisely such material as paper, and this must be used for their own good. To instill a love for this kind of creativity, mom and dad can go to the trick and captivate the child by creating toys by showing photos of hand-made paper crafts that they themselves liked the most.


You can literally in thirty minutes or even less, cut out a cute bunny or, for example, a bird, with which the child can later play or use them as a decor for a children's room.

How to make a cardboard bird?
- Using the template, cut the bird in shape, draw feathers, a key and a tail for it;
- Fold a sheet in the shape of a square of any color in an accordion;
- Make a hole and finally attach the bird's wings.

If your child enjoys making a bird, then don't be limited to just one. By hanging a few paper birds on a simple wooden stick, you can turn them into an interesting craft for decorating an entrance, for example, in a nursery or a corridor.

Please note that absolutely all complex work in which something is required to be cut must at first be carried out either personally by adults, or under their control.

In order for the child to develop neatness, it is necessary to ask him, after completing the work, to put all the tools in the prepared box.


How to make a three-dimensional picture using paper with cardboard?
The lightest paper crafts are appliques, which are taught to do in elementary school.

Of course, a beautiful and at the same time still voluminous picture made with your own hands from bright flowers can be an excellent gift for a sister or grandmother from a child. At the same time, it is not at all necessary to spend money on expensive colored paper, since today, according to the instructions, flowers can be made, in principle, from any napkins or even toilet paper.

If you decide to choose the second option and make your own craft from the toilet paper available at hand, then it is better to give preference to more expensive paper, on which there will be perforations. It will be possible to paint over it in the future.

As practice shows, it is even easier to work with napkins and it is only important to make sure that you do not accidentally break it during work.

The sequence of actions should be as follows.
- First, you need to fold the napkin four times, securing it in the very middle with a stapler.
- Secondly, a circle is carefully cut out of the napkin and, by lifting each of its layers in turn, a fairly lush flower is obtained.
- Thirdly, from the prepared dark green paper, it is necessary to cut out about 10 leaves using a template.
- Fourthly, a basket should be cut out of brown paper and glued onto a thick cardboard sheet of any color.

All that remains is to place flowers with leaves in the basket. If you want something original, then you can try to make a basket, for example, from corrugated paper or foil, which is used for baking.

Paper crafts for the new year
Classic snowflakes can be an excellent paper decoration for the new year. There are a huge number of different options for how to make beautiful paper snowflakes, most of which can be easily done by a child, repeating simple steps after the parents.

No less popular crafts are paper balls or a garland. To make them look more interesting and unusual, you can sprinkle the product with bright iridescent sparkles a little.


The balls will look interesting if you make them openwork. The easiest way to make such a ball with your own hands is to find its diagram, then carefully cut out the shape and glue it.

In conclusion, it is worth noting that any paper craft will look good if it was made with soul.

Photo of paper crafts with your own hands


You can make a lot of crafts from plain paper that will keep your baby busy and enjoyable. As you know, cutting and gluing paper parts develops the child's fine motor skills, and also allows the child to show their imagination and creativity. After all, you can make absolutely everything out of paper that you have enough imagination for. And we will help you and your baby get some inspiration and tell you what you can do out of paper.
What can children make out of paper?
We make paper applications for children 1-3 years old
Basket with mushrooms
We need
- Template
- Paper
- Pieces of colored paper
- PVA glue
At this age, it is still too early to handle scissors and carry out complex elements of crafts. Therefore, it is better to start with simple applications.
- Take a piece of paper and draw a basket on it or circle its pattern.
- Cut the mushrooms of different shapes and sizes for the child from colored paper.
- Cut into small pieces of brown and yellow paper.
- Ask your child to glue the paper over the basket. You need to try to fill all of its space, without going over the edges.
- Then have him fill the basket with mushrooms. We glue the mushrooms to the basket.
Also, the basket can be cut out of paper and glued, or painted with paints.
Aquarium with fish

We need
- Colored paper
- Scissors
- Markers
If the child still does not know how to cut objects, it is better to do it for him. Prepare all materials in advance.
- Take a piece of blue paper and cut out a semicircle. This is for the aquarium. You can leave the sheet as it is - rectangular. After all, aquariums come in different shapes.
- Prepare small parts for the baby, cut out fish, algae, pebbles and bubbles.
- Ask the baby to make the bottom of the aquarium by pasting it with paper pebbles.
- Then, to keep the fish cozy, populate their house with algae.
- Now you can "launch" the fish - we glue them.
- The fish also breathe, only with gills and under water, so let's add air bubbles to the fish.
- Draw the scales and eyes as desired.

What else can you make of paper for babies?
For children at such an early age, it is best to start mastering creativity by creating simple appliqués from small pieces of paper. Be sure to do crafts under the supervision of an adult.

- You can make anything out of pieces of paper, even a ladybug. Don't forget to decorate it with a flower:

- They say that bears and fish are not very friendly, although the first second are very fond of:

Paper crafts for children from 3 years old
Passionate about "Chtun"

We need:
- Sheet of colored paper
- Sheet of white paper
- Scissors
- Paper glue
- Markers
- Ask your child what is his favorite book. Fold a sheet of A4 white paper in half to make a book and ask your child to draw the cover of the book on it with felt-tip pens. Let him also write her name and the name of the writer on it, if he already knows how to do this. If not, then help him in this.
- Cut three strips from a colored sheet about 1 inch wide. We will make legs of two, and divide one into a pair of chtuna handles. Fold your legs in an accordion.
- The remaining rectangle of paper is the torso of our creature. Glue your legs to it.
- Cut the sheet for hands in half and have the child draw fingers at the tips. This can simply be done by drawing a grid: 4 vertical stripes and one horizontal one below. Glue your arms to your torso. Insert the booklet into them with glue.
- Bend your upper body forward. Scissors into ragged bangs in a zigzag fashion.
- Cut out a couple of circles out of white paper and draw the pupils inside them. Glue them to your torso. You can also add glasses from them, as shown in the picture.
- Now it remains to finish drawing parts of the face: a smile, a nose, etc.
Place the chtuna near the bookshelf. So he will remind the kid about reading and will be a kind of call to read something.
Volumetric bunny

We need
- Paper (white or colored)
- Scissors
- Paper glue
- Felt-tip pen
- Ruler
- We take a sheet of paper and horizontally cut out two strips along the width of the ruler.
- We bend the first strip into two WRONG parts and cut. We fold each of them into a ring and glue them together. We glue both rings to each other.
- Cut the second strip into three equal parts. Cut one of them lengthwise into two thin strips - these will be the ears of the bunny. Make a loop out of each and glue. Glue the resulting ears with the head - with a smaller ring.
- From the second part we make legs in the same way as ears. We glue them from the bottom of the body.
- We cut the third part lengthwise into two thin stripes, but now we round off its corners with scissors. We pass this strip through a large ring - the body and glue it inside so that the legs stick out.
- From the last strip we make a small ring - a tail. To do this, it is worth shortening it a little. We glue on the back.
- It remains only to draw the eyes and nose of the bunny with a felt-tip pen.

Hat - dinosaur

We need:
- Colored paper - 3 sheets
- Paper glue
- Scotch
- Scissors
- First you need to cut 4 stripes about 3 cm wide along the length of the sheet. Two of them will go to the circle, and the rest - across the "cap" (spikes will be attached to this part).
- From the two remaining sheets of paper, cut strips about 5 cm wide, but now across the sheet (shorter). There should be 10 stripes. We will make thorns out of them.
- Fold each piece in half. Step back about 1-1.5 cm from the fold line and draw a triangle mark up to the edge of the part, as in the picture below. Cut before reaching the fold line.
- Glue the strips for the cross piece and glue the thorns to it, as shown in the photo.
- Let the glue dry. At this time, measure the size of your baby's head. Glue the rim of the cap along its diameter with adhesive tape. The same is with the cross side.
- Now glue the triangles of the thorns tightly together. While the glue dries, it is best to secure the thorns with paper clips or clamps so that they do not fall apart.
- Glue the comb to the cap at the front and back.
What else can be made of paper for a child?
You can make any headdress out of paper, which will be a great accessory for a festive or any other holiday.

- A headpiece is a great addition to a fancy dress party. You are unlikely to find such a hat in a store:

Paper crafts for a child from 5 years old
Crocodiles

We need:
- Colored paper
- Scissors
- Felt-tip pen
- The principle of creating crafts is similar to rabbits. Also make 4 strips of paper. Divide two of them into equal parts. We need about 10 short strips.
- Roll one strip into a ring. Put the other one inside the ring and glue it as well. Similar to making a paper garland.
- Take a piece from another strip and fold it in half. Draw an elongated triangle, slightly receding from the fold line. Cut without touching the seam. This will be the mouth of a crocodile. Bend the crocodile's nose to make it look like a crocodile's face.
- Cut out two small triangles and glue inside the mouth. Draw the fangs with a felt-tip pen.
- Slip your head through the top ring of your torso and tape together.
- Cut into thin strips. Round one at the edges and push it inside the triangle and glue. These will be the eyes. Draw them with a felt-tip pen.
- From other thin ribbons, create 4 legs and attach them under the crocodile's belly.
- Push a strip of paper at the end of the body, glue it into a loop and cut a corner at the end. This will be the crocodile's tail.
Rainbow and clouds

We need
- Colored paper - rainbow colors
- Thread - 60 cm
- Beads - 3-4 pcs.
- Scissors
- PVA glue
- Sewing needle
- Stapler
- Cut 7 strips of each rainbow color, 4 cm wide, and red - 29 cm long, each next color 2 cm smaller than the previous one.
- In the center of each stripe, draw a line with a pencil. Now fold the ribbons on top of each other so that the centers line up.
- Pierce all tapes in the center with a needle. Let an adult do it. A thread will be passed through this hole in the future.
- Now fold the stripes so that the edges match (see picture). Staple at this location.
- Trim the other side of the rainbow along one line and sew with a stapler. You should have such a blank.
- 6. Now we put the thread into the needle and put on one bead, and tie it with a knot so that it does not fall. We pass the thread through the rainbow into the hole that we made at the very beginning of the work. Tie the thread with a loop at the top.
- You can add a few more beads if you like. Cut out 9 droplets of the same size, bend them along their length. We glue one drop on the thread, but do not cover it up to the end. One volume droplet should consist of three flat ones. Therefore, we fasten their sides together (photo below).
- Decorating the ends of the rainbow. Also thread them with a bead and add drop by drop.
- Now all that remains is to add fluffy clouds by gluing them to the ends of the rainbow with cotton wool and glue.

The pendant can decorate a child's room, delighting him with bright colors on cloudy days. Or you can give the craft to your dad so that he can place this gift at his workplace. He will always remind him that a loving family is waiting for him at home.
Origami paper crafts for children from 7 years old
Organizer for stationery

We need
- Thick paper - 6 sheets (assorted colors)
- Each compartment must be completed separately. To do this, take a sheet of paper, fold it in a triangle and cut it off so as to make a square format out of it.
- Then we fold it in half, the resulting side doors bend inward in halves. Turn the sheet over, make the same folds. As a result, the sheet should be all in square lines.
- We fold each corner inward, as shown in the picture, and fold the two sides inward.
- Then we turn the craft over and bend it inward on both sides. Insert a piece of colored paper into the resulting pockets, cut it to size, if necessary.
- We insert one side into the hole of the other, forming a three-sided cup.
- Repeat these simple movements with the 5 remaining pieces of paper.
- Glue the resulting cups together. Circle the bottom on a regular sheet of paper, cut out and glue to the cup.

This is perhaps the simplest and least expensive type of creativity for children and adults. And probably, there is no person who has never launched a paper airplane at least once in his life, and these endless ways to make your liner faster brought so much joy and first childhood victories. In the article, we will look at some interesting crafts that you can easily repeat with your children. Classes in creativity with paper will be interesting not only for kids, but also for school-age children. Making paper crafts develops fine motor skills, teaches a child to work with scissors, be careful, patient and attentive.
And just for the joy of children, we need scissors, glue, a couple of sheets of paper, for more advanced users, a couple of colored sheets of paper (cardboard). And you will undoubtedly make your baby happy. In the process of working with very small crumbs, you can remember colors, shapes in a playful way and just have a great time.
Today we would like to offer you some simple techniques that even the smallest can cope with to make their origami.
For the first type of crafts, we need
- Scissors;
- Glue;
- Markers or pens;
- Several sheets of colored paper.
The technique for making such paper crafts is very simple. All we need is to choose a favorite character or animal. Choose a suitable paper color and get started.
How to make a paper craft?
Below we will take a look at three simple paper crafts: a mouse, a bunny and a bee.
As an example, consider the manufacture of a mouse.
Step 1:
We need to prepare everything we need to work. To make a mouse, we need to cut out the following elements from paper:
- 1 rectangle (for the body of the mouse). Make the sides of the rectangle pointed, as shown in the example. (this will be the head of the mouse);
- 3 thin strips (these will be antennae);
- 1 spout triangle;
- blanks for ears 2 larger ovals and 2 smaller ovals, glue them together;
- blanks for the eyes 2 larger ovals of white and 2 smaller ovals of black, glue them together;
- 1 ponytail, cut a slightly curled strip out of paper.
Step 2:
Now that we have all the elements of the mouse, we need to hold it together with glue. We bend our largest rectangle (body) in half, but do not press it down, we glue the front part. We are waiting for the glue to set.
Step 3:
We glue all the other elements of the mustache, nose, tail and eyes to the finished main part.
Examples of work in a similar technique.


For the second type of crafts we need
The next type of paper crafts is also very simple to make, but very colorful and bright. Such crafts will also look beautiful like bowls for pens and pencils.
- Scissors;
- Glue;
- Markers or pens;
- Cardboard cone.
For example, consider making a bee

Step 1:
We need to prepare everything we need to work. To make a bee, we need to cut out the following elements from paper:
- 1 large rectangle the size of the cone you have chosen to craft;
- 3 black stripes;
- blank for the wings, make it the same as in the example;
- 1 circle, this will be the face of a bee;
- blanks for antennae.
Step 2:
At this stage, we need to take a cone and glue it with a large rectangle blank.
Step 3:
While the glue on our cone dries, we can prepare the face of our character. Draw eyes and a smile on the prepared circle, then glue the antennae.
Step 4:
We continue to work with the cone, glue strips characteristic of the bee on it, at approximately the same distance.
Step 5:
We collect our bee, glue all the remaining elements to our cone. The bee is ready.
Examples of work in a similar technique


For the third type of crafts we need
The third version of the crafts is slightly different from the first two. It will take a little more time and patience to make. But these types of paper crafts look very beautiful and stylish. And they are suitable not only for children's creativity, but also for decorating a room and many more different applications.
- Scissors;
- Glue;
- Pencil;
- Several sheets of colored paper;
- Ruler.
As an example, consider making a bunny.

Step 1:
We need to prepare everything we need to work. To make a bunny, we need to cut out the following elements from paper:
- circle, this will be a blank for the bunny's face;
- 4 oblong ovals for the ears (2 a little more, 2 a little less) glue them together to make the ears;
Step 2:
We need to make the base of our bunny. We take a sheet of A4 paper, now we need to make something that looks like an accordion. So that at the end, our bunny turned out to be even, using a ruler, divide the A4 sheet into even parts. Now, along the outlined lines, we bend our leaf into an accordion. To make the bunny bigger and more prominent, you can make several of these accordions

Step 3:
The next stage of our work, we need to glue our ready-made accordions together with glue to make a circle.
Step 4:
On the finished circle we glue the face of our bunny and the finished ears. You can make several of these bunnies and fasten them together using a thread, and decorate the room with such a cute handmade garland.
Examples of other works performed in a similar technique.


We hope our article was useful for you, leave your comments and send us photos of your work.
Paper crafts is the largest section from the category of children's creativity. Despite the fact that paper is the most affordable material for needlework, works from it can be very different: from simple applications to volumetric models.
And in order to diversify the standard curriculum for manual labor, we suggest that you familiarize yourself with the crafts of preschoolers in our section, where you will surely find something interesting and original as an idea for creativity.
Contained in sections:
Includes sections:
- Paper and plastic. We master the technique of paper plastic with children
Showing publications 1-10 of 4659.
All sections | Origami
 Yes, there was a formidable beginning ... And people died without a trace, But even in the darkness, a native red star shone for us. Ksenia Trofimova Deyanova 2020 marks a significant date - the 75th anniversary of Victory in the Great Patriotic War. Patriotic education of the younger generation is always ...
 Municipal State Preschool Educational Institution "Kindergarten in Bira" GCD summary for cognitive development (cognitive and research activities) in the younger group. Topic: "Trip to Paper kingdom»
Author: Marina Dmitrievna Chernigovskaya p. Bira ...
Municipal State Preschool Educational Institution "Kindergarten in Bira" GCD summary for cognitive development (cognitive and research activities) in the younger group. Topic: "Trip to Paper kingdom»
Author: Marina Dmitrievna Chernigovskaya p. Bira ...
Paper crafts - Collective work on making paper crafts for children in the junior group "We vote for peace"
Publication "Collective work to make crafts from paper children's ..."  Natalia Efrimidi Collective work "We vote for peace" second junior group Program content: Educational tasks: To form interest in applications, curiosity, to foster a benevolent attitude to birds, wildlife, the environment. Educational ...
 Library of images "MAAM-pictures"
 This master class is for teachers and parents. Purpose: for group lessons and individual play of preschool children. Purpose: to acquaint children with pets and their cubs, teach them to name and compare them in size; develop curiosity, memory, ...
Summary of the lesson on the application of paper plastic "New Year tree" in the first junior group LESSON OUTCOME Prepared by the educator: Tsibaeva Lyubov Vladimirovna, Kemerovo, MBDOU No. 236 Methodical development of educational activities on the topic: "Festive Christmas tree" Application (paper plastic) Age of pupils: junior (third year of life) Educational ...
 Designing from paper in the senior group on the topic "Butterfly" (origami) Purpose: to teach children to design a butterfly out of paper. Tasks: educational: - to teach to fold the basic form of origami - a double triangle; - consolidation of skills in working with paper; developing: - to develop ...
Crafts from paper - Crafts from paper accordion "Lark"
 March 22, according to the national calendar, was called the Day of Magpies. People used to associate this March day with the arrival of spring, the arrival of birds, including larks, one of the first birds returning from warm regions. This his melodious singing is carried far over the expanses of meadows and fields, ...
 Application "Hedgehog" Purpose: to create a volumetric application from paper strips. Tasks: - to acquaint with the method of gluing paper strips into "droplets"; - to teach to fold the leaves "oblique accordion"; - develop hand motor skills; - develop creativity. Required material: ...
Summary of classes in the middle group on the application "Mimosa Branch". Applique made of rolled corrugated paper balls Summary of the lesson in the middle group on the application "Mimosa Branch". Purpose. To carry out the application "Mimosa branches" from balls rolled out of corrugated paper. Tasks. Strengthen the ability to analyze the sample; develop fine motor skills of the hands, imagination, thinking, creative ...
DIY finger paper theater Do-it-yourself finger theater based on the fairy tale "Kolobok". Purpose: to create a paper puppet theater with the joint activities of children of the older group in a lesson in visual activity. Tasks: - to develop the desire to most accurately convey your idea, to show ...
Probably every mom in her daddy or on the table has a paper craft from her beloved child. Every eighth of March or the ninth of May, a child brings a beautiful paper flower or a postcard with fireworks from the kindergarten. In general, paper art is popular in preschool.
The site, for example, presents a wonderful idea for making a garland of cute doves. And making flowers from rings will create not only a warm and spring mood in the group, but also develop fine motor skills, a sense of form and the ability to combine. The combination of several materials is especially interesting. When they are put together, the pictures are original, voluminous and very interesting.
The goal of a competent teacher is not only to interest and involve a child in making paper crafts, he must provide support in the implementation of any paper idea. The child himself may not cope with a difficult task for him, although he will gladly take up its implementation.