Installation of Kermi radiators with side connection. Kermi heating radiators are an example of efficient steel radiators. How the heating batteries are connected
Buying or renovating a private house is definitely an important and joyful event. However, it has many different difficulties, the solution of which does not always have the strength and time. For example, the "heat" problem of your home, which cannot be left for later. But at the same time, natural questions arise: what is the cost of installing heating batteries? What brand of radiators should you pay attention to? How will the heating device be installed and how long will it take?
We will be happy to help you with making such an important decision! Our company, which is an official dealer, namely "Kermi", will give you a quick and free consultation on all questions of interest, will help you with choosing a suitable heating battery, the warmth of which will delight you even on the most rainy days of Moscow. It should be noted that the cost of installing a radiator will also please you extremely. In most cases, it is fixed and is the average on the market.
Why exactly "Kermi"? These radiators are made of the best modern materials, namely steel. The radiator will look presentable for a long time and will harmoniously complement the interior of your home! Kermi has a long history and a good reputation among customers. In addition, radiators of this brand are extremely easy to install and durable.
Of course, installing batteries has various nuances, which our masters will explain to you for free! You just need to call us and send us a plan of the room where the selected radiator will be installed. Our engineers will give you comprehensive answers to all your questions.
The cost of installing heating radiators in a private house is on average about 250 thousand rubles. One cannot but agree that heating in the house is an extremely important point, on which you cannot save money, and, of course, you should trust a trusted brand and craftsmen who will save your precious time and money.
Our engineering department carries out installation of heating systems, cold and hot water supply and sewerage systems, with any level of complexity.
During installation, only high-quality equipment and materials are used that have been used by our specialists for two decades.
Estimated installation cost table
| Name | Description of work | PRICE | |
|---|---|---|---|
| BOILER ROOM: (installation of any complexity) | |||
| Installation of an electric boiler | Installation, connection to the system | From 6.000 | |
| Wall-hung boiler installation (single-circuit) | From 8.000 | ||
| Installation of a wall-mounted boiler (double-circuit) | Installation, connection to the chimney, connection to the heating and water supply system | From 10.000 | |
| Floor standing boiler installation up to 60 kW | Installation, connection to the chimney, connection to the heating and water supply system | From 14.000 | |
| Floor standing boiler installation up to 140 kW | Installation, connection to the chimney, connection to the heating and water supply system | From 20.000 | |
| Installation of a floor-standing boiler over 140 kW | Individually | Individually | |
| Installation of an indirect boiler, combined heating up to 200l | From 6.000 | ||
| Installation of an indirect boiler, combined heating over 200l | Installation, piping, connection to heating and water supply systems | From 8.000 | |
| Installation of the safety group | 1.200 | ||
| Expansion tank installation | Installation, connection to the heating system | From 1.500 | |
| Circulation pump installation | Installation, connection | From 3.000 | |
| Installation of a distribution manifold in a boiler room | Installation? Combs for pumping groups | From 2.000 | |
| Installation of the pump group | Installation, connection to the heating system | From 3.500 | |
| Hydraulic switch assembly | Installation, connection | From 2.000 | |
| Burner installation (gas, diesel) | Installation, connection, adjustment, launch | From 8.000 | |
| Installation of remote control of the boiler room | Installation, connection to systems | From 5.000 | |
| Various boiler room works | Individually | Individually | |
| INSTALLATION OF HEATING, HEATED FLOOR: | |||
| Installation, installation of a heating radiator, with laying and connecting pipes | From 3.000 | ||
| Installation of a heating convector, with laying and connecting pipes | Assembly, installation, connection | From 3.000 | |
| Installation of a water heated floor | Insulation laying, pipe laying in clips | From 600r / m2 | |
| Mounting the manifold cabinet (external) | Installation | From 1.500 | |
| Manifold cabinet assembly (built-in) | Stroba (brick, foam block), installation | From 5.000 | |
| Installation of a collector (manifold) up to 6 circuits | From 4.000 | ||
| Installation of a collector more than 6 circuits | Installation, connection to the heating system, water supply, underfloor heating | + 500 per circuit | |
| Installation of riser pipes | Mounting | From 500 | |
| Installation of a room thermostat | Installation, connection | From 1.000 | |
| Installation of a thermostat on heating radiators | Installation | From 200 | |
| Stroba (brick, concrete, foam block, etc.) | Individually | Individually | |
| Installation of insulation on the pipe | Laying insulation on the pipe | From 50r / per m | |
| Heating system pressing | From 3.000 | ||
| Pressing system underfloor heating | Commissioning, commissioning | From 3.000 | |
| CHIMNEY: | |||
| Chimney installation (inside the house) | Assembly and fastening of chimney components | From 1.500 | |
| Chimney installation (outside the house) | Individually | Individually | |
| Installation of a coaxial or turbo chimney | Installation, hole punching | From 2.500 | |
| WATER SUPPLY: | |||
| Installation of a flow type water heater | From 3.000 | ||
| Installation of a storage type water heater | Installation, connection to the water supply system | From 4.000 | |
| Installation and connection of the water outlet | Installation of water sockets for hot or cold water, with pipe laying | From 1.400 | |
| Installation of pipes for the cold water supply system | Installation of the pipeline from the source to the entrance to the house | From 4.000 | |
| Installation of a borehole pump | Installation, connection | From 5.000 | |
| Installation of a submersible well pump | Installation, connection | From 4.000 | |
| Pump station installation | Installation, connection | From 4.000 | |
| Installation of a hydraulic accumulator | Installation, connection | From 2.500 | |
| Installation of a drain valve in a well, well | Installation, connection | From 2.000 | |
| Pressure switch installation | Installation, connection | From 2.000 | |
| Installation of the automation unit for the pump (dry run protection) | Installation, connection | From 2.000 | |
| Check valve installation | Installation | 200 | |
| Pressure reducer assembly | Installation, connection | From 800 | |
| Installation of a cold water meter, hot water meter | Installation, connection | From 2.000 | |
| Installation of fine filters | Installation | From 700 | |
| SEWER DRAIN (inside the house): | |||
| Installation of a sewer pipe to the drain point | Installation, connection | From 1.600 | |
| Installation of the funnel (without roof passage) | Installation, connection | From 2.000 | |
| Installation of sewerage lounger | Installation, connection | From 2.600 | |
| Installation of a sewer riser | Installation, connection | From 2.000 | |
| Installation of the ladder | Installation | From 1.000 | |
| Sewerage check valve installation | Installation | From 1.000 | |
| Installation of the sololift sewage pumping unit | Installation, connection | From 4.500 | |
| Drain pump installation | Individually | Individually | |
| Water analysis | Installation, connection | From 1.000 | |
| Selection of a water treatment system based on the obtained water analysis | Individually | Individually | |
| Installation of a water treatment plant | Installation, connection, commissioning | Individually | |
| Replacing the filter cartridge | Installation, connection | From 300 | |
| ELECTRO / INSTALLATION (equipment) | Cable laying, connection | Individually | |
| OUTDOOR WORKS (various kinds) | Individually | Individually | |
| INSTALLATION OF SANTECH / EQUIPMENT | Individually | Individually |
What heating radiators to buy, what to choose and who to entrust the installation of heating devices? As in other matters related to the construction of a private house or renovation of an apartment, you can completely take over the solution of all issues or entrust the work to professionals.
But when installing heating, a large number of difficulties arise, while the heating system is planned to be mounted once, and I want it to serve for many years and not make you regret the money that was saved once due to the subsequent removal and installation of the radiator. In this article we will try to figure out how to correctly create a heating project for your home, and talk about the principles of installing and connecting kermi radiators to the heating system.
Any search engine on request will give out many sites that will make you a project without any problems and make a list of equipment that you need to purchase (specification). The cost of these documents will directly depend on the number of square meters in your house and the level of complexity of the heating network. In addition, a number of other factors are taken into account, which also affect the cost of creating a project. We recommend that the prepared documentation be provided to installers for familiarization, or take into account the information provided by equipment suppliers, since heating devices differ in configuration.
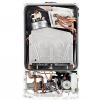
In this article, we will not go deep into the installation and adjustment of heating boilers, the laying of pipe lines, the purpose of pumps, which heating system to use in a particular case. Here we will only discuss the principles of installing heating radiators. It is not a problem to buy heating radiators with a full set of mounting accessories. After all, KERMI steel radiators are supplied already with a complete assembly kit.
Complete set of radiators Kermi (Kermi) FKV, FKO
The standard set of the KERMI FKV radiator includes:
- brackets for mounting the radiator on the wall;
- mayevsky valve;
- thermostat valve;
The standard set of KERMI FKO radiator includes:
- heating radiator, selected by you by standard size;
- bracket for fixing the device on the wall;
- stub;
- mayevsky valve;
- dividing plug;
- a wrench for installing a dividing plug;
- dense plastic packaging.
Installation (installation) of radiators with bottom connection
The principles of installing radiators with your own hands are quite simple. First of all, we remove the mounting plates from the package. Do not rush to completely remove the protective film from the radiator, it will keep its surface in perfect condition until finished construction works in home. Next, you fix the plates to the walls (you need to correctly calculate the mounting height, the distance between the plates: they must be at the same level). If you incorrectly mount the brackets, the heating radiator may be installed crookedly, or simply will not fit into the grooves. After this operation, put the radiator on the mounting plates. We remind you that the distance from the floor to the radiator and from the radiator to the window sill must be from 10 to 13 cm above and below.
Thus, we have installed heating batteries. After this procedure, you need to connect the battery to the heating system. This requires additional accessories that are not included in the standard kit. For radiators with bottom and side connections, different accessories are required. The KERMI FKV is connected to the heating system thanks to a connection group (multiflex), conical inserts, a fitting (Eurocone) with a 2/3 union nut (this fitting is purchased together with pipes). The connection sequence is as follows. We take two conical inserts and place them tightly into the radiator connection pipes, after which we wind the connection group and tighten it tightly with a wrench. Next, we take the eurocone, attach it to the pipe and simply make the connection between the pipe and the multiflex (when using polypropylene pipes, you must additionally purchase two conical inserts that are placed between the fitting and the multiflex). The most important thing to remember is that in the radiator the coolant flows in a certain direction, therefore, the supply is always an internal tube, and the return is an external one. Finally, we left the simplest thing: the installation of the thermostat. You just need to screw it onto the mounting place.

Replacement of radiators with bottom connection
is not difficult. Before starting work, it is necessary to shut off the supply of coolant (hot water) to the heating radiator, this is quite easy to do, since this feature is already provided on the multiflex. After that, you should unscrew the connection between the radiator and the multiflex, and then simply remove the radiator from the mounting plates.
Do-it-yourself radiator installation with side connection

First, we recommend reading the installation instructions for the radiator that comes with the kit. It describes some of the features of the installation of heating batteries, such as: the supply of coolant should be made at the top of the heating battery, and the return flow - at the bottom of the radiator. It doesn't matter which side the supply and return will be. In order for the THERM X2 system to work correctly on batteries with 12, 22, 33 types, you need to install a separating plug on the return line, but everything is in order.
At the first stage, we install the mounting plates on the wall: you need to correctly calculate the mounting height and the distance between the plates, the plates must be on the same level. If you do the wrong installation of the plates, then the heating radiator may be installed crookedly, or simply not enter the grooves. After this operation, you just need to put the radiator on the mounting plates. We remind you that the distance from the finished floor to the radiator and from the radiator to the window sill should be in the range from 10 to 13 cm above and below. The main thing is not to completely remove the protective film, as it will help keep your heater in perfect condition until the repair is completed. But the installation of radiators does not end there. Install a THERM X2 separating plug on the return. This plug does not allow the cooled coolant to be in the heating battery and removes it from the radiator.
Now let's connect the radiator to the heating system. To do this, you will need two valves, one to supply fluid to the battery and one to drain fluid from the battery. Let's start with the intake valve. Connection dimensions ½, male thread. Please note that for the convenience of installing and replacing heating batteries, this valve must be with an "American". We separate the valve from the American woman, screw the valve onto the heating pipe, then screw the American woman into the battery. Then we connect the two elements of the intake valve. Now we connect the check valve. The process is the same as for installing the inlet valve. The heater is then ready for use.
Installing the kermi separation plug
We place the assembly key in the dividing plug. Then visually make sure that the connection is correct. When the key handle is horizontal, the plug must be in a vertical position. We install the plug in the heating radiator. To do this, we bring the plug to the battery, pay attention to the arrow on the key (the arrow should point to the back plate of the heating battery). Insert the dividing plug into the radiator connecting thread. For convenience, you can slightly squeeze the plug and, moving it back and forth, insert it until it stops. Remove the assembly key. Connect the heating batteries.
Replacing radiators with bottom connection
Replacing the batteries is also easy. You just need to shut off the coolant supply to the heating radiator at the inlet and return valves, unscrew the American, after which you just need to pull it off the mounting plates, and you can replace it.
Conclusion
Now we know that you can buy heating radiators anywhere and you can install heating batteries yourself, and replacing heating batteries does not pose any problems, given that the installation was performed correctly and using suitable shut-off valves.
Those specialists who work in the field of engineering communications are well aware of the fact that installation of Kermi radiators is an excellent way to provide your country cottage with warmth and comfort. After all, first of all, German heating devices are famous for their reliability. Agree, this factor is very important.
Even a device that heats very well, but often breaks down, cannot be good. Inexpensively in the capital and region, you can in our online store. If you need installation of Kermi radiators in Moscow, then our engineering and installation company "Seti Service" is ready to help you.
There are many advantages of ordering the installation of Kermi radiators from us both at reasonable prices, and in the ability to immediately order installation, and in professionalism ... All connoisseurs of strict lines and correct geometric shapes will appreciate the design of these models. The heat dissipation of Kermi radiators is excellent. And the cost is not that high.

Kermi radiators are made of steel. There can be from one to three panels. The thickness of one panel is 1.25 millimeters. To increase heat transfer, models with special fins can be ordered. To install these units, you need to turn off the water. Our masters will leave on the agreed day and will do everything necessary work... Quality is our profile.
Connection, installation of heating batteries Kermi in Moscow
As we have already said, these heating units are suitable for private homes. This is due to the fact that the pressure that they withstand cannot be high. therefore installing Kermi batteries welcomed in individual heating communications. The external design of these radiators is very modern and beautiful. Interested in Kermi? We will answer all your questions!
The advantageous feature of this equipment is the absence of odor. And already battery connection Kermi and sheer pleasure at all. They have proven themselves well in a single-pipe and two-pipe layout. Agree, this is a very good characteristic! All the necessary valve fittings have already been prepared and installed at the factory. Therefore, control of the temperature level will not cause any difficulties.

After you have purchased the necessary radiators, you should think about all the necessary components. If you purchase equipment from us and order its installation, then we will deliver the selected radiators absolutely free of charge. By the way, the cost of Kermi's equipment is quite low. If you have already bought Kermi radiators from another company, you can still contact us. Order now!
Sale, installation, replacement of Kermi radiators
We can say with confidence that, like the installation, sale of Kermi batteries is pleasant. After all, these units are of very high quality and are characterized by increased reliability. As you know, German quality is incredibly high in everything.
The entire production process is constantly monitored. All types of work are carried out extremely accurately and accurately. You need replacement of Kermi radiators only after many years. If you would like to replace old batteries with new Kermi radiators, you are welcome to us, in the "Service Network"!
By the way, it is very important to follow all the rules when installing these units. After all, otherwise you will not be able to feel the difference between high-quality equipment and the one that was installed earlier. or at home from our company - consistently high reliability indicators.
Connecting Kermi radiators, do-it-yourself installation and dismantling
What heating radiators to buy, what to choose and who to entrust the installation of heating devices? As in other matters related to the construction of a private house or renovation of an apartment, you can completely take over the solution of all issues or entrust the work to professionals.
But when installing heating, a large number of difficulties arise, while the heating system is planned to be mounted once, and I want it to serve for many years and not make you regret the money that was saved once due to the subsequent removal and installation of the radiator. In this article we will try to figure out how to correctly create a heating project for your home, and talk about the principles of installing and connecting kermi radiators to the heating system.
Any search engine on request will give out many sites that will make you a project without any problems and make a list of equipment that you need to purchase (specification). The cost of these documents will directly depend on the number of square meters in your house and the level of complexity of the heating network. In addition, a number of other factors are taken into account, which also affect the cost of creating a project. We recommend that the prepared documentation be provided to installers for familiarization, or take into account the information provided by equipment suppliers, since heating devices differ in configuration.
In this article, we will not go deep into the installation and adjustment of heating boilers, the laying of pipe lines, the purpose of pumps, which heating system to use in a particular case. Here we will only discuss the principles of installing heating radiators. It is not a problem to buy heating radiators with a full set of mounting accessories. After all, KERMI steel radiators are supplied already with a complete assembly kit.
Complete set of radiators Kermi (Kermi) FKV, FKO
The standard set of the KERMI FKV radiator includes:
- brackets for mounting the radiator on the wall;
- mayevsky valve;
- thermostat valve;
The standard set of KERMI FKO radiator includes:
- heating radiator, selected by you by standard size;
- bracket for fixing the device on the wall;
- stub;
- mayevsky valve;
- dividing plug;
- a wrench for installing a dividing plug;
- dense plastic packaging.
Installation (installation) of radiators with bottom connection
The principles of installing radiators with your own hands are quite simple. First of all, we remove the mounting plates from the package. Do not rush to completely remove the protective film from the radiator, it will keep its surface in perfect condition until the end of construction work in the house. Next, you fix the plates to the walls (you need to correctly calculate the mounting height, the distance between the plates: they must be at the same level). If you incorrectly mount the brackets, the heating radiator may be installed crookedly, or simply will not fit into the grooves. After this operation, put the radiator on the mounting plates. We remind you that the distance from the floor to the radiator and from the radiator to the window sill must be from 10 to 13 cm above and below.
Thus, we have installed heating batteries. After this procedure, you need to connect the battery to the heating system. This requires additional accessories that are not included in the standard kit. For radiators with bottom and side connections, different accessories are required. The KERMI FKV is connected to the heating system thanks to a connection group (multiflex), conical inserts, a fitting (Eurocone) with a 2/3 union nut (this fitting is purchased together with pipes). The connection sequence is as follows. We take two conical inserts and place them tightly into the radiator connection pipes, after which we wind the connection group and tighten it tightly with a wrench. Next, we take the eurocone, attach it to the pipe and simply make the connection between the pipe and the multiflex (when using polypropylene pipes, you must additionally purchase two conical inserts that are placed between the fitting and the multiflex). The most important thing to remember is that in the radiator the coolant flows in a certain direction, therefore, the supply is always an internal tube, and the return is an external one. Finally, we left the simplest thing: the installation of the thermostat. You just need to screw it onto the mounting place.

Replacement of radiators with bottom connection
is not difficult. Before starting work, it is necessary to shut off the supply of coolant (hot water) to the heating radiator, this is quite easy to do, since this feature is already provided on the multiflex. After that, you should unscrew the connection between the radiator and the multiflex, and then simply remove the radiator from the mounting plates.
Do-it-yourself radiator installation with side connection

First, we recommend reading the installation instructions for the radiator that comes with the kit. It describes some of the features of the installation of heating batteries, such as: the supply of coolant should be made at the top of the heating battery, and the return flow - at the bottom of the radiator. It doesn't matter which side the supply and return will be. In order for the THERM X2 system to work correctly on batteries with 12, 22, 33 types, you need to install a separating plug on the return line, but everything is in order.
At the first stage, we install the mounting plates on the wall: you need to correctly calculate the mounting height and the distance between the plates, the plates must be on the same level. If you do the wrong installation of the plates, then the heating radiator may be installed crookedly, or simply not enter the grooves. After this operation, you just need to put the radiator on the mounting plates. We remind you that the distance from the finished floor to the radiator and from the radiator to the window sill should be in the range from 10 to 13 cm above and below. The main thing is not to completely remove the protective film, as it will help keep your heater in perfect condition until the repair is completed. But the installation of radiators does not end there. Install a THERM X2 separating plug on the return. This plug does not allow the cooled coolant to be in the heating battery and removes it from the radiator.
READ ALSO: How to properly connect a pool filter
Now let's connect the radiator to the heating system. To do this, you will need two valves, one to supply fluid to the battery and one to drain fluid from the battery. Let's start with the intake valve. Connection dimensions ½, male thread. Please note that for the convenience of installing and replacing heating batteries, this valve must be with an "American". We separate the valve from the American woman, screw the valve onto the heating pipe, then screw the American woman into the battery. Then we connect the two elements of the intake valve. Now we connect the check valve. The process is the same as for installing the inlet valve. The heater is then ready for use.
Installing the kermi separation plug

We place the assembly key in the dividing plug. Then visually make sure that the connection is correct. When the key handle is horizontal, the plug must be in a vertical position. We install the plug in the heating radiator. To do this, we bring the plug to the battery, pay attention to the arrow on the key (the arrow should point to the back plate of the heating battery). Insert the dividing plug into the radiator connecting thread. For convenience, you can slightly squeeze the plug and, moving it back and forth, insert it until it stops. Remove the assembly key. Connect the heating batteries.
Replacing radiators with bottom connection
Replacing the batteries is also easy. You just need to shut off the coolant supply to the heating radiator at the inlet and return valves, unscrew the American, after which you just need to pull it off the mounting plates, and you can replace it.
Conclusion
Now we know that you can buy heating radiators anywhere and you can install heating batteries yourself, and replacing heating batteries does not pose any problems, given that the installation was performed correctly and using suitable shut-off valves.

Our partners
moscow, st. Industrial, 11
MO, Shcherbinka, Simferopolskoe sh., 17
This email address is being protected from spambots. You need JavaScript enabled to view it.
Sale of Kermi Radiators
Buy Kermi equipment from an authorized distributor at the best possible price.
Our specialist will call you back within 15 minutes * and provide personal conditions for the purchase of Kermi products.
* Mon-Fri. from 9:00 to 18:00 Moscow time
Source: http://kermi-all.ru/vybor/montag.html
Correctness (admissibility) of the installation of the connection to the KERMI radiators
plz tell me how to connect kermi radiators with bottom connection?
there are no taps in the set, I bought tees (metal layer), who can tell you how to properly connect the batteries through tees
connect the batteries correctly
with the help of such devices, called multiflexes. There are straight and angular. And to them you already connect your metal-plastic using the endings
Plumbing works Moscow and the region
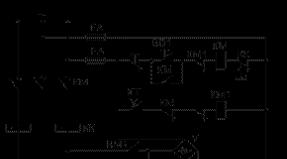
There is a certain project for heating, it contains a drawing for connecting KERMI radiators (I attach a drawing)
In fact, the installers did it without corners (I drew on the second drawing)
motivating that additional corners are additional resistance and a decrease in reliability.
As a customer, I like the drawing more, BUT the installation has already been done differently and the arguments of the installers.
Dear experts, tell me on this issue.
Made with stainless tubing?
AndreyR - according to the engineering project, it was conceived correctly, according to the manufacturer's recommendations, with a stainless steel supply pipe, but the installers followed the path of the least labor costs and now, with this design, at the junction of the exit of the "bare" pipe from plaster, with thermal movements , there will be abrasive spalling of the pipe.
No extra. hydr. curved tube does not give resistance. your performers are looking for cunning and excuses now.
Most likely the reason is that for the connection stainless. they needed to buy tubes. nozzle on the expander.
Saved you on the corners and sleeves (approx. 800r \\ radiator). The bending radius may be less than permissible.
No extra. hydr. curved tube does not give resistance.
I mean, the corners do not give resistance? Wrong. And why, then, the local resistance coefficient in the corners is considered about 2? This is the equivalent of about 1-2 m of pipe.
Another thing is that in a two-tube this resistance could be neglected.
at the junction of the exit of the “bare” pipe from the plaster, with thermal movements, there will be abrasive erosion of the pipe.
Well, I hope they monolithic it in a plastic corrugation.
The bending radius may be less than permissible.
But this must be checked.
Wrong. And why, then, the local resistance coefficient in the corners is considered about 2?
He is kind to the people who conducted water and heat to their homes.
You first take a look at my photo and do not confuse a curved stainless steel. tube and brass or bronze square under the press for the MP pipe.
I don’t understand, what are we comparing - your photo with the photo of the top starter, right?
I say this about the corners featured in his project. Compared to the actual bent pipe. He has the same pipe material - MP (he is silent on this subject)? So what's the point in switching from MP to bent stainless steel, this is add. connection with a drop in reliability, it is easier and more efficient then to bother and bend the MP itself with an acceptable radius. Bent stainless steel allows smaller bending radii, but. not fundamentally. Fundamentally - this is a corner.
READ ALSO: How to connect the amplifier
according to the engineering project, it was conceived correctly, according to the manufacturer's recommendations, with a stainless steel lead pipe
Well, where did you see the conceived stainless steel in the "project"? There, the corners are in full with the same MP. If you choose between 2 corroded MP corners for each pipe (\u003d 4 MP connections in the screed, and there are 8 of them per radiator!) And bent MP, then I would choose a neatly bent MP in the corrugation.
All of the above remains valid in the case of replacing the MP on the PEX.
If you choose between 2 corroded MP corners for each pipe (\u003d 4 MP connections in the screed, and there are 8 of them per radiator!) And bent MP, then I would choose a neatly bent MP in the corrugation.
When connecting the MP pipe, I would choose a solution with a pipe, than draw a conclusion from the wall with a curved pipe, because for MP pipes the same pipes go under the press if you are not in the know.
He is kind to the people who conducted water and heat to their homes.
i would choose a solution with a tube
I would, in principle, too. And it’s better to do everything stainless. But we have a topic of discussion "the initial project vs what has actually been done, and what is better."
We have a discussion in the topic "initial project vs what has actually been done and what is better."
Yes, we are like and did not leave the topic, various options and preferences were voiced here.
He is kind to the people who conducted water and heat to their homes.
the corners themselves under the press were bought, i.e. they are lying.
here is a photo of the work in reality how it looks
In general, I have a question of qualification of employees
a project was done on the basis of snaps, guests, prohibitive amounts and engineering calculations, and then their team comes and does such a job
The question arises of the qualifications of workers
It can be seen in the photo that for such an installation, you only need a Swede, and for a tube under the press, a more expensive tool, which apparently did not exist. It’s also “complexity”, when installing the pipe, it would be necessary to recess the pipes deeper into the plate, because with the pipe you need a distance of about 20-25 cm for the pipe + bending from the bottom of the pipe itself. I see the next minus armier. the mesh for the screed is placed on the pipe, and not under it.
He is kind to the people who conducted water and heat to their homes.
their team comes and does such a job
It looks prettier than a white pipe.
The reason is not only this, if you remove the radiators for plastering, painting the walls a couple of times before gluing the wallpaper, then the lonely exiting MP pipes can be easily damaged, bent or flattened, but this certainly will not happen with stainless steel pipes.
He is kind to the people who conducted water and heat to their homes.
bend or flatten
It can be seen in the photo that for such an installation, you only need a Swede, and for a tube under the press, a more expensive tool, which apparently did not exist.
there is a press, all connections are made with a press
Athas. Not, formally, maybe even mines. the radii are not broken. But not comme il faut. Thermal insulation was not reported, the bends are extremely sloppy.
You have every right to demand "under the project".
Correctly formulated - INACCURACY somehow
Below I look, you can do without corners - and from above they are needed, otherwise the pipe comes out of the wall crookedly. And of course, as Technician wrote, a san would go out of the wall with a stainless steel. It looks prettier than a white pipe.
In the photo she is already bent out of the wall. Well, then everything is right.
i already found a couple of broken kinks
and tell me a good such stainless steel for these cases? what’s called where to look?
She's almost all good. The main thing is that it dock with your metal plastic material not by press fittings. You probably looked at the photo of Technician-san. Something like that. There are several types of them. Good luck to you.
already found a couple of broken kinks
Centralized or apartment heating system (boiler)?
AndreiR, off topic, but the screed is thin. Over the insulation can crack.
And the distance from the bottom of the battery to the floor will be less than a reasonable minimum.
When ordering a project, it was agreed that the screed was 7cm, respectively, as far as I understand, should it be normal? over the heater,
over a clean floor 10cm battery
then excesses are not so critical.
a couple of broken kinks
100% violation. Any installation instructions for metapole say that kinks are unacceptable. There, aluminum is broken and practically nonexistent, and destruction will go on. Have these gavriks not even used a spring? To count them!
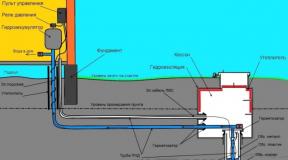
For heating the house, the Solid TA-15 Dragon TA-15 boiler was selected.
According to the calculation of power, it should be enough for heating the ground floor and, if necessary, the attic.
Kermi radiators with a lower supply were chosen as heating radiators - I just planned to connect the Rehau pipes brought to the right places.
The distribution of pipes to the radiators was chosen collector, since it was planned to carry out non-freezing heating - so as not to drain the system every winter.
These radiators already have Mayevsky taps for bleeding air and you can use a thermal head.
Before buying radiators, it was necessary to determine the power of the radiator itself, which would be required for heating a particular room.
In the most approximate calculation, you can focus on such a value - 1 kW of radiator power per 10 square meters. m. of heated area.
BUT THIS IS A VERY APPROXIMATE VALUE !!!
Note that sellers are somewhat cunning when selling radiators.
AS A RULE, the radiator power is indicated maximum, which can be obtained at a coolant temperature of 95 degrees and a room temperature of 24 degrees heat.
This temperature of the coolant will kill the plastic pipes through which the coolant will be supplied to the radiators.
Typically, the temperature at the direct feed set in the range of 65 - 80 degrees.
Thus, the power of the radiators must be recalculated taking into account the temperature of the coolant that will be used by you, as well as the room temperature.
What else I liked about Kermi radiators is that the manufacturer provides complete information on the most different modes of operation of radiators in a given temperature mode and provides the necessary coefficients for calculating the power and size of the radiator itself.
In my case, I got 10 radiators on 8 lines.
On two lines I have two small radiators
- C / S and bathroom
- Tambour and hallway
Large radiators - one per line.
As large radiators, I settled on the model FTV Profil-V THERM-X2 TYPE 22
What is the difference between the types of radiators Kermi?
Type 10 - the thinnest without a "back wall"
Type 11 - single heatsink
Type 22 - double radiator - the best option
Type 33 - a triple radiator - the "thickest" of all.
The height of the radiators can be selected from the following sizes: 300, 400, 500, 600 and 900 mm.
The length of the radiators can be equal to: from 400 to 3000 mm.
In small rooms (toilet, hallway), I chose thinner radiators - type 11.
I calculated the power of the radiators based on the following data:
- direct feed temperature - 75g.
- return flow temperature - 65 g
- room temperature - 20g
- to recalculate to a room temperature of 24 grams, you need to multiply the radiator power by a factor of 1.12 (according to Kermi)
Here is a table for these parameters:

What does this table give us?
Knowing what kind of radiator power we need, we can choose a radiator of one size or another.
For example, for one room I need a radiator with a capacity of 1400 watts.
We look at the table and select the nearest suitable value and see what sizes in height and length, and also what type are suitable for us ...
Everything is very simple!
And here is the calculation of the radiator power:

And this is a table for choosing the coefficient when converting the radiator power to a specific temperature on the direct and reverse supply, as well as the required room temperature:

Also for Kermi there is a table on the volume of coolant that is placed in a particular radiator - it is important to know to understand what kind of boiler volume we need ...

Sizes of Kermi radiators:

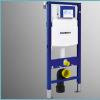
Radiators are supplied with a pair of mounting plates that allow you to mount the radiator to a wall spaced 3cm or 5cm of your choice.
At the same time as radiators were purchased:
- thermal heads
- valves locking and connecting RLV-K

- Rehau fittings eurocone for quick connection of the rehau pipe is stable to the radiator.


Here is what I got as a result:
We expose the mounting strips by level: 


Behind the radiators, I sanded the walls and caulked the seams.
We install anti-removable plugs on the mounting strips. They are also vibration spacers: